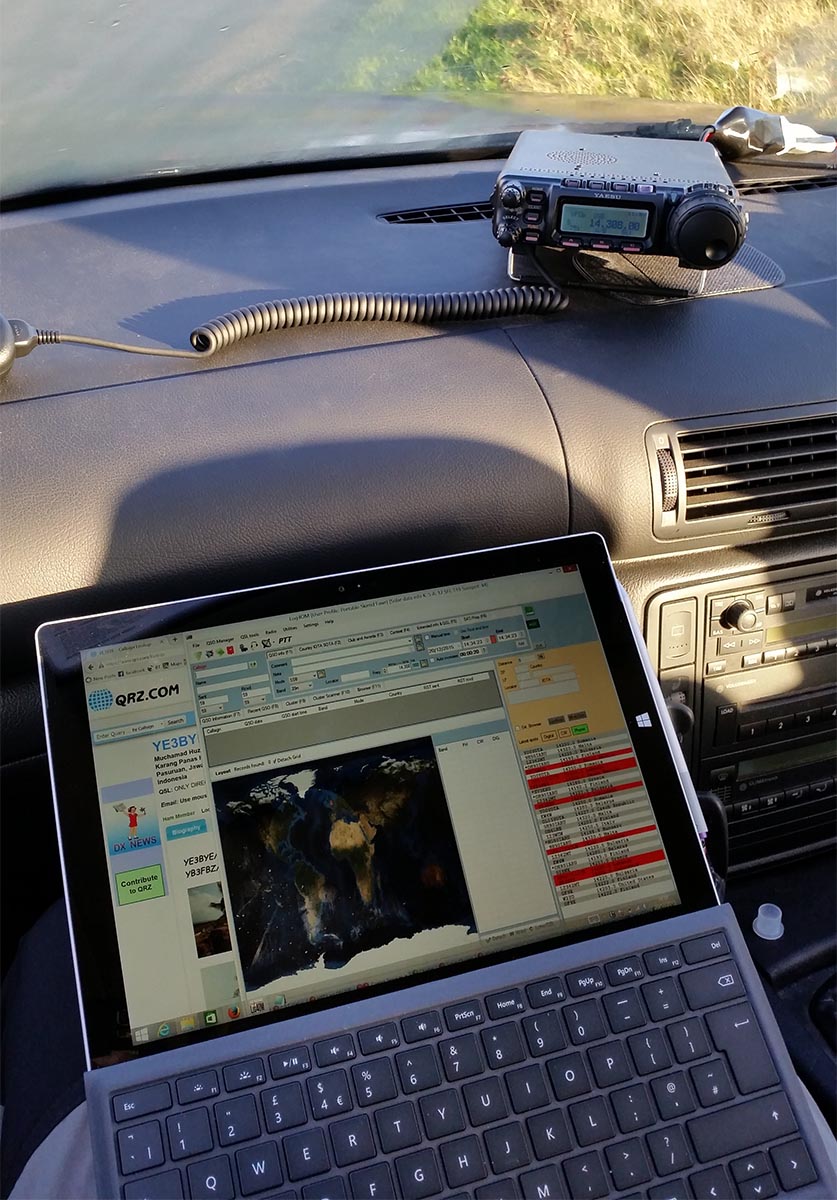
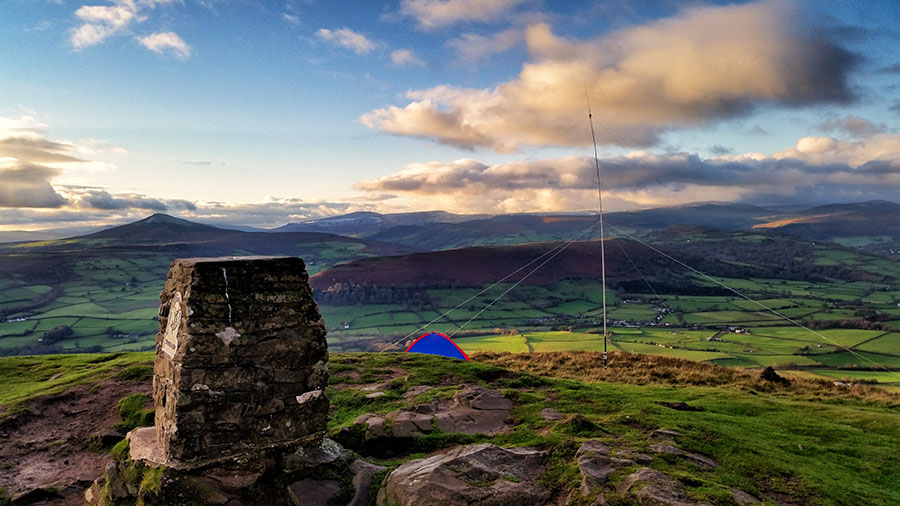
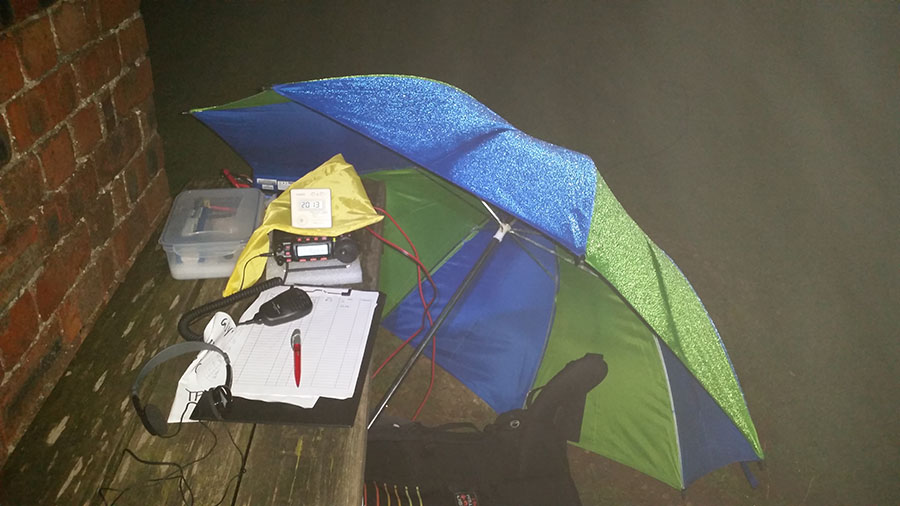
I have a drive on site North of town which is great for setting up mast systems and testing/building antennas but I have been looking for somewhere a bit closer to home and also a bit quieter on HF. Also in times of prolonged wet weather (like now!) access my usual site can be prone to getting stuck in the mud in my 2WD car. As there looked to be good activity today on 20m and 40m I decided to pop out for an hour or so to test a new site under 15 minutes drive from me that I have been considering. It’s relatively high for the area, a pretty clear take off and I was able to find a spot to pull off the road that was fairly clear of houses and power wires to erect the inverted V link dipole I take for SOTA activations:
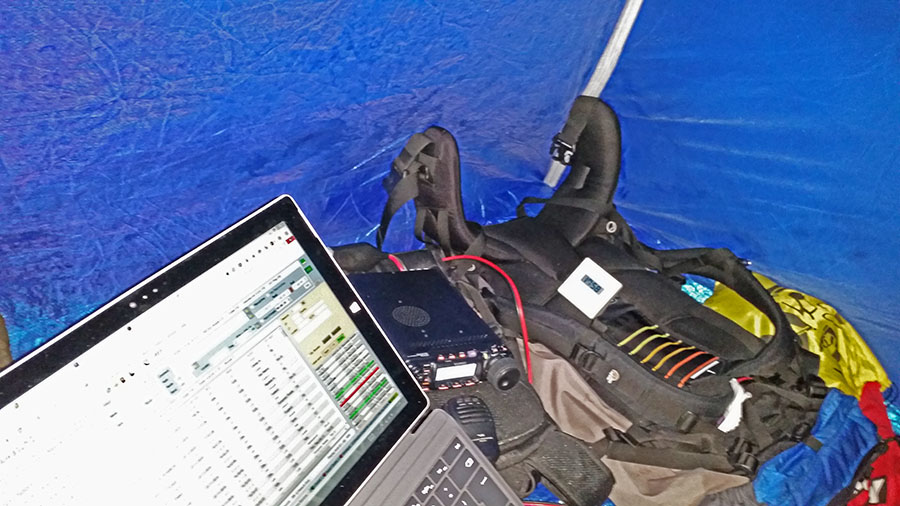
The site gets cell coverage so I had the luxury of using my Surface Pro 3 for logging with Log4OM and online lookups on qrz.com via my phone as a WiFi hotspot:
For power I used one of my 8400mAh LiFePo4 batteries I also use for SOTA activations as I don’t have my car wired up to power the radio.
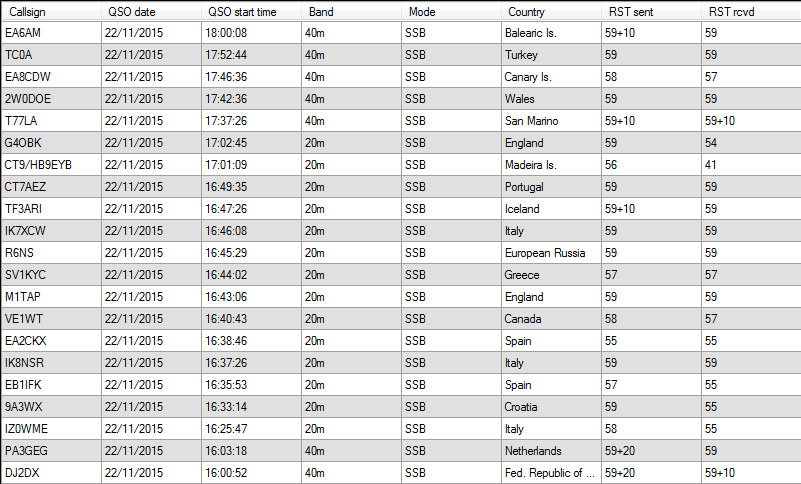
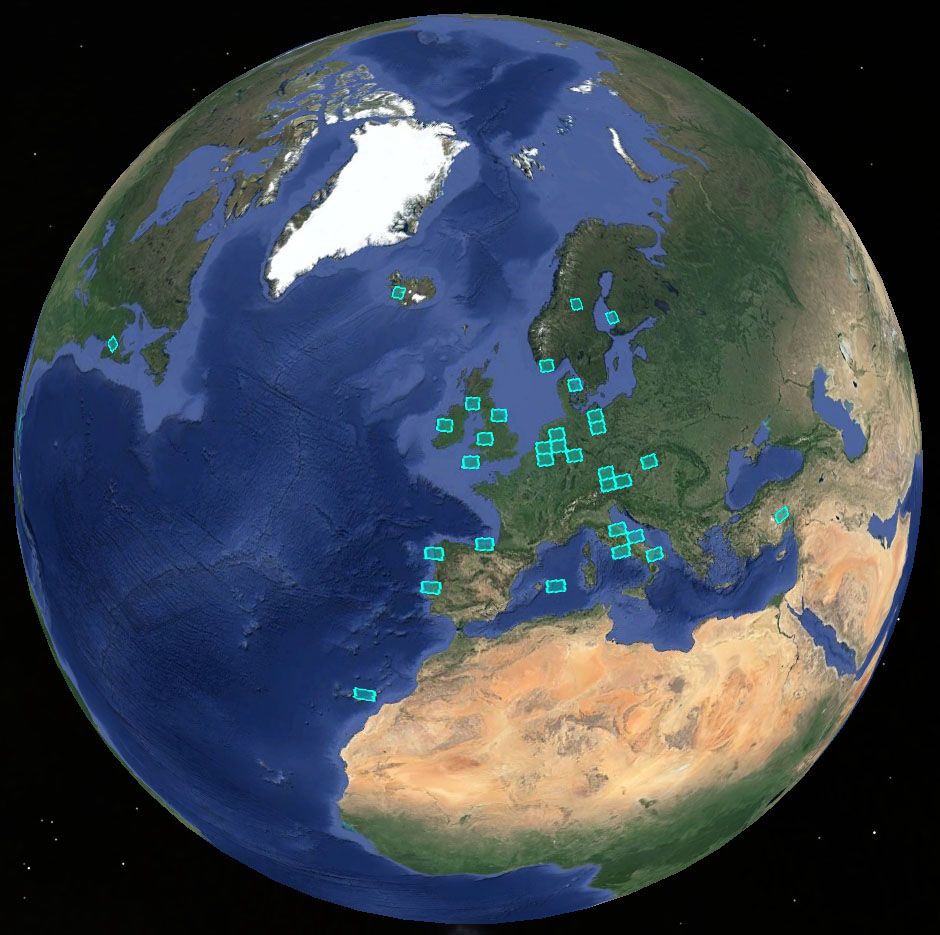
I was pleased to get no noise at all on 40m and 20m so that is a bonus. Bands were fairly busy with some strong special event stations and many calling them. I tuned around getting in where I could. I could hear several USA stations calling in strongly and managed to find a few calling to work. The battery wasn’t newly charged so I only worked for about an hour an half but it was nice to get out and try the site out. Looks promising and should be ideal for final assembly and tuning of my forthcoming cobweb antenna build.
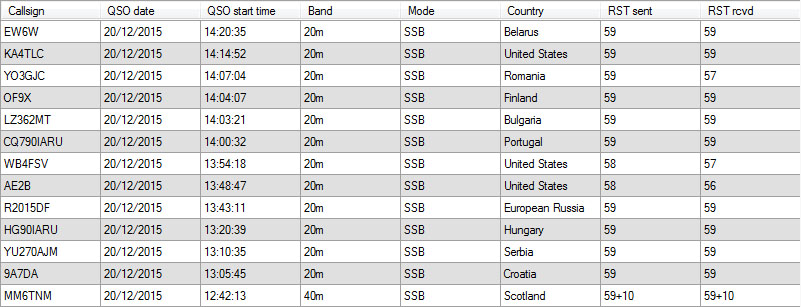
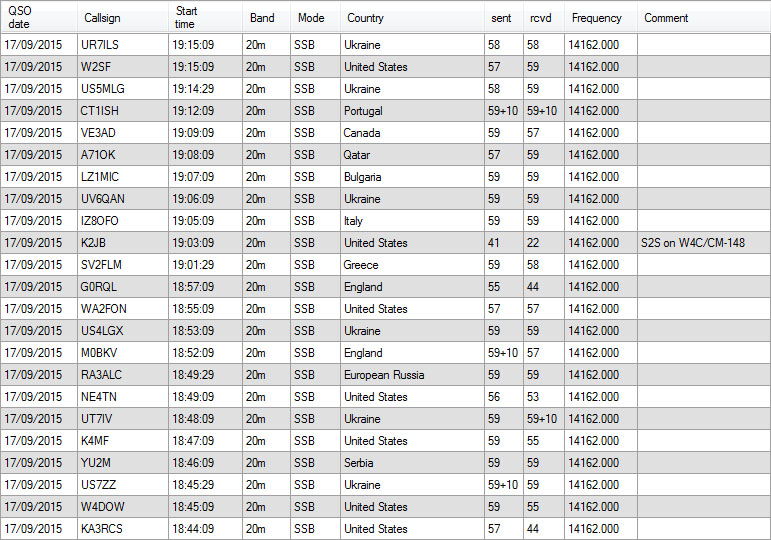
Only 13 QSOs but happy with a quick spell on the radio:
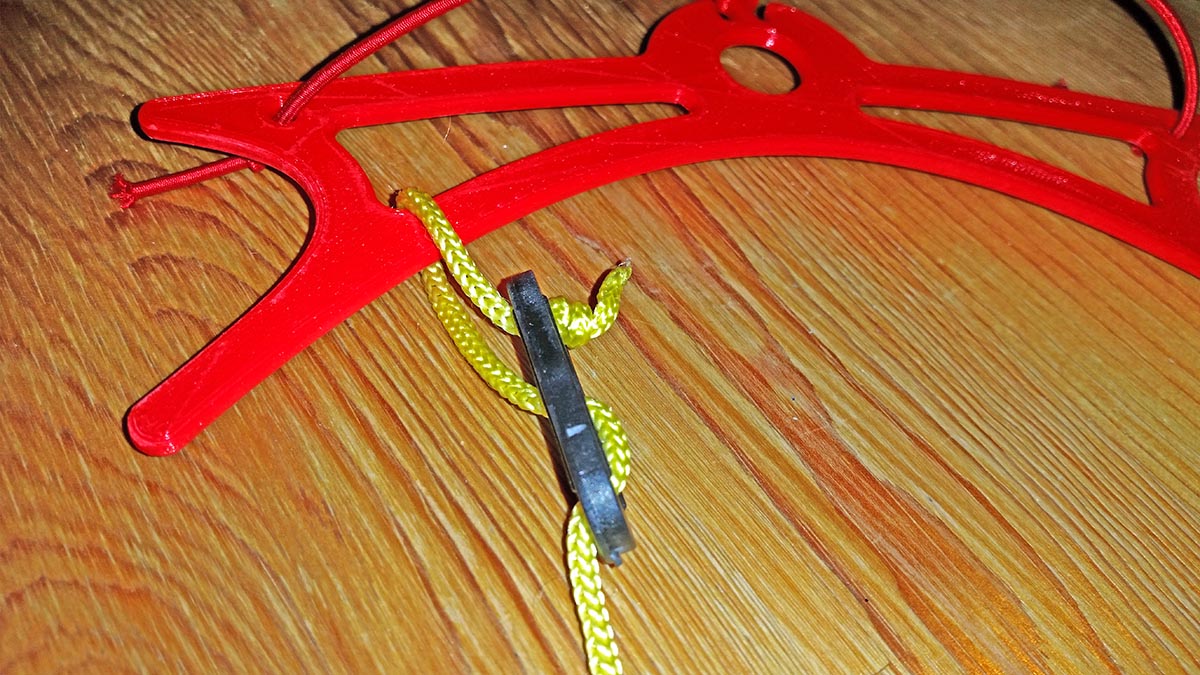
For my SOTA activations and HF portable backpacking operating I am using a 3 band link inverted V dipole and winding the dipole up onto a small round spool. Now the colder and darker months are here I was interested in the wire winders a lot of people use. My friend 3D printed me one to try out, but I did not like the kinks it puts into the wire so I decided to keep to my spool method as it keeps the wire lovely and straight. But we thought we would evolve the winder into one suitable for the 4 string guys I use to keep the mast up.Up to date I have been looping them up and tying the loops with a loose overhand knot. This works quite well and adds no weight at all. However it can be fiddly with gloves and although unfurls nicely 90% of the time but sometimes does get a knot or small tangle, which I can do without now winter is upon us.
The initial design used was based on one download from a 3D print site, but I wanted to make some improvements by extending the length and deepening the scoop in the middle and adding some function for an elastic loop to keep the string tidy when wound up.
This is the model Paul came up with during our discussions. Deep winding Vees and deep scoop, but with minimal weight. It will be printed in PLA not worring about it’s longevity as will not be outside for long at a time and a nice bright conspicuous red:
And here is it dimensioned up:
To use these winders you need to wind them in a figure of 8 fashion both to unwind nicely and also to not introduce twists like this:
This is how they should be wound:
And when wound like that this is how easily they are unwound:
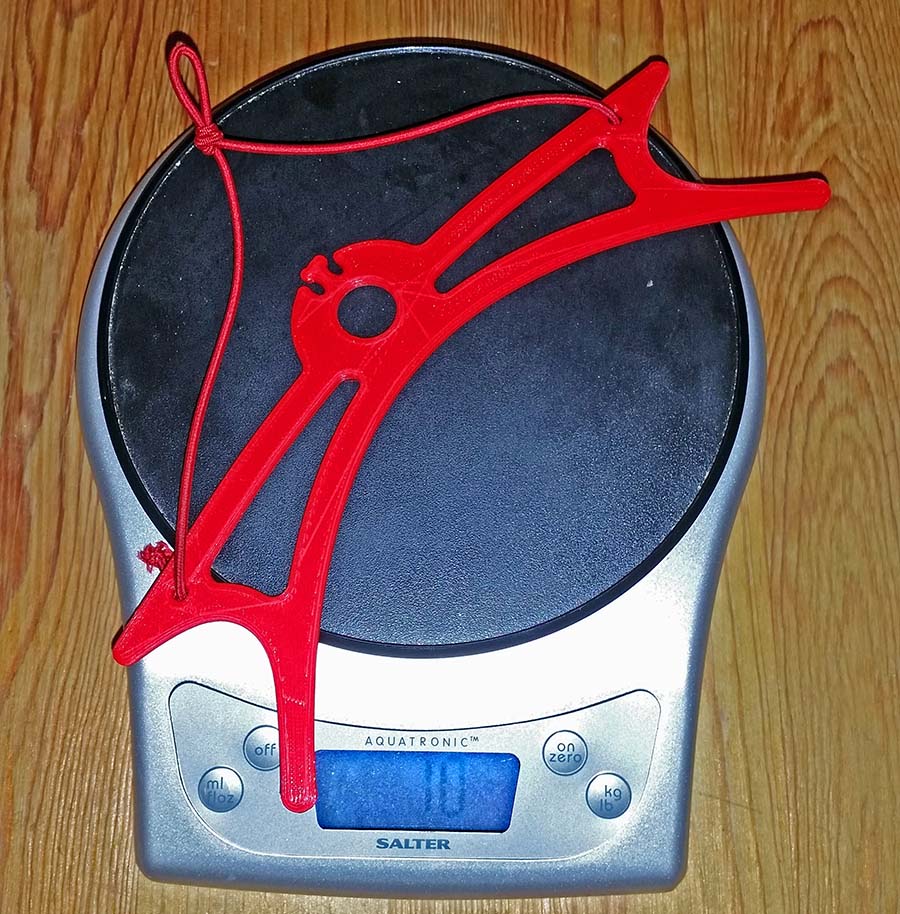
To retain the string nicely some elastic cord from eBay was added. A loop tied in the middle to make fitting and removal of it easy. Finished bare winder weighing in at 10 grams which tied up with the 3D model prediction:
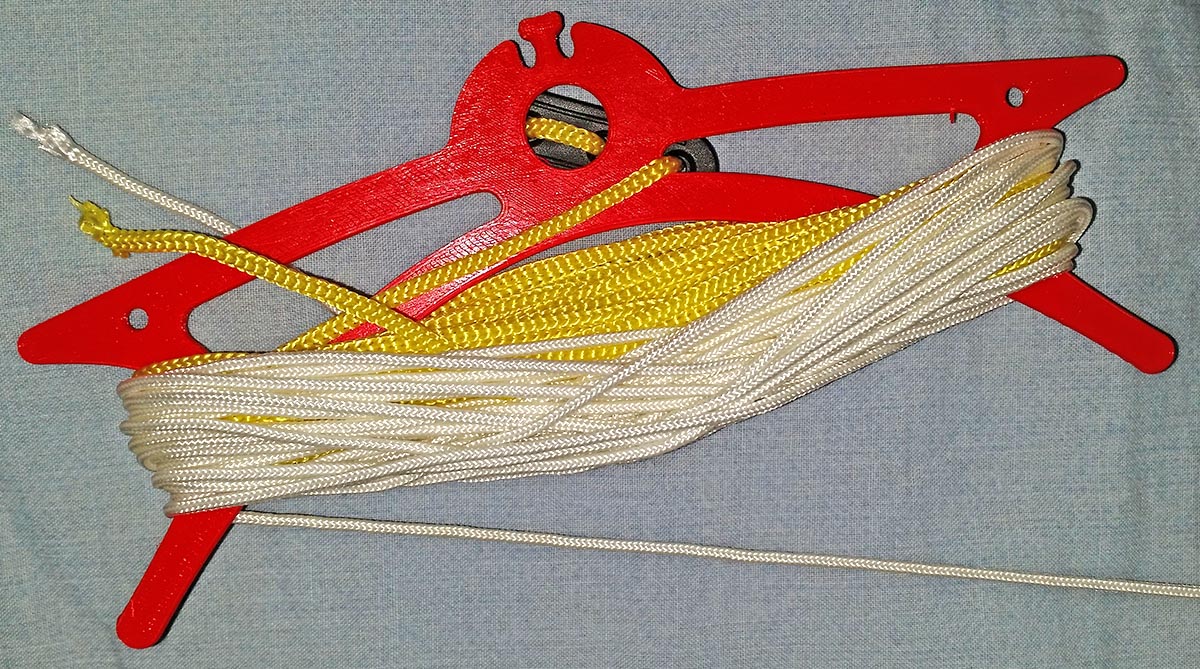
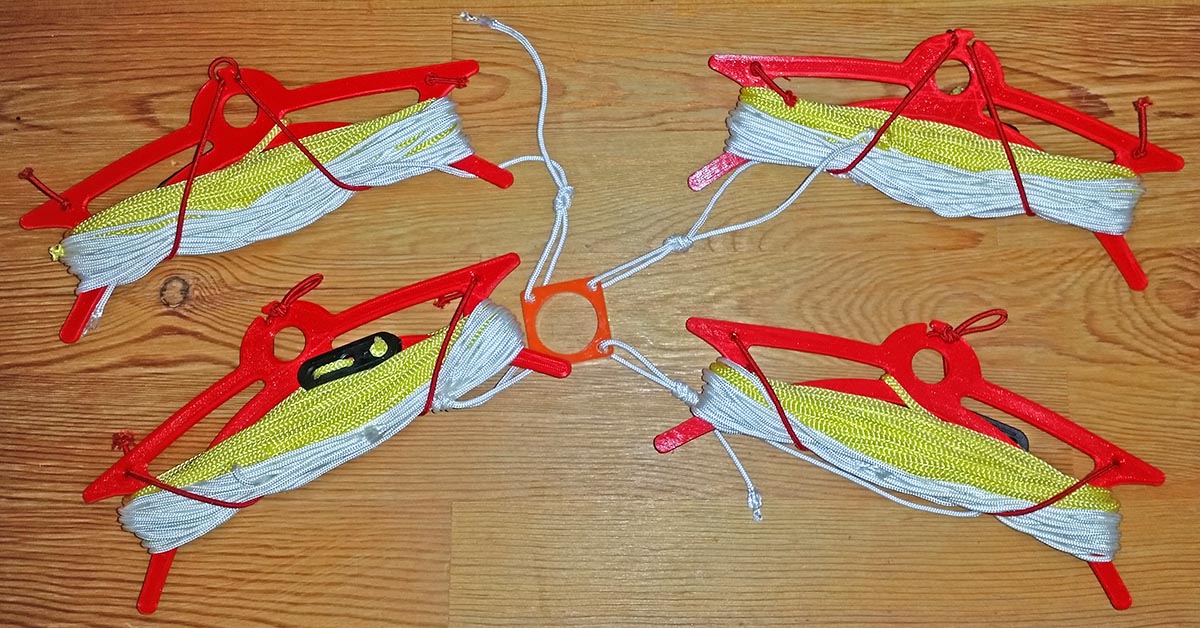
To save having to tidy them up and possibly misplace these in the field I have attached the guy through one of the loops in the frame in the same loop that will go around the guy peg. This will actually also help me to slide the tensioner up the line easily with gloves on as I like to pack them away with the tensioner at the bottom of the guy:
All four guys tidy and ready to be deployed quickly. The longer part of my guys are the white cord, the last 3metres are in hi vis yellow to hopefully reduce chance of them being tripped over:
These are nothing new of course but it was nice to make them exactly to my requirements. Similar winders can be bought from places like SOTAbeams etc, though this unit is similar in size to the midi winder SOTAbeams sell but a third of the weight and the deep arch allows the string to lie nicely and has loads more capacity than my guys need and they guy an 8 metre fishing pole.
If anyone with their own 3D printer is interested is making use of this design my friend Paul has made it available on Thingiverse and Youmagine.
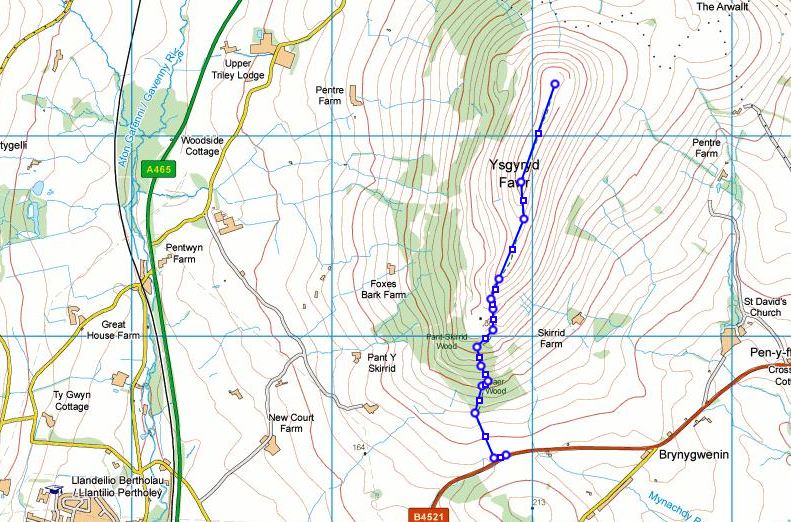
Been a while since I have been out due to other commitments and various reasons, but I had the chance of heading up to Skirrid Fawr GW/SW-106 to activate it for the first time (for me). As it was a Sunday afternoon the car park was packed as ever, even though I left it later in the afternoon. But I managed to squeeze in at the car park found at SO329164 and head up the usual path. This takes you up through the trees (at any junctions go up) and to a gate by a stone wall. Turn right here and head up again taking a left up some steps a couple hundred metres after. Up some stone steps then go right and onto the ridge. Easy to find your way up this one even in complete white out. The walk is 1.3 miles and a height gain of 277m, reasonably steep in places but not too bad even with my 40lb sack.
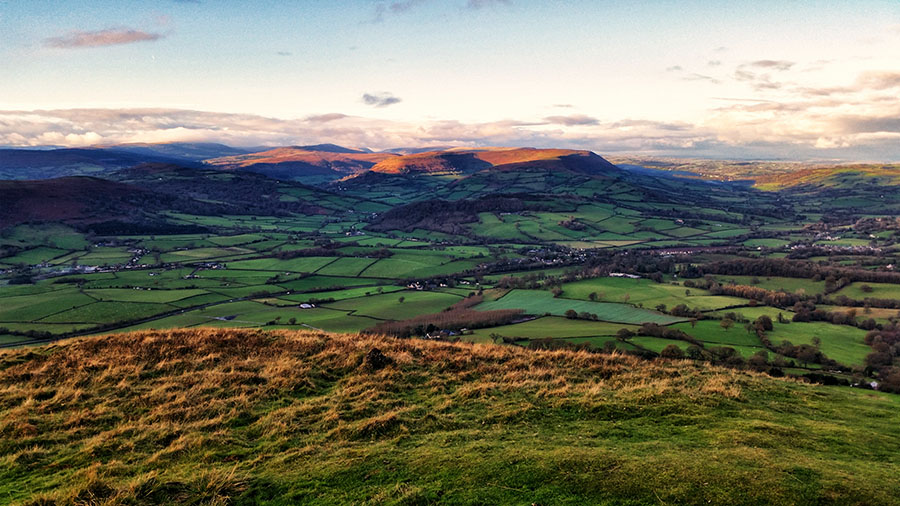
As I was getting rained on I donned my waterproof trousers on the ridge not wanting to sit for some hours in cold wet trousers. Luckily shortly after it stopped raining. Nearly always works! By now it was not that far from sunset and I managed to grab a couple of nice views.
Looking West from the summit over where I set up the station.
View back along the ridge I just ascended.
There is a nice little area West of the summit where you can set up and be out of the way of the main of the foot traffic. As it was getting on I only had one set of visitors that I heard. Though once the headphones were on there may have been more.
As there is pretty decent mobile internet access from Skirrid I decided to road test my new Microsoft Surface Pro 3 using the phone as a WiFi hotspot. This worked out well. I ended up being there about 2¼ hours and over that time the Galaxy S5 went from a full charge (at home) to about 75% battery power. That included taking the photos on this page and also syncing those photos and my Log4OM files via Dropbox. I was able to keep an eye on the SOTA alert page (for what it was worth!) and use the lookup on the logging program Log4OM. I did disable the instant upload of the QSO information in case of typos. The integral fold out stand for the Surface Pro 3 was good as it hokked over my knees and kept the keyboard and screen at a suitable place to use. As the text is quite small on the Surface I was introduced to the joys of steamed up glasses when coming back into the beach shelter after and antenna tweak. Quite pleased with the Surface Pro 3 as it still has 70% battery power left.
I started on 40m hoping to get some inter G SOTA and WAB trig chasers but things were very slow even after self spotting. An activation during the ARRL Sweepstakes Contest was possibly not one of my better ideas. I worked a couple of stations on 40m then I kept getting someone moving onto my frequency and they seemed oblivious to me. I then noticed when I transmitted the SWR bar graph was going up. Normally I have no reading on my link dipole. I checked outside and saw a couple of sections of the fishing pole had retracted and the ends of the dipole were on the ground. After sorting that out I decided to try 20m. The band was full of the ARRL contesters and as I wasn’t prepared with the complex exchange data I tried to avoid them. I managed to find a clearish frequency and struggled along with slow QSO rate despite spotting myself again until a contester came on frequency that definitely wasn’t there before for about an hour. I tried 40m again and worked a few more before I quit. I noticed that in all the time I was there only 3 other SOTA spots popped up and none of those on a band or mode I could chase.
The main reason I packed in was my butt was killing me. The Surface Pro was great but it meant staying in one position all the time and I need a better seat than the garden kneeler I have. I was starting to feel the chill too, though inside the shelter was pretty comfortable compared to the wind chill outside. Tonight’s lesson learnt is no matter how windy or wet it is, no matter how stiff your fingers are, it IS worth the time to pack your guy strings away the way you normally do, that never ever has a tangle OR you will spend ages breaking your back in the kitchen later untangling an impossible jumble.
Overall 21 QSOs which is a bit disappointing but a few new countries worked.
I decided for home I wanted a box just outside where my radio sits that I could plug different antennas into easily, so I looked for a tidy way to run antenna feed lines through the exterior walls. Most were running to a large waterproof box that the antenna feeders plugged into but were a lot larger than I wanted. The box would offer a socket and be cabled through the wall and into the back of the radio. I also wanted it to be basically waterproof and compact.
There are many waterproof boxes on the market of course, but none I felt would be ideal. Then a good friend then got his hands on a 3D printer so we decided to print me a box to my design.
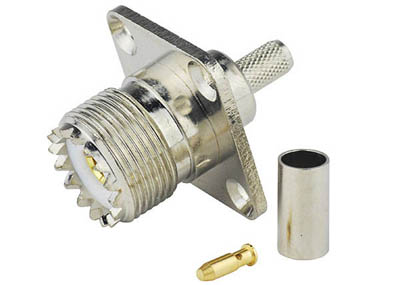
First step is to draw it up. I planned for 2 connector positions (one for each output from the FT-897D) and made it suitable for both single hole bulkhead type connectors and 5 hole panel mount connectors. It will take SO-239 and N-type (my preference) connectors. Both will be cable mount and crimped, which I use in my day job at L Band and above and much prefer to pretty much all other cable fitments for flexible coax.
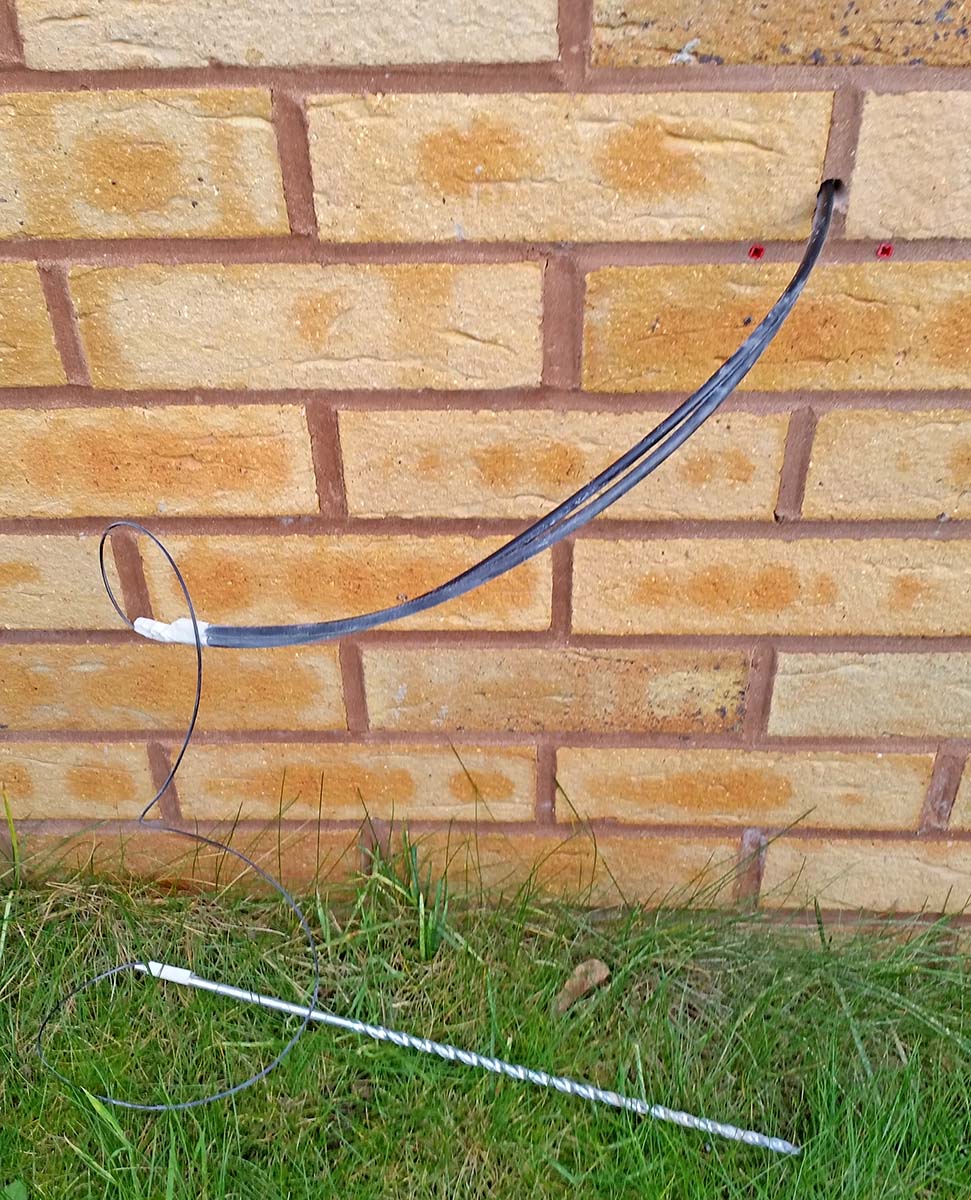
The coaxes will be fed through a hole straight through both skins of the house through a vertical mortar joint at an upwards angle and the wall plate part of the box fixed to the wall with two fixings into the horizontal mortar line. (My bricks require an SDS drill to drill holes in, plus this is easier to repair if removed later).
A simple slide on cover open only at the bottom extending down past the connectors will shield it from even the most horizontal rain.
Now to send the files over to my very generous friend Paul for 3D printing. He did an initial print of my design exactly as drawn, which took some time for the cover as we didn’t print it the most efficient way up. We got it done, but before I had chance to fit it discovered it was printed in PLA rather than the ABS we thought it was. So Paul decided to redesign it with printing in mind in smaller parts that would be cemented together, having already proven on my Cobweb antenna that this approach was a better plan.
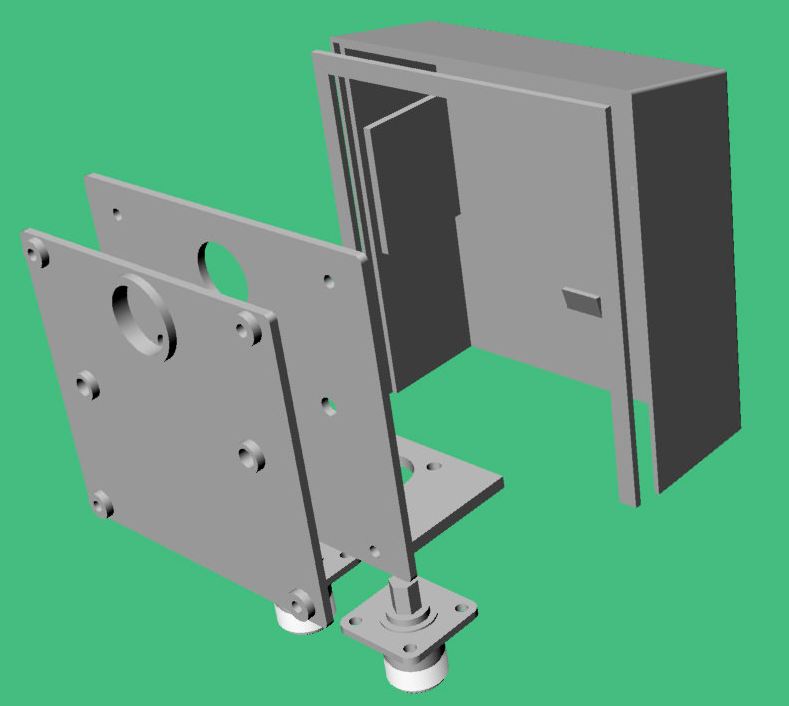
Paul’s design was four pieces rather than my two:
Here is some of the 3D printing and assembly:
The two parts of the weather cover:
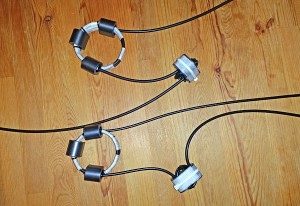
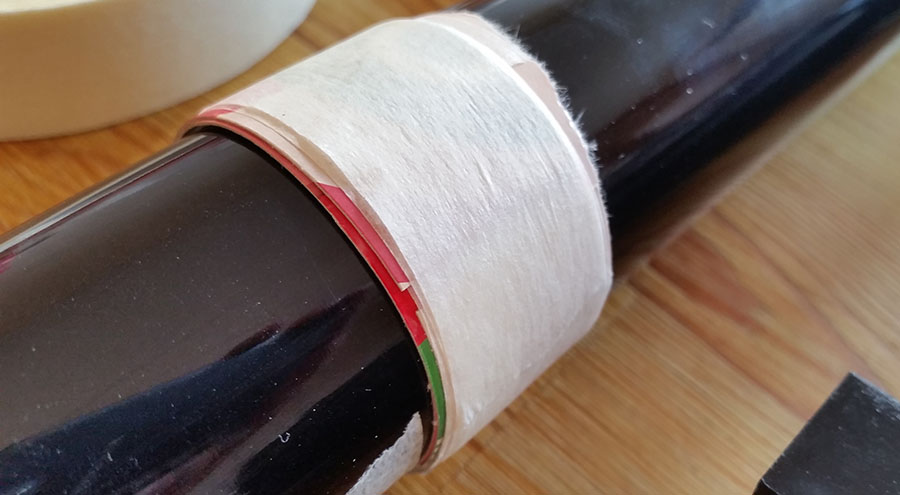
For the feeder from the coax box outside to the radio I wanted to add a hi band and mid band ferrite choke as described by GM3SEK here. I wound one with RG223 which was a springy slippery nightmare and one on RG58 which was much easier. There was no way to get the coils of either sitting tidily with just cable ties so I used masking tape to keep things tidy. As where they will come through the wall is very hard to get to I need to wind them on first and will have to pass the shorter tails out through the wall and fit the connectors outside.
Holes all drilled from outside, and short tails pulled through from inside using the smaller drill and some wire:
Connectors fitted. As well as remembering to fit the crimp ferrules make sure you feed the coaxes through the hole in the coax box BEFORE fitting the first N-type type connector beautifully. Otherwise it needs to be cut off and wasted. Grrrrr. The final SO239 and N-type socket fitments are not as tidy but electrically good:
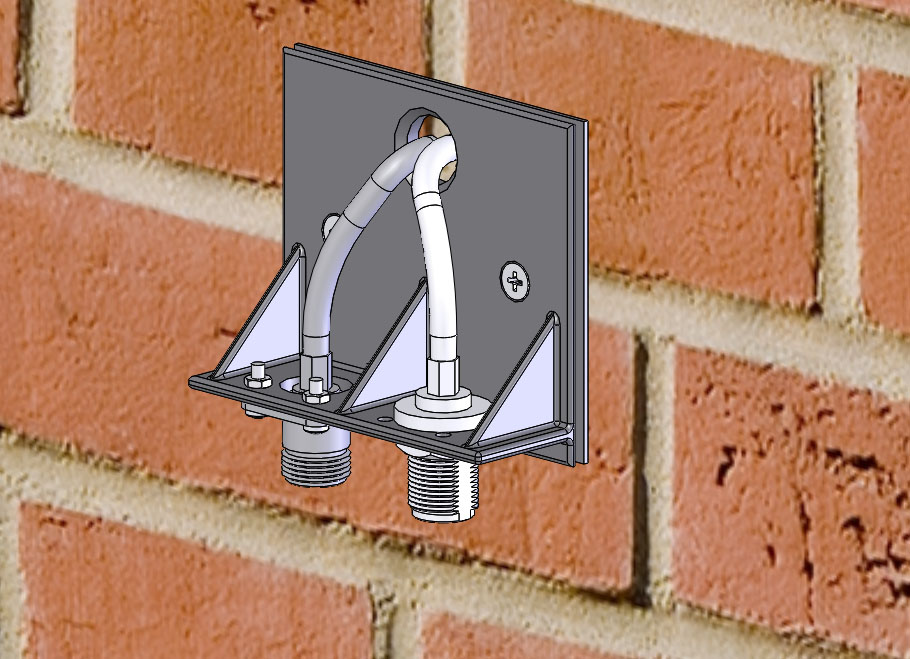
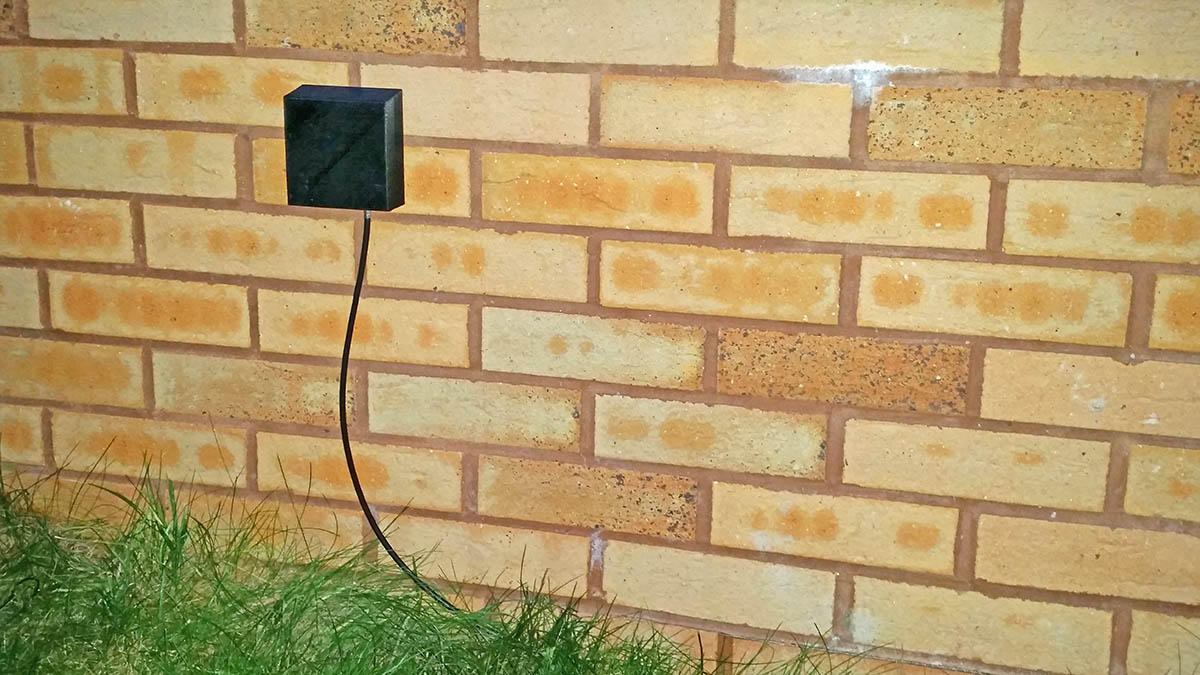
Antenna cable and rain cover fitted. I have also smeared the cables and backs of the connectors with a good layer of vaseline in case any water does manage to run down the wall and down the cables:
From concept to reality. Cool.
If anyone with their own 3D printer is interested is making use of this design my friend Paul has made it available on Thingiverse and Youmagine.
My current circumstances preclude my having a permanent mast up for antennas so I am having to stick up a portable style telescopic fishing pole with an inverted vee dipole when it gets dark, and take it down again before I go to bed. Quite tiresome but better than nothing.
I started by strapping my 8 metre fishing pole to the rotary washing line that is installed in the garden but it’s a bit of a faff in the dark and I get covered in cobwebs, and it’s a bit wobbly. Also its location means I don’t have room for a 40m inverted vee, and the locations I have for the ends of the dipoles are not in line with the pole so that means it is always stressed and bent over quite a lot. So I needed another solution.
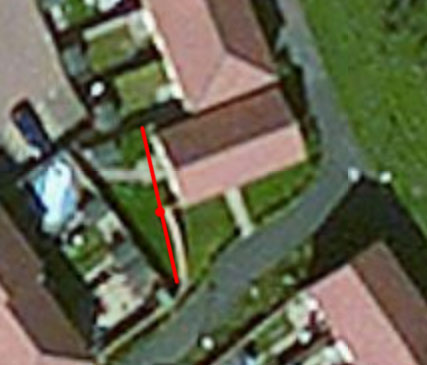
Using the very useful Link Dipole Calculator on the SOTA Mapping pages I was able to calculate that there is room for a 20/40m inverted vee if I use a 10m fishing pole and mount to to the corner of a 6 foot brick wall in the back garden and I can arrange the ends of the dipoles to be in a straight line with the mast to relieve stress on it. Both solutions have one end of the dipole coming close to building which is not ideal but the higher pole will help and at least it’s a bungalow so most if not all the actual radiating elements should be above the roofline.
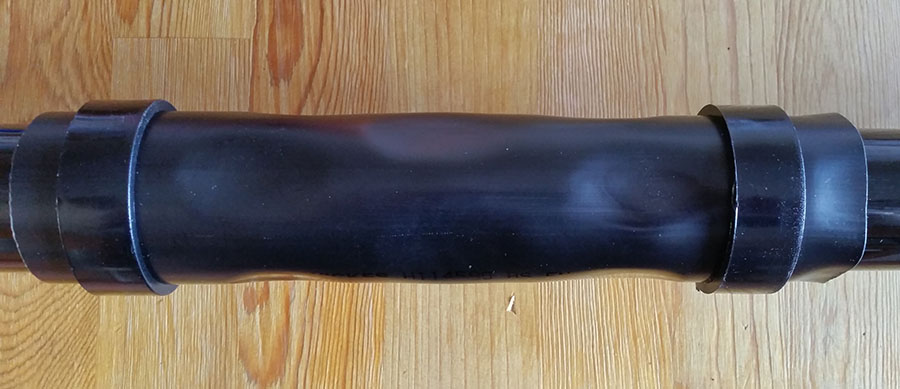
Next challenge is to come up with a quick and simple arrangement to erect it. After looking around and some thinking I decided I needed some sort of cup to sit the bottom of the mast in and a sleeve higher up to extend the mast into giving it secure support. Scouring the DIYs the closest I could find for the upper sleeve was some black 50mm downpipe. This also had suitable wall fixings that keep it fairly close to the wall. However it turned out to be a beautiful fit for the top of the bottom section (no use to me), but sloppy on the next section up.
I was trying to think of ways to line the pipe to get a better fit and how I might secure it in the pipe and in talking to a friend who is very good at engineering solutions he suggested heating the pipe and bending it inwards in several places. Perfect!
As there is quite a bit of play I used strips of cereal bar box and masking tape to build up the pole to a nice fit on the tube to keep it centred around the pole.
Then a bit of masking tape over the outside to keep it still.
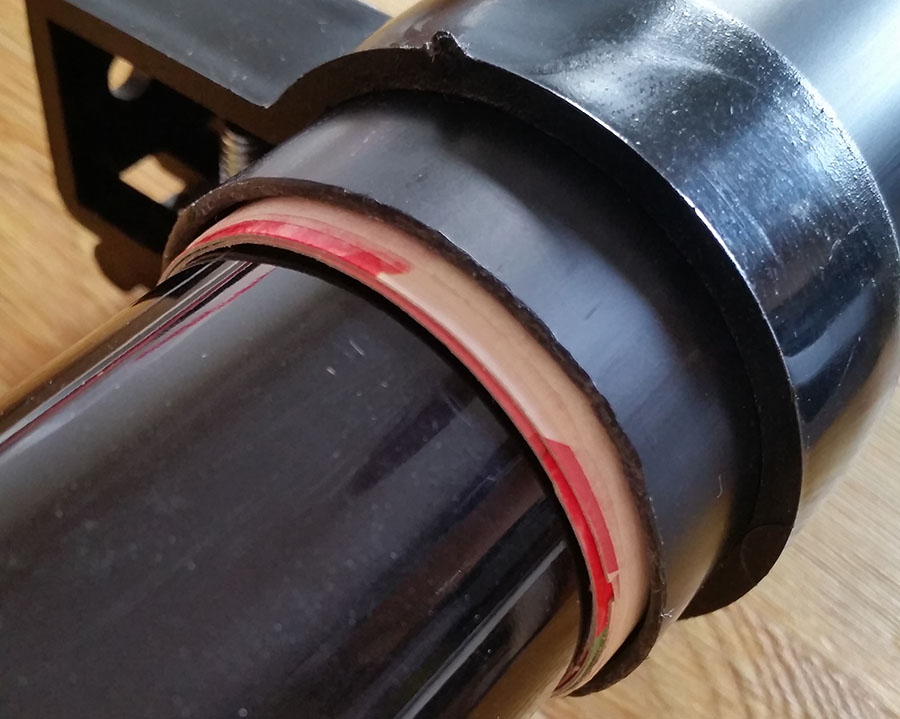
Once set up I used a heat shrink gun to heat up small areas of the pipe and used a teaspoon to press the soft pipe against the pole and hold it there until the plastic cooled a little. I kept the teaspoon in a cup of ice water between uses to keep it cool and cool the pipe quicker. I did three sets of four indentations. Set one at 0° 90° 180° and 270°, 2nd set at 45° 135° 225° and 315°, 3rd set as the first. Then I took off the top card and masking tape and pushed the top edge in as well for a bit more support. I left the bottom entry oversize for easy entry.
This worked better than I expected! The fit is very close. If I had known how good the pipe would keep the new shapes, I would have wrapped a sheet of printer paper around the pole to have a little freedom on the fit. However, it works and here is the pole standing upside down with the pipe fitted showing it gripping the pole.
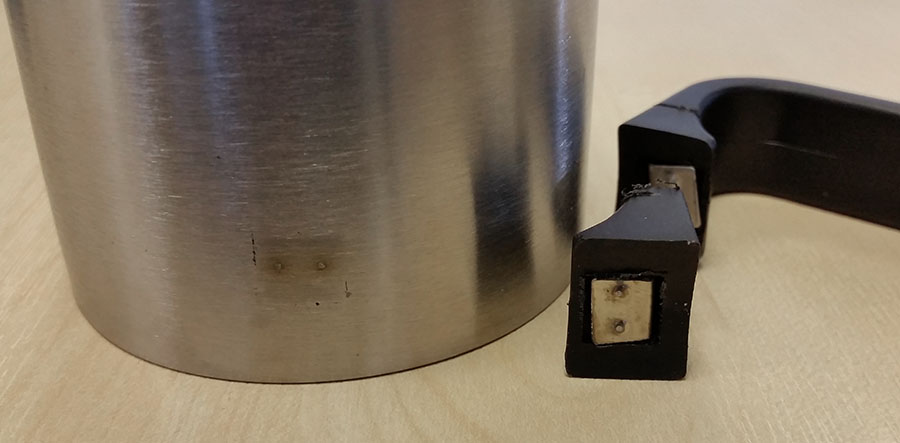
The cup for the base of the pole took a bit more searching for. Nothing was quite the right size, or if it was it was flimsy plastic. It doesn’t need to be industrial but will need to stand the leverage the top 8 metres or so of pole exerts when the wind blows. After much looking and considerably over budget at £10, I got a metal camping mug from Mountain Warehouse. Of all the metal cups I found it was the only one that was close to the right size and also was parallel sided, which would be useful.
First the handle had to come off. I wasn’t sure how it fixed on so I started sawing it off. First cut through just plastic, then the 2nd hit metal as I cut closer. I decided to just try and break it off. Came off easily and I was able to see it was only a tab spot welded on. So the other was off in seconds.
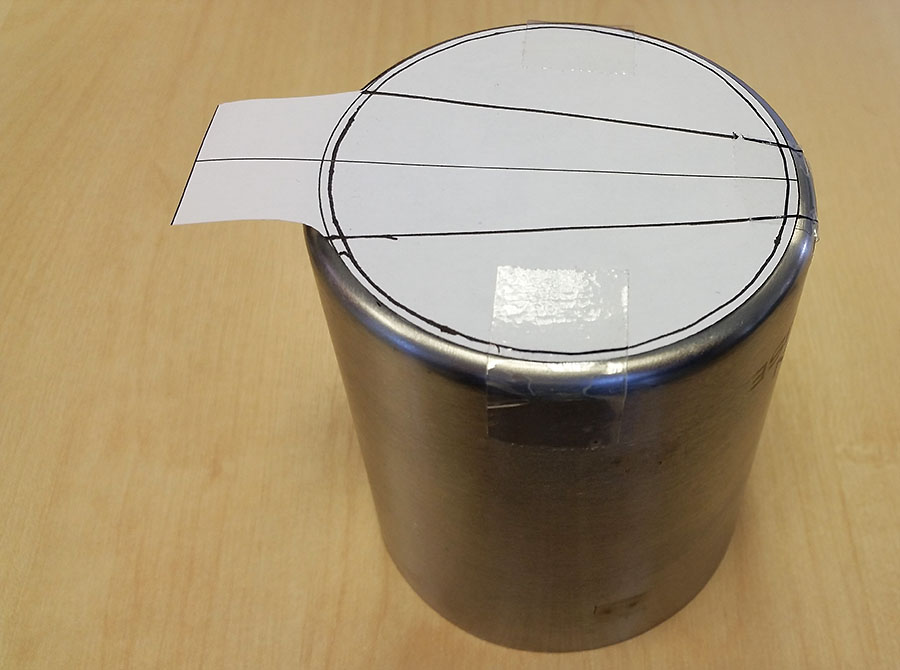
I had also though of how to attach it to the wall as screws through the side wouldn’t work as the heads would be in the way of the pole and the wall thickness of the double skinned cup are very thin anyway meaning it would deform. So it had to be fixed at the base. A simple metal shelf bracket was chosen, cheap and plenty strong enough. In order to line up correctly with the black pipe, the centre of the cup needed to be 55mm from the wall. To make it easy to do I drew a circle a little smaller than the cup base, and positioned the centre of it 55mm from a base line, printed and cut it out, and taped it to the base. It was then easy to line the shelf bracket up with my centreline and the upright part with the base line (left in the photo) so I could mark where the new holes in the shelf bracket needed to be (it goes without saying the ones already in it were no use).
I was then able to drill the bracket and the cup with new holes for fixing the cup to bracket, and a couple extra for rain drainage. As the metal is very thin I also cut a disk of 1.5mm aluminium sheet to spread the load of the screws. I just printed a circle the right size, cut it out, taped it to the aluminium and cut round it with tin snips. A quick file of the corners and it was sorted.
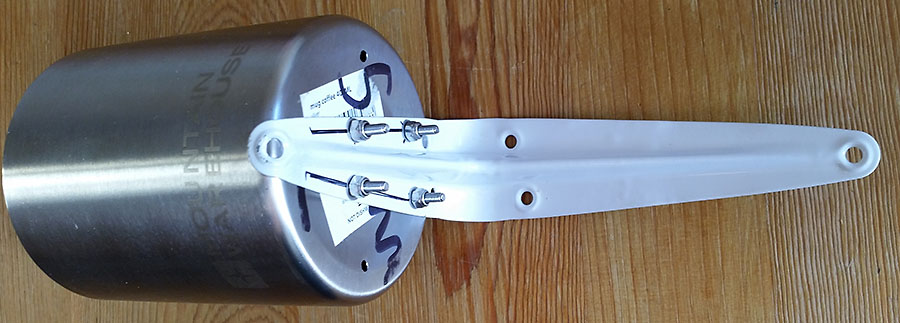
Now just needs bolting up together. I used nyloc nuts so I can do it up tight enough to be sure but not need to crush the cup getting the nuts to stay tight. The disk and bracket spread the load well anyway, but I know they should never come undone. All the fittings are A2 stainless steel so should last a while outside.
So the pole can sit in the cup but not rest on the heads of the screws I cut a sheet of rubber matting to raise the pole base off the heads. May help absorb some (tiny fraction of) shock if the mast happens to collapse down one day. Ready to go on the wall now.
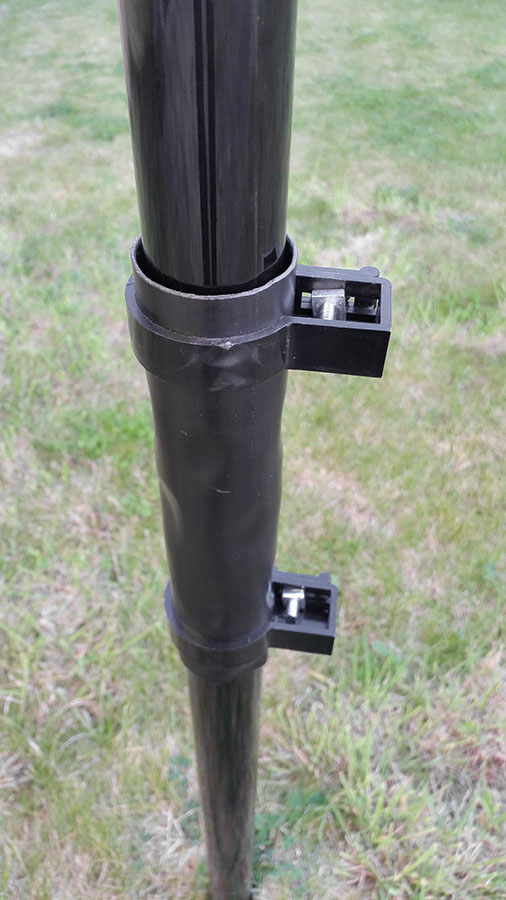
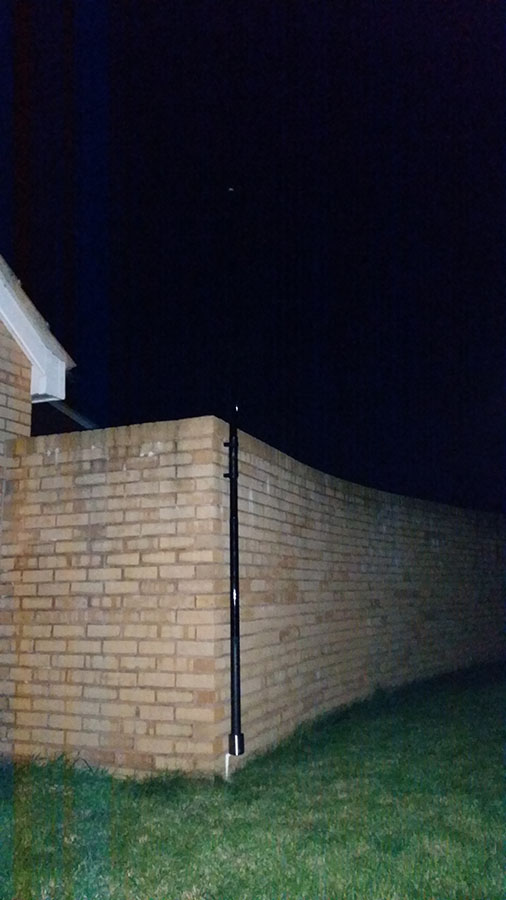
All set and just need to screw these to the wall. And a rubbish picture taken in the dark with my phone with the mast in situ.
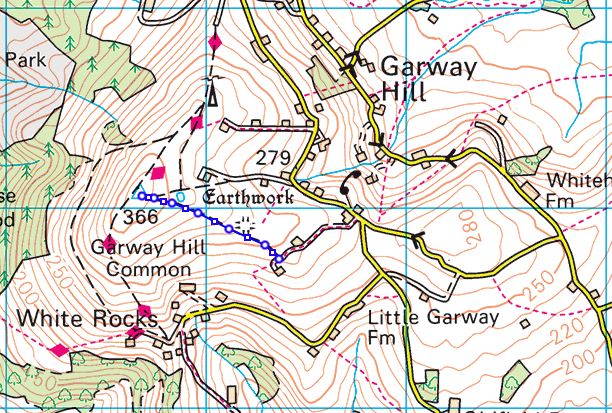
As things have been quiet lately I have been doing other things that need attending to but I needed a radio fix. First I thought I’d pop up to my local drive on site that I use for testing antennas and setting up mast systems etc, but then I though why not pop up to Garway Hill G/WB-013 again to activate that again. So I did.
There is a small space to park at SO444247 that is possible to fit a few cars in. A fairly gentle but continuous slope takes you up the obvious track leading to the top field and trig point. The walk up is only a half mile and 121 metres of ascent.
Took my two daughters (both early 20s now) to get them some fresh air, but soon left the eldest to push the youngest’s wheelchair up the hill for me as time was getting on and it’s slow hard work especially with a decent rucksack on your back as well.
By the time I reached the summit the view had gone. This is a picture the girls took on the way up.
At least it wasn’t actually raining. Yet.
For this activation I had considerably reduced the pack weight. Most of it by switching from the FT-987D to a new FT-857D. I also left the beach shelter at home though I would have been better operating from it as it turned out. Also I saved a fair bit of weight switching from a steel lump hammer for the pegs to a lightweight plastic one. That was very nice, though the hard ground and light hammer did require some fairly furious hammering to get the small tent pegs in. This resulted in a wild inaccurate swing terminating at my forefinger which is sporting a nice lump and bruise today.
System set up I started on 20m, found a free frequency and spotted myself with Rucksack Radio Tool. Good signal on Garway with Three. I even saw 4G flash up now and then!
No instant pile up tonight, but first contact was in the States, and most of first 10 were too. A nice start. Interestingly, although inverted V antennas are meant to be pretty much omni-directional I did set up with the dipole broadside on to East and West. Steady going, longest gap between QSOs about 3 or 4 minutes. With 23 QSOs in the bag including a Stateside S2S (just!) I decided to switch to 40m to see what was about. I also switched to the other battery at the same time to share the drain.
40m seemed pretty busy and finding a free frequency without an adjacent strong signal took a little while and wasn’t necessarily a 100% success on the lack of adjacent strong signals. I did notice a lot of my QSO signals were really strong both ways. The QSOs came in slow but steady getting 30 QSOs in about 40 minutes. During which I had to get out the umbrella and hold it down with my rucksack and edge the radio underneath into the dry. A lull in callers was an opportune moment to go QRT as my girls by now were bored and cold. I was wet and cold. Although it was only about 14°C the water and air cooling had turned my fingers pretty stiff and I was shaking a bit with the cold. Pretty sure my personal CPU was running slow too! All would have been prevented in the beach shelter. “Man who not make mistake not make anything”
In order for your QSOs worked when not at home to appear correctly on QRZCQ.COM you need to add the portable and alternative callsigns to your QRZCQ.COM account.
Assuming you have your main account set to your normal callsign (eg G1YBB), to add a portable callsign in your home country (eg G1YBB/P), or an overseas country where you add a prefix or suffix for the country you are working from (eg G1YBB/VP2) is quite straight forward.
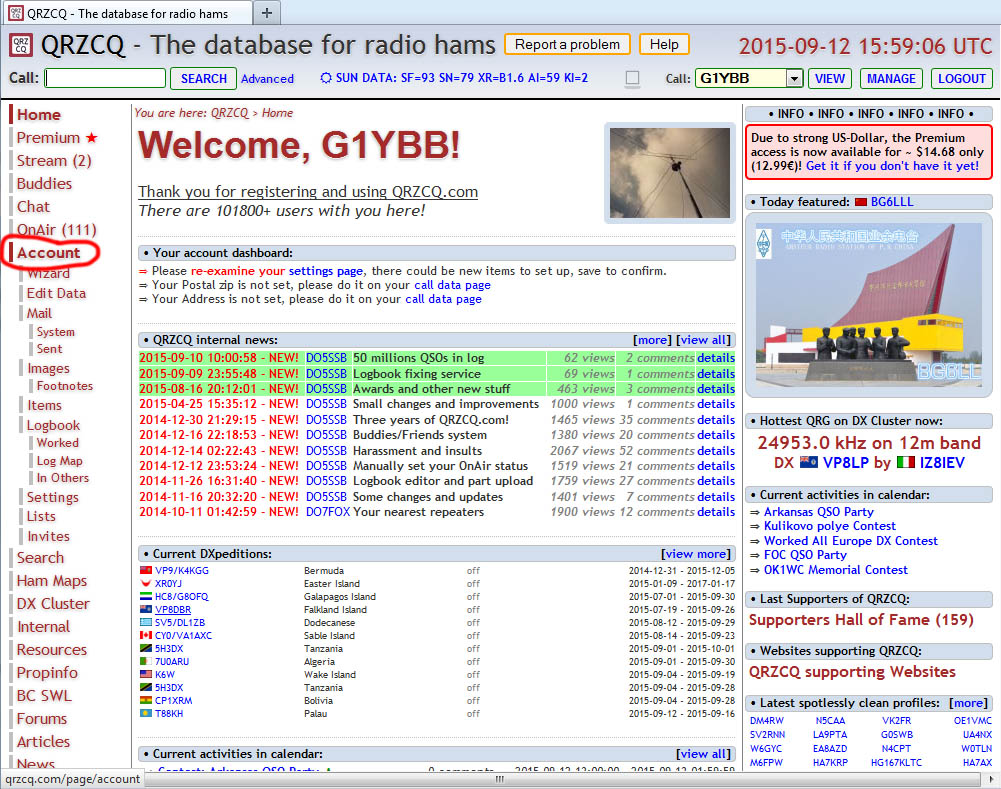
Once logged in go to “Account” on the menu on the left:
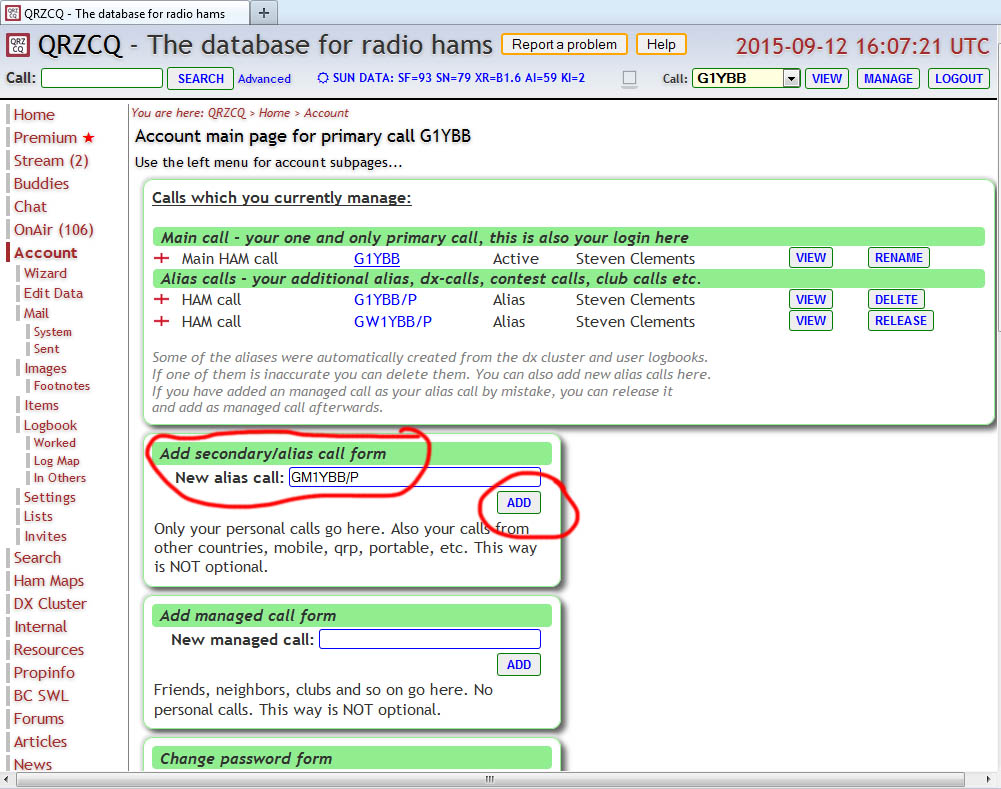
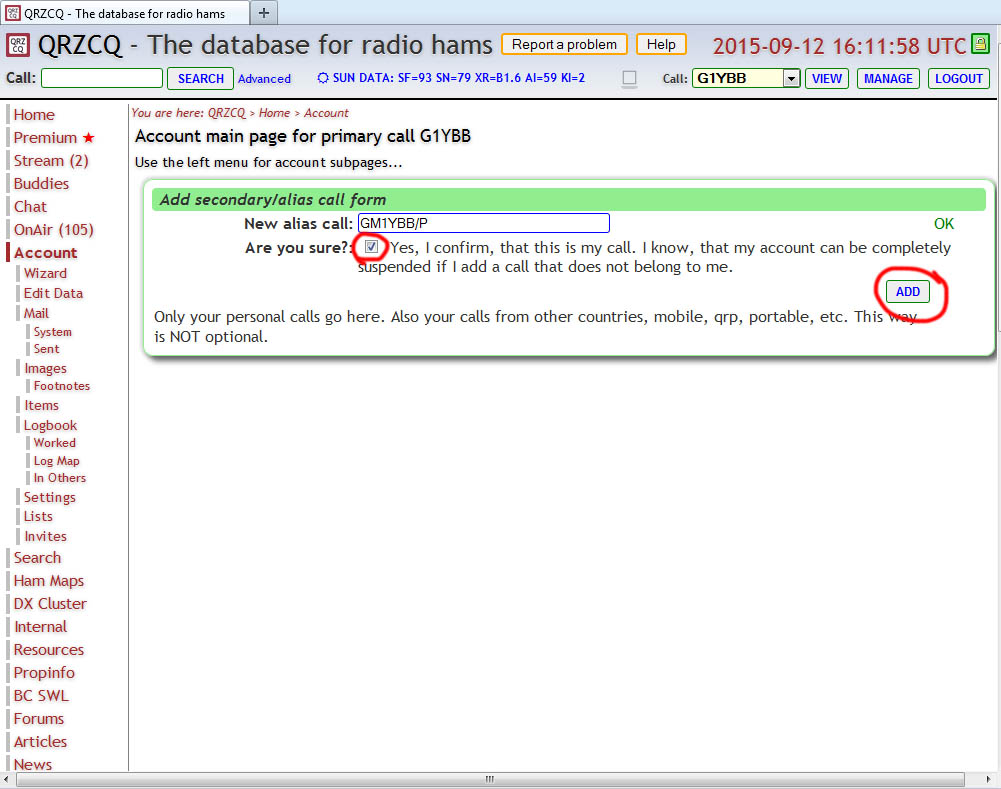
Then for your portable or DX callsign just enter it into the box for a secondary/alias call form and click “ADD”:
Tick the confirmation that the callsign belongs to you and click “ADD”:
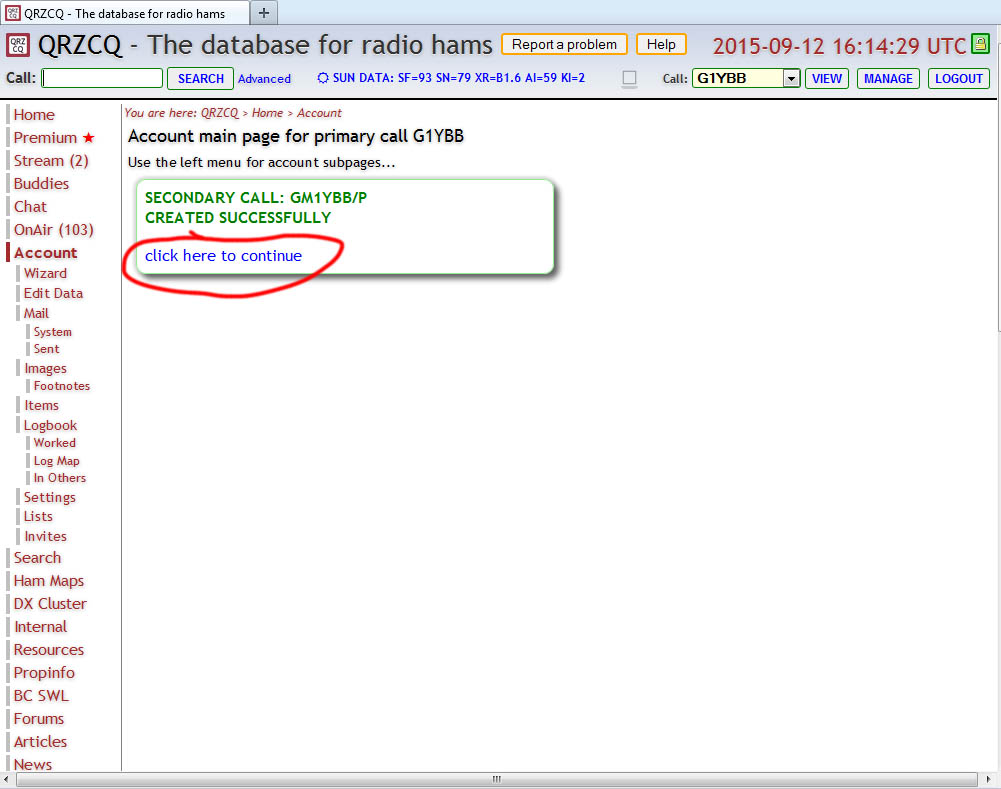
Callsign is created. Click “click here to continue” to see your new callsign:
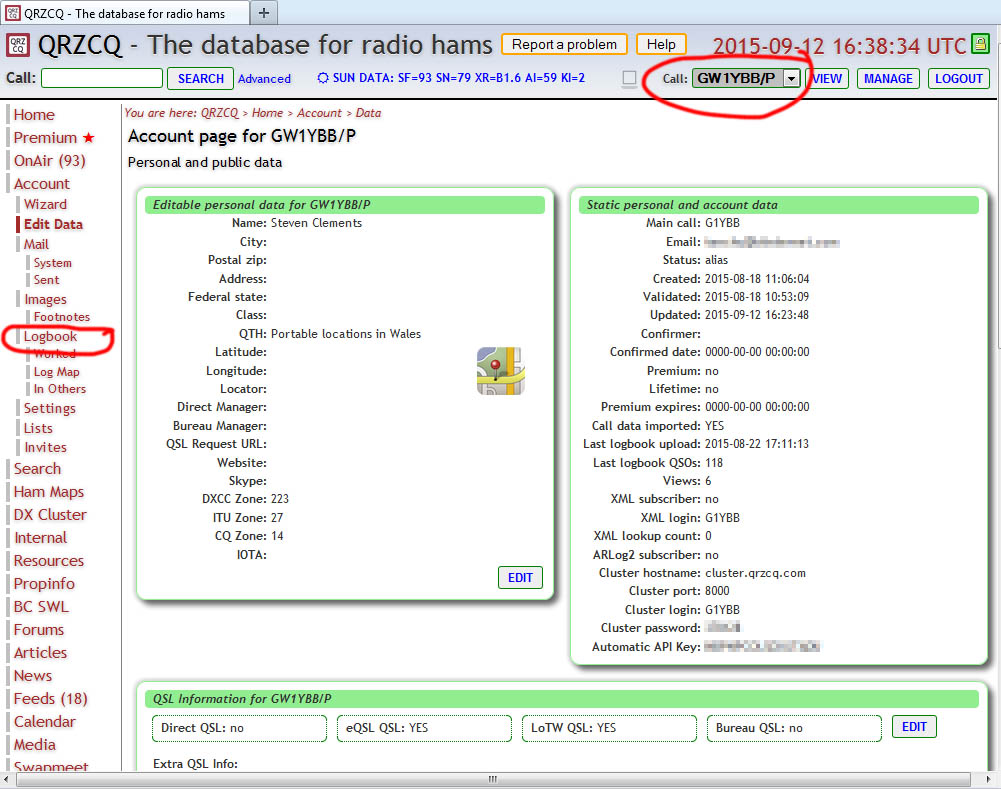
New GM1YBB/P callsign in my list. For some reason QRZCQ.COM won’t let me change my GW1YBB/P DXCC setting from England, so the England flag shows, yet set the Scottish callsign correctly. I must report that:
Log4OM does not support QRZCQ.COm so I cannot advise on your software settings if your software supports it. So I am uploading the exports ADIF files created by Log4OM.
Use the callsign picker top right to select which callsign you wish to upload QSOs to. I am going to add some older ones to GW1YBB/P:
Once you have selected the callsign, click the “Logbook” menu item on the left:
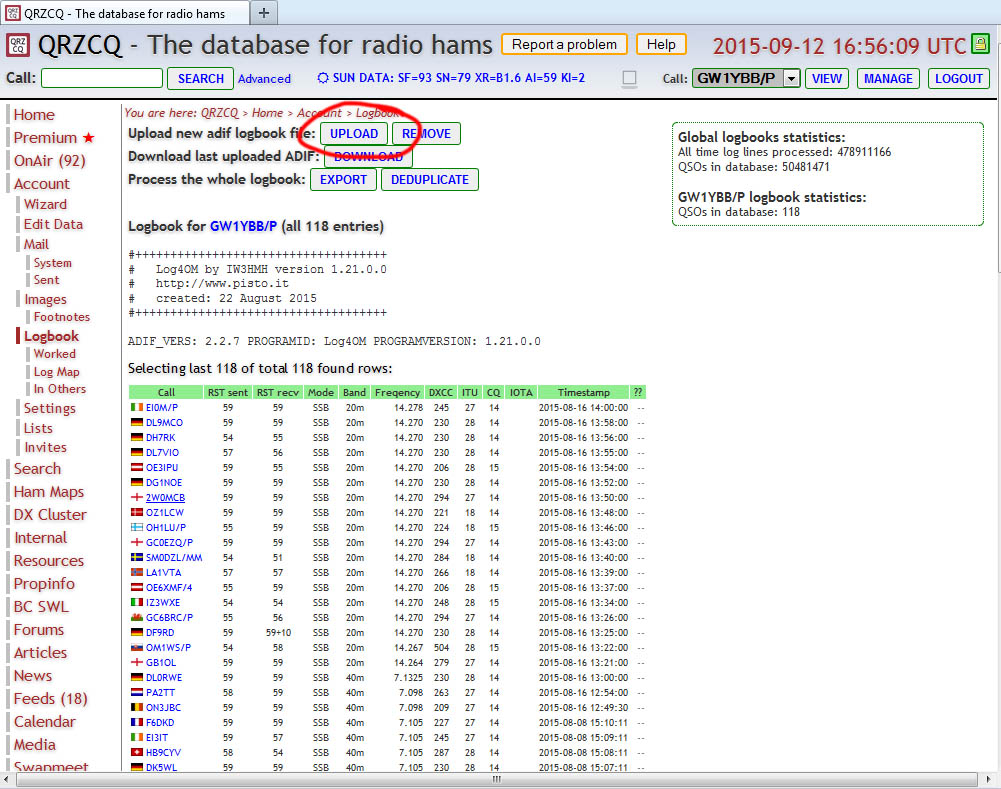
There you can choose the “Upload” button:
The rest is self explanatory. Repeat the process (using the callsign picker) to upload ADIF for your other callsigns.
In order for your QSOs worked when not at home to appear correctly on ClubLog you need to add the portable and alternative callsigns to your ClubLog account.
Assuming you have your main account set to your normal callsign (eg G1YBB), to add a portable callsign in your home country (eg G1YBB/P), or an overseas country where you add a prefix or suffix for the country you are working from (eg G1YBB/VP2) is quite straight forward.
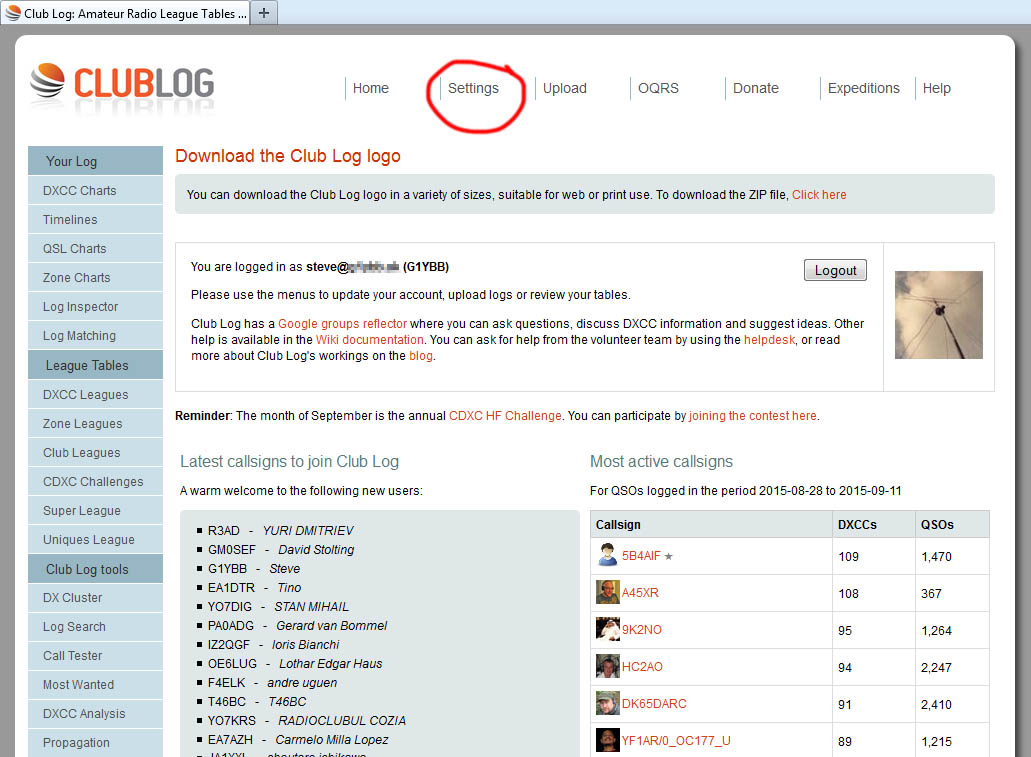
Once logged in go to the “Settings” at the top of the page:
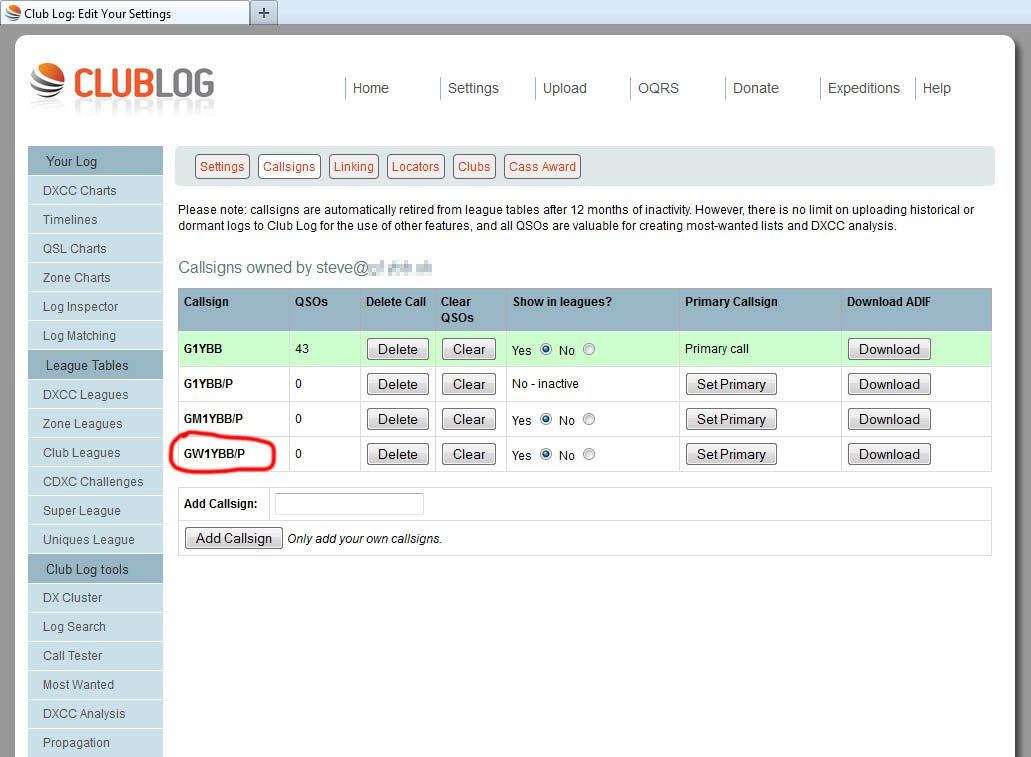
Then click on “Callsigns”:
ClubLog have made it very easy to add a callsign. Just type in carefully your portable callsign and click “Add Callsign”:
Done! Repeat for other variations as required. You can link your home country portable callsign to your home callsign if required for the ClubLog awards tables. I haven’t done this as yet.
ClubLog is now ready to accept your QSOs directed to the correct logbook via your logging software.
In Log4OM each callsign configuration you have set up will have it’s own HamQTH setting although some are common. Setting up multiple configurations for Log4OM is shown here.
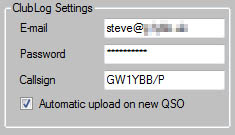
Enter the email and password you use to log in to the ClubLog site. That is used for ALL variations of your station locations and callsigns. The unique part that identifies where your logging software uploads the QSOs is the callsign which must match one of the callsigns set up on your ClubLog site.
Here is the info entered into the Log4OM settings for my GW1YBB/P Waun Fach configuration:
Just change the callsign to suit on each configuration and QSOs will upload to correct log on HamQTH.
In order for your QSOs worked when not at home to appear correctly on HamQTH you need to add the portable and alternative callsigns to your HamQTH account.
Assuming you have your main account set to your normal callsign (eg G1YBB), to add a portable callsign in your home country (eg G1YBB/P), or an overseas country where you add a prefix or suffix for the country you are working from (eg G1YBB/VP2) is quite straight forward.
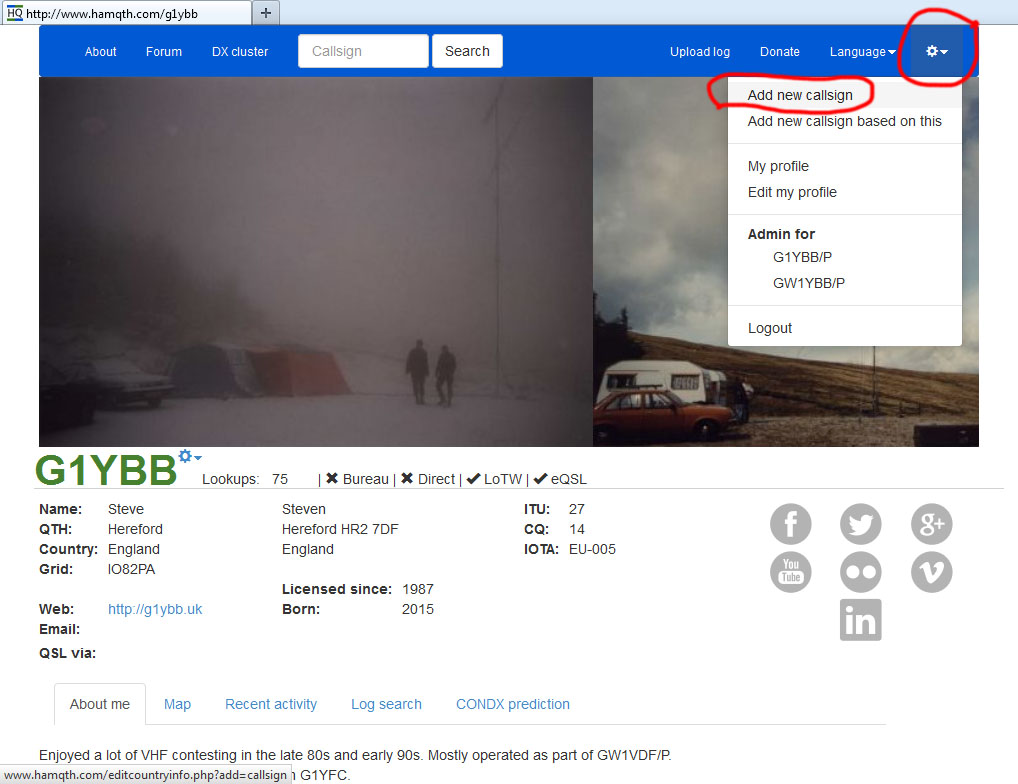
Go to the settings gear icon top right of the page when logged in and looking at your profile and choose “Add New Callsign”:
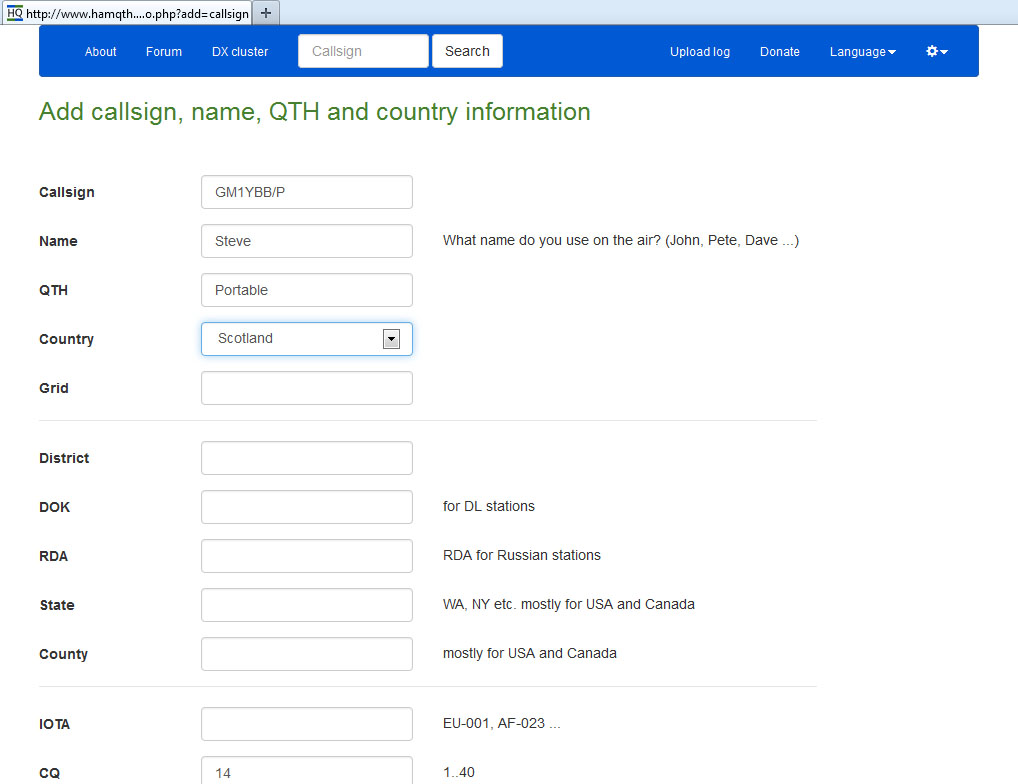
Fill in the new station details and scroll down to “Save” and save the new callsign:
You will be taken straight to the settings page where you can activate the logbook for your profile, set QSL settings etc:
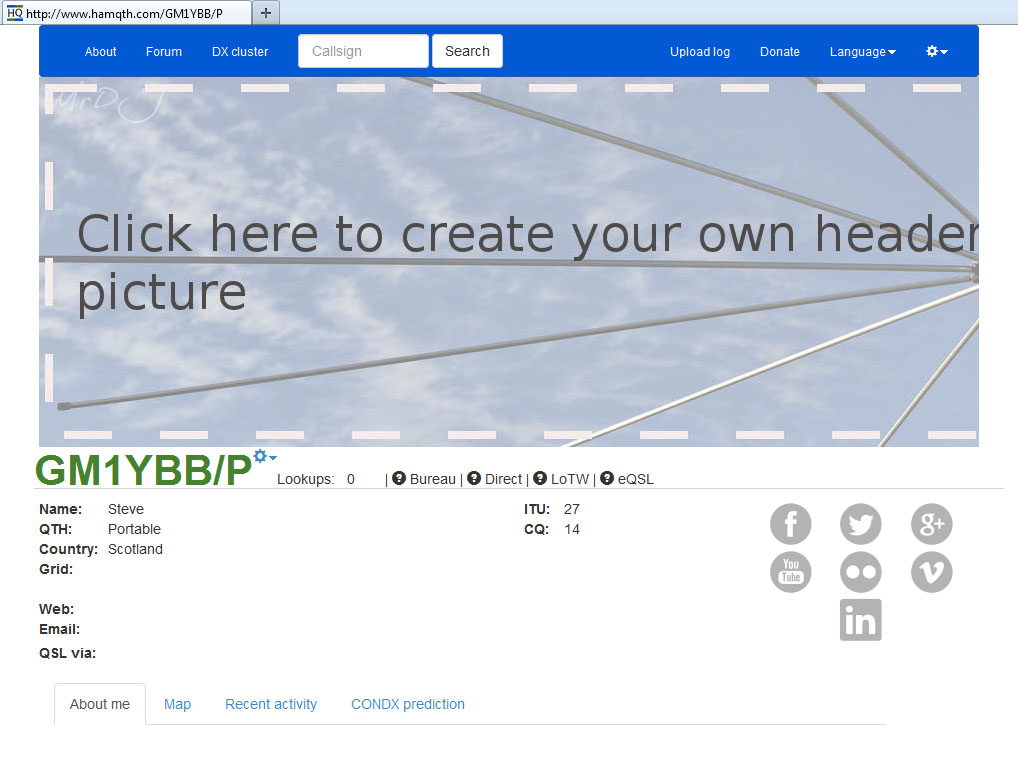
Once settings are made, scroll down to the bottom of the settings page and click “Back” which takes you to your profile page:
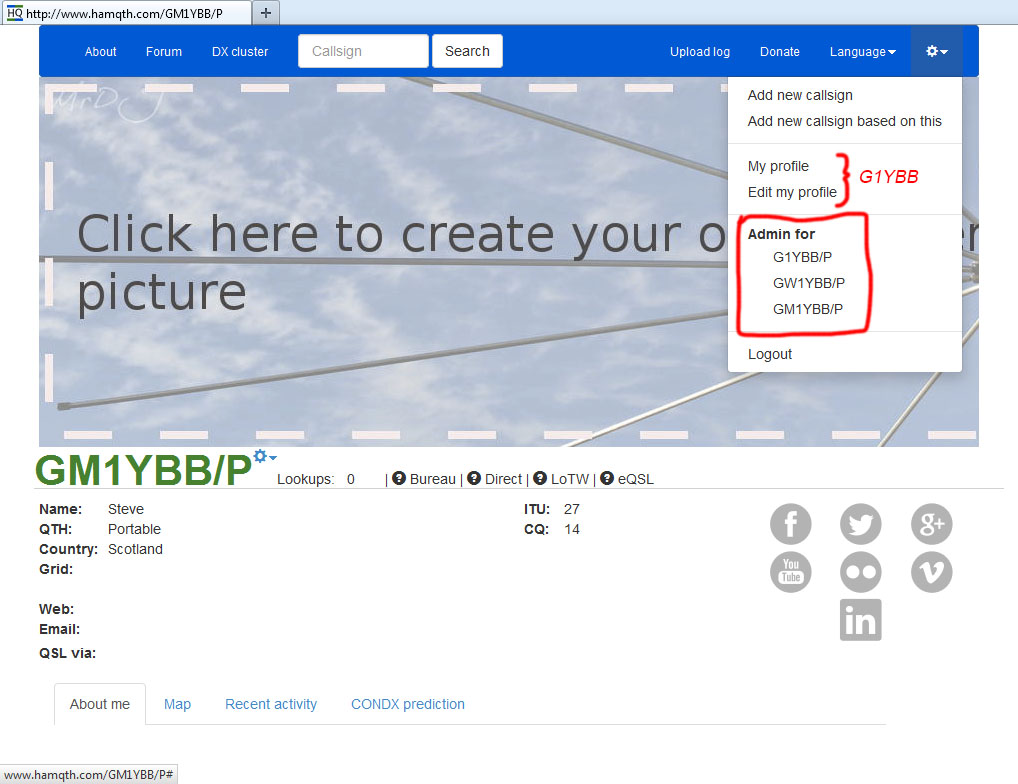
You can see all your created callsigns up on the settings top right:
HamQTH is now ready to accept your QSOs directed to the correct logbook via your logging software.
In Log4OM each callsign configuration you have set up will have it’s own HamQTH setting although some are common. Setting up multiple configurations for Log4OM is shown here.
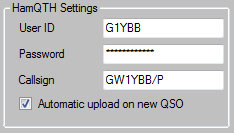
The user ID is your main callsign and the password is the password you use to log in to the HamQTH site. That is used for ALL variations of your station locations and callsigns. The unique part that identifies where your logging software uploads the QSOs is the callsign which must match one of the callsigns set up on your HamQTH site.
Here is the info entered into the Log4OM settings for my GW1YBB/P Waun Fach configuration:
Just change the callsign to suit on each configuration and QSOs will upload to correct log on HamQTH.
HRDLOG.net is the easiest of the online logging sites to get your QSOs associated with any portable or alternative callsigns you use.
All you need to do is set up multiple configurations in your logging software so that you can have one (at least) with the callsign used on the location. Setting up multiple configurations for Log4OM is shown here.
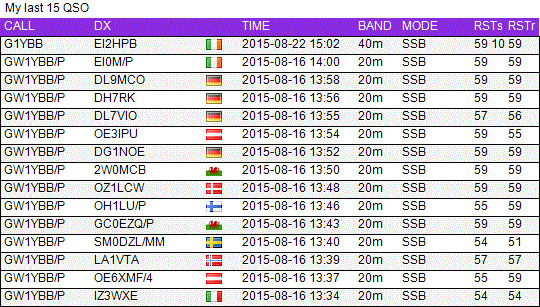
As long as your configuration has the station callsign set correctly (eg GW1YBB/P) HRDLOG will show that callsign used in your logbook:
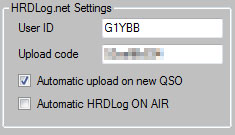
Set Log4OM (or your particular logging program) to have your user ID (callsign) and the upload key received by email when you signed up. Shown here in Log4OM:
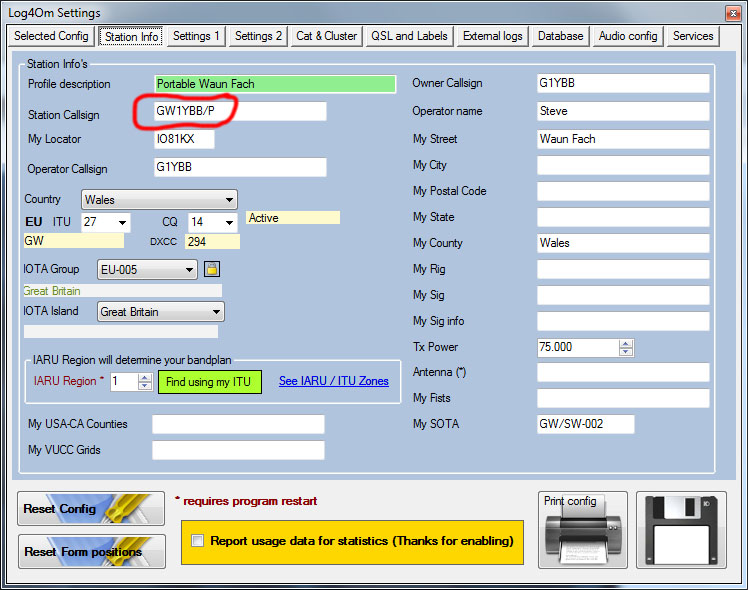
And station callsign set in station details for each configuration:
That’s all it needs to work.