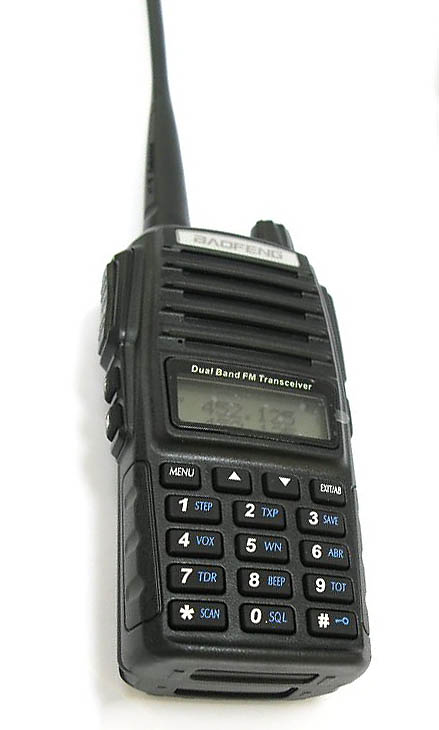
Due to construction projects I have had on the go for a while I haven’t been out to do much actual radio lately. But I recently purchased a Baofeng UV-82HP 144/432MHz handheld as I am driving up to the top of two 14,000feet+ SOTA summits in Colorado later in the year and thought it would be rude not to activate them. I got the handheld as the trip is with non radio friends and is for sight seeing so I wanted something small and quick to deploy. So when myself and YL found somewhere new to go for our weekend jaunt up the mountains I quickly checked if it was a SOTA summit and turned out it was, so I grabbed the 82HP and took it! I have not used it as yet so at least I could check it worked!
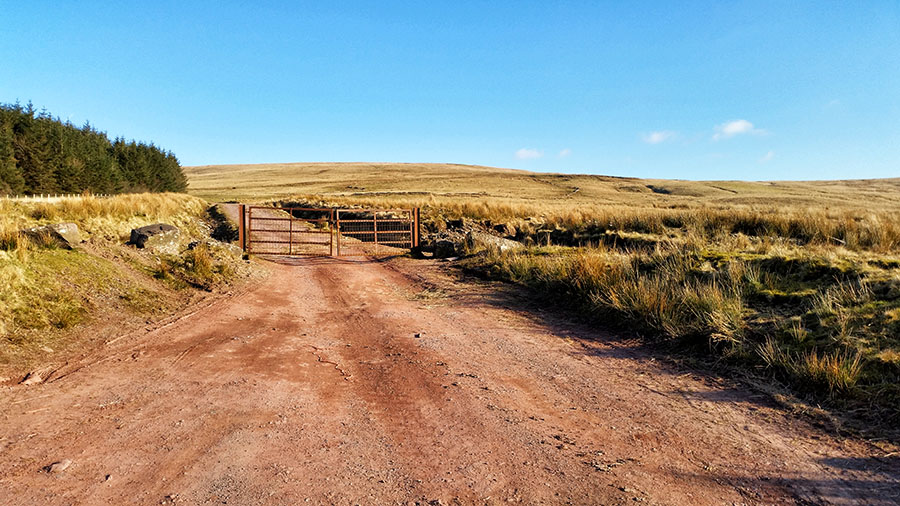
We parked at the start of the very well defined track leading us most of the way to the summit:
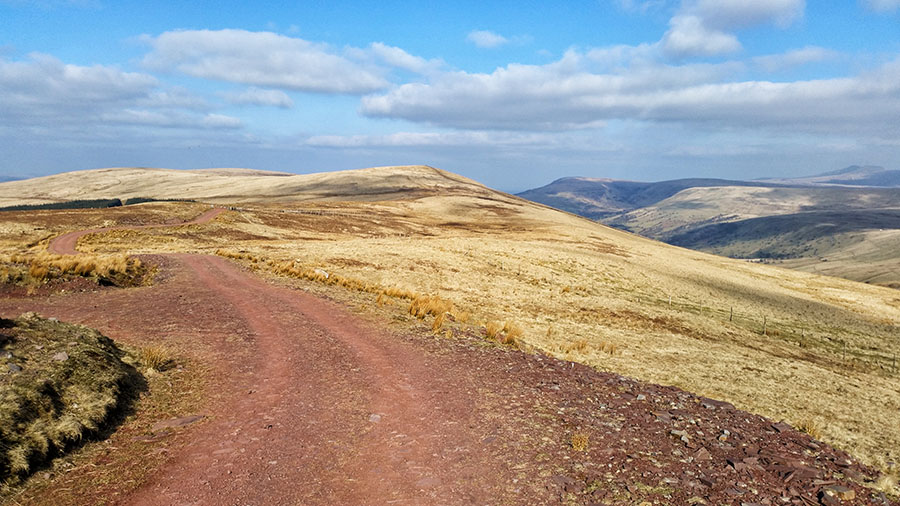
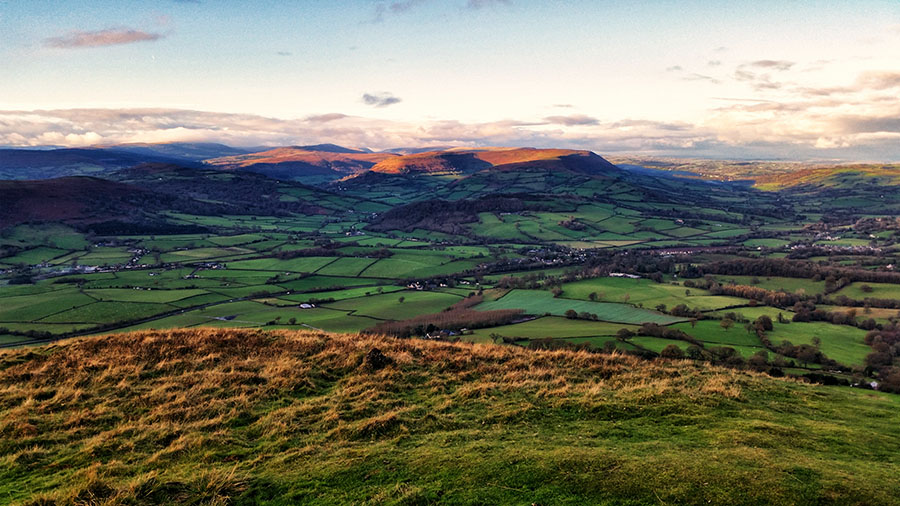
The day started cloudy but dry but turned out beautiful later. This picture was actually taken on the way back but is on the early stages of the track. That is Fan Gyhirych on the right in the distance:
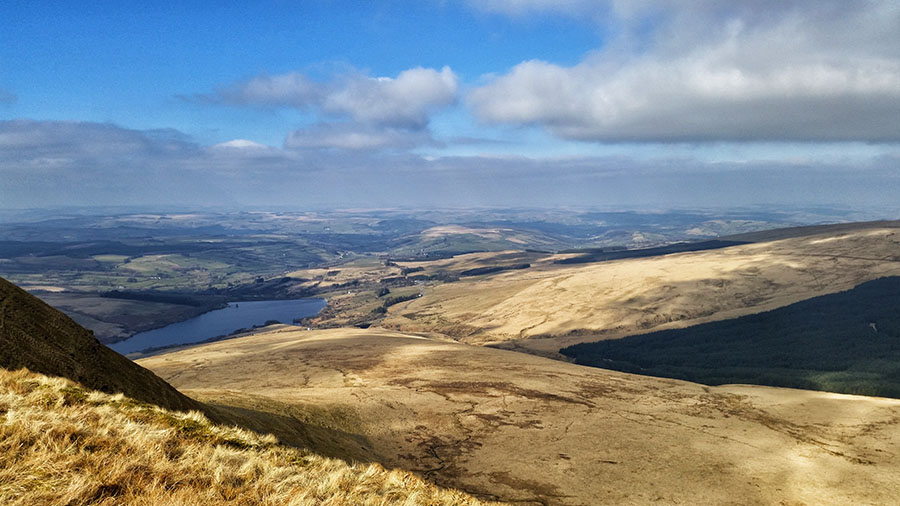
I had 3G coverage on Three network along the track which was handy as I could revise my rather hopeful estimation of arrival time on my SOTA alert! The view whilst updating my alert:
Once on the summit I was able to spot myself and my call on 145.500MHz was quickly answered. Moving down to 145.475MHz to carry on. First QSO I was a bit weak with the other station but after a call for QRZ when we closed I had a good strong station return. The wind was quite keen on our bare hands, my YL was logging for me as we were stood up. With 4 QSOs in the bag to qualify as an activation my further QRZ calls went unanswered so it was time to move on.
Heading back down the views from the summit ridge were great today:
All in all quite pleased with the little UV-82HP as people could hear me pretty well on its supplied rubber duck antenna. I did have an issue where it seemed to be slow in opening receive after transmit and as a result I often missed first couple letters of a returning call but I found some squelch tail delay settings to turn off which will hopefully correct this.
When I made my lightweight aluminium portable contest mast I designed up an ultralight strong mast guying ring to use that was both strong and light. I designed it for my friend to injection mould in a fibreglass reinforced plastic that is really strong. The material is so strong I could not damage a 1.5mm thick long credit card size sample by hand even across the edge of a table. All I did was hurt my hands.
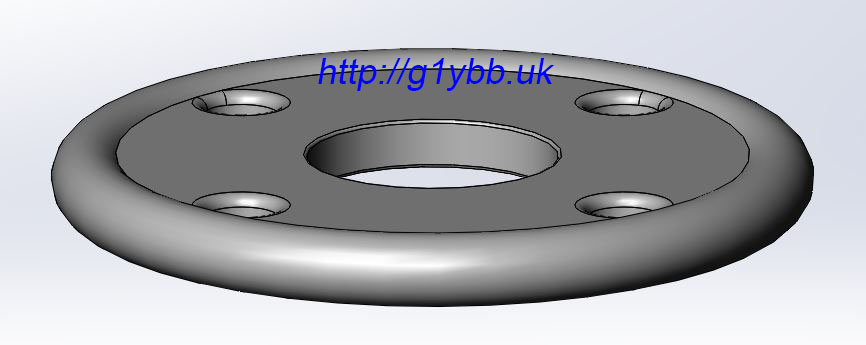
So with one eye on weight and one on strength this is the design I came up with. The design criteria was that these rings would hold up a mast carrying a decent sized 144MHz long yagi with at least a 5m boom on an exposed mountain summit in winds at least as strong as the tent will take but also be nice and light and small. They are very similar to many others you will see (there’s only so many ways a guy ring can be designed), but this is only 61.5mm outer diameter and 14.2 grams in weight:
I went for the simple 4 holes rather than extra holes for 3 point guying that some rings offer as it’s easy enough to just use 3 of the holes. Rope holes are 5.8mm which is plenty big enough for 550lb paracord or other ropes you would use with a lighter weight mast system. The centre hole is 20.5mm sized to fit the top section of my mast. For the lower thicker section it’s easy to open the centre hole with a step drill, in my case 26mm. 30mm is about as big as I would open it too though to retain full strength.
When the rings arrived in the post the first job was to test it for strength. I figured I would make a good test load. Just needed something to hang off and give it some welly. I am a good 170lbs, probably more with boots and big coat on. The rucksack is full of 2 litre bottles of water, probably a good 30lbs more easy. So about 200lbs bouncing weight on the guy ring. This is on a very short length of paracord. A longer length will absorb more shock like a climbing rope does:
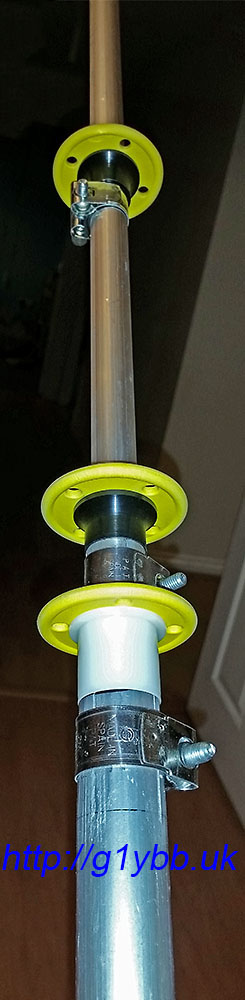
Once I was happy with them fitted to the mast and the guy ropes tied on:
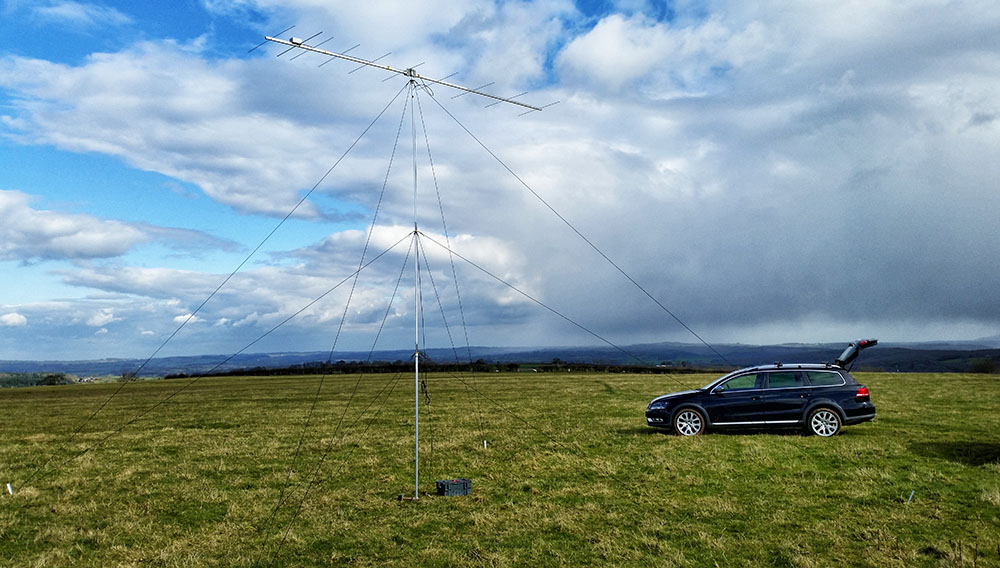
And in action:
These rings will also be very useful for SOTA activations where the very ultralight commercially available rings may be a little brittle without adding a noticeable weight penalty. Used for a fishing pole mast the mast will break long before these rings will!
I mentioned that these could be ideal for other radio hams doing SOTA activations and other portable operations wanting a very strong but lightweight guy ring he has made these available (pretty much any quantity) on his website: https://dura-id.store/product/lightweight-mast-guy-ring
Having just finished making a lightweight aluminium portable antenna mast for backpacking VHF contesting I wasn’t really happy with the initial way we were tying down the guy ropes.
Typically I have tied off guys that don’t have tensioners with several half hitches. These are quick and easy but they are hard to tie tensioned properly and I have lost two 19 element MET yagis, a Yaesu rotator and an aluminium scaffold pole when one guy worked loose on a windy day. I didn’t want to use tensioners on this setup as they can work loose and we are going to be operating from a tent and won’t see any loose guys until too late most likely. Also I’m using for this mast lightweight paracord which is meant to be good to 550lbs breaking strain, but I am wrapping that around fairly sharp edged aluminium angle guy stakes which might create a weak point on the paracord. The mast is not massive and I have 2 sets of main load bearing guys but I want this to stay up on exposed windy Welsh mountain tops.
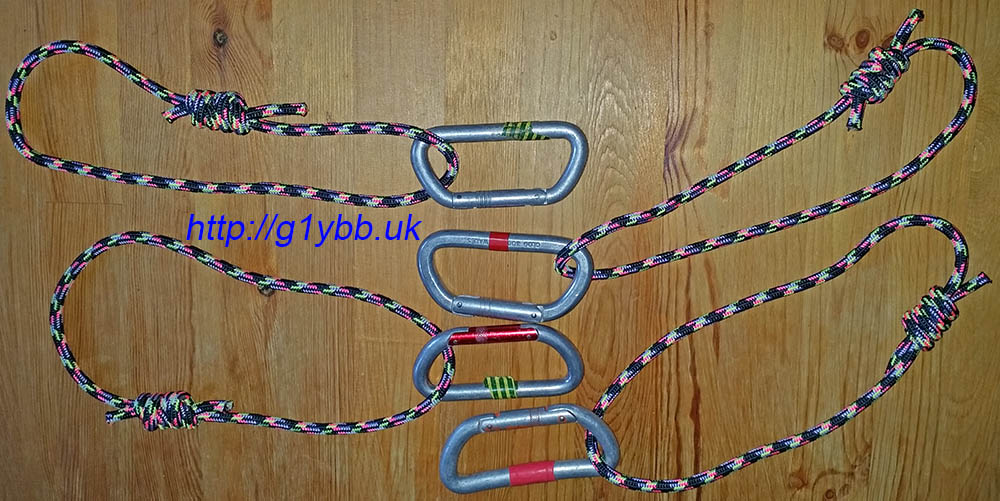
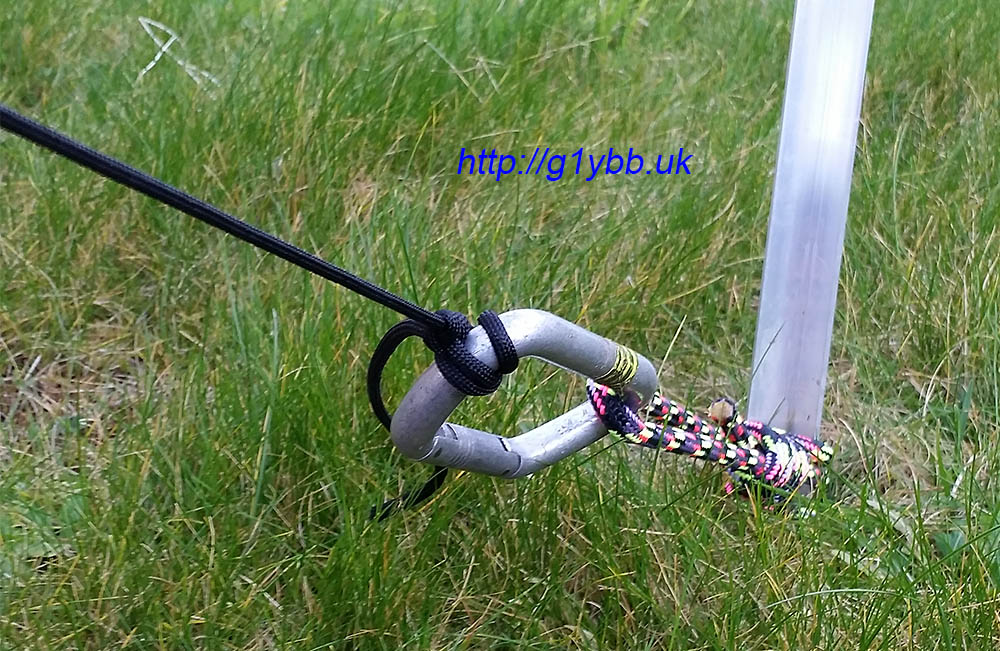
So I thought a round bar would be a better shape to tie the guys to and a clove hitch would be a good start knot as it can be tightened up. For the round bar I thought I would use some of my old climbing karabiners. And to attach those to the guy pegs I would use some small sized climbing rope about 6 or 7mm and use a clove hitch to quickly attach those to the pegs.
Here are the karabiners and rope loops. The rope loops were made from about 1m of rope each and a double fisherman knot used to make the loop:
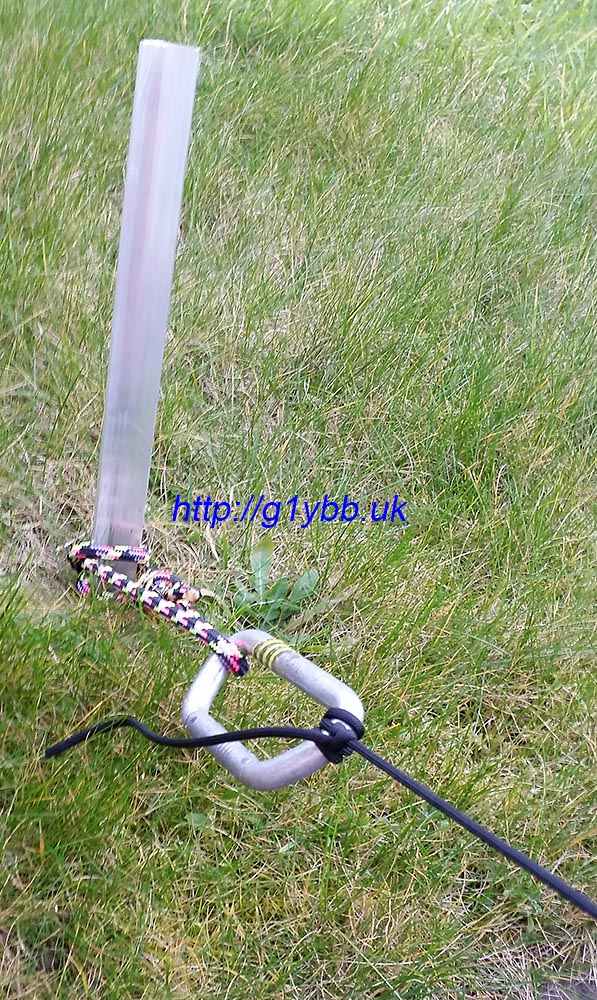
Once the karabiner was fitted to the guy peg it was very quick and easy to make a clove hitch and slip it on, tension, then lock off with a couple of half hitches:
This adds an extra 381grams to carry but I think it will be worth it in the long run. I could probably cut that down with newer smaller and more lightweight climbing karabiners (I’m not going to risk the cheapie ebay style mini ones) and probably a smaller rope would be OK to use:
This is one way of many options, I’d love to hear your methods and tip and tricks!
(email explained on welcome page)
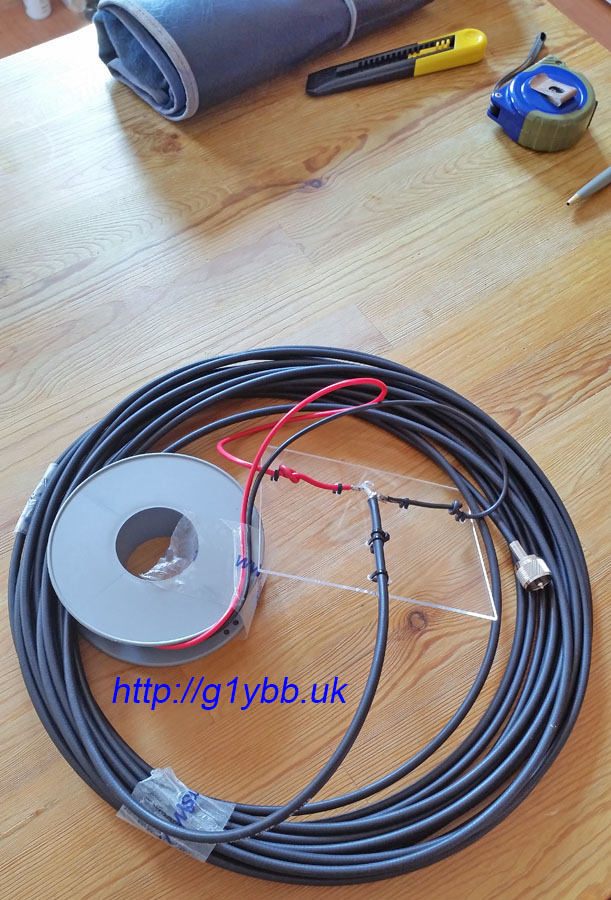
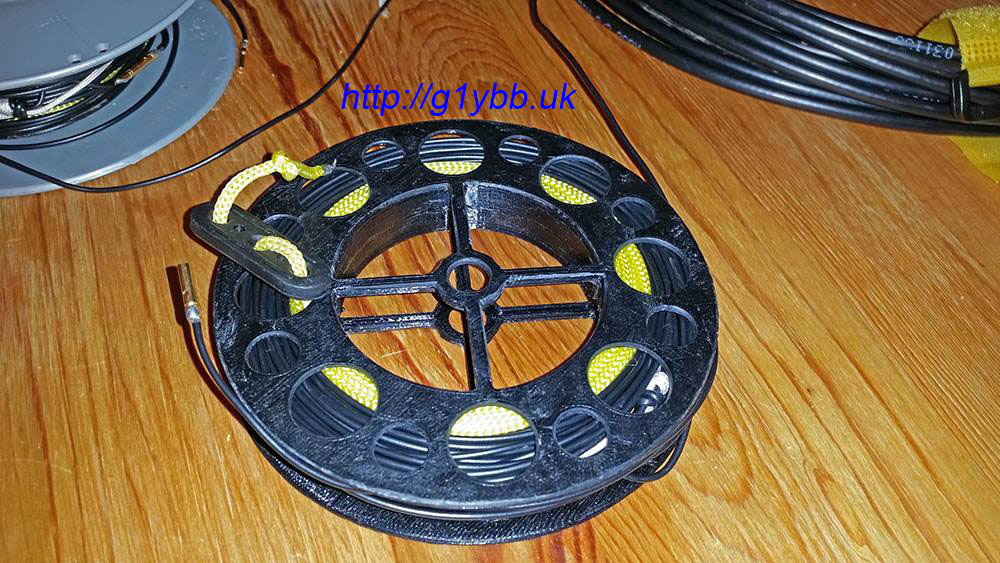
My portable HF 3 band linked dipole for SOTA activations I like to pack the wire away on a spool rather than a kite style wire winder. I find the figure of eight loops put kinks into the wire and I just prefer the wire to lie straight.
Since I made the dipole I have been winding both halves of the dipole onto one shared spool like so (picture is an older dipole but the spool is the same one I now use on the portable dipole):
I use this spool as it’s the smallest I have to hand and has the capacity for both wires including their integral guy strings each end. This is OK in that it keeps the wires lovely and kink free but it takes a while to wind them onto the spool, and bringing one half of the dipole to the other invariably involves unhooking it off every tiny thistle or twig on the ground. Also the two halves love to tangle together.
My dipole (described here) is for 20m, 30m and 40m with small bullet connectors for the links and is made from insulated 16/0·2mm wire with 3metres of 3mm nylon guy line attached at the end of each half.
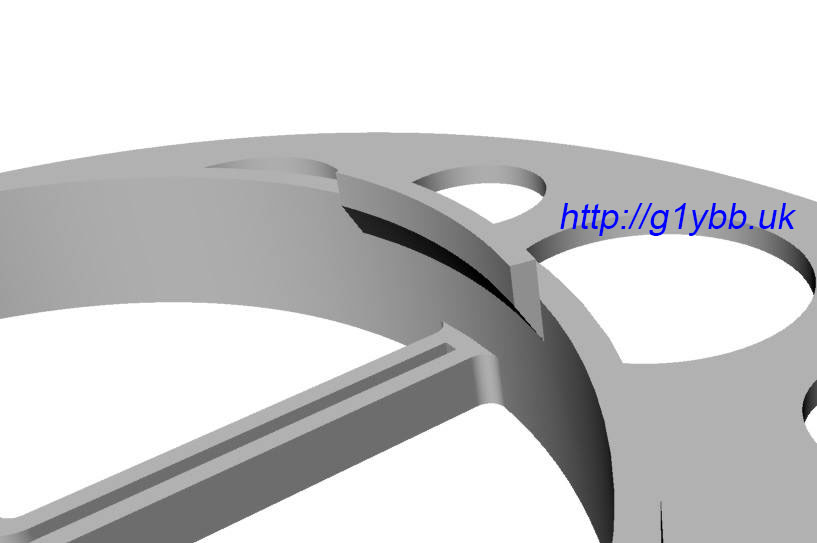
So I decided to model a smaller dedicated single wire spool to separate the wires and make deployment and packing away easier and faster. This would be 3D printed by my friend Paul so the design needed to be suitable for that, ideally with no time consuming support structures needed during the printing. It would be in ABS so a two part (identical halves) design was used which would be cemented together. The cement works like a weld essentially melting the two parts together. Loading on this part is very minimal anyway.
This is the design I came up with:
The design features were to be:
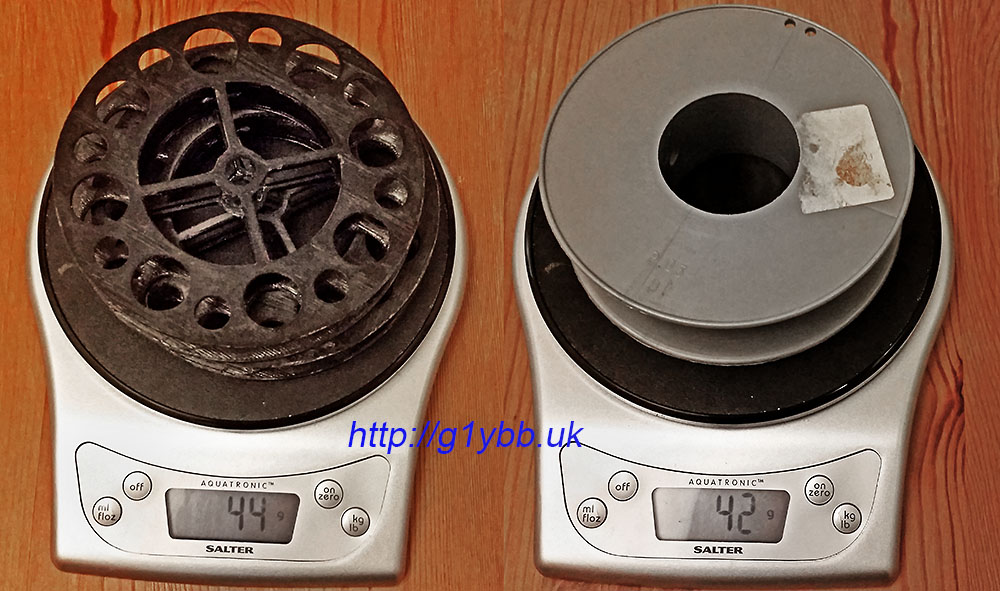
Lightweight. I wanted the two spools to be equal or less weight than the existing single grey spool. I am always aware of ‘feature creep’ upping the carry weight. A large central drum and shallower cheeks keeps weight down, as do the weight reducing holes.
Function. Obviously I need it to take all the wire without overflowing but not have so much capacity I was carrying dead weight.
Usability. I wanted to make it easier and faster to use. The larger internal drum size means more wire wound per revolution and the cross members in the sides are sized to allow a gloved finger from each hand to fit in quadrants 180° from each other to make a simple hand winding action. Additionally the larger weight saving holes were sized to allow the plastic guy locking buckle to pass through to make starting the winding up of the guy very easy.
Bonus features. I realised when adding the weight saving holes that a good airy pattern of holes would greatly help with natural airing and drying out when packed away wet. I also added some internal locating lugs that would self centre each half during the cementing together process (a request from Paul after the prototype build).
The 2nd version soon arrived and was tested with the dipole. It was definitely much easier and faster to wind up the single dipole half which fitted nicely in the spool capacity (that’s an open 20m to 30m link sticking out):
Deployment is extremely fast as the spool is small enough still to use a thumb and finger of one hand as an ‘axle’ on the centre hole each side (sized to take a pen or pencil for when it’s too cold for dexterous hands) and as I can now deploy each half where I need it immediately with no tangles I’d say deployment is between 2 to 4 times faster which is appreciated when the wind and rain is biting.
Paul has made a small improvement to the design for printing purposes. My location lugs had such a small surface area they did not have time to cool down before layers so he has extended them lengthways but removed the vertical part of the lug to keep the volume (and thus weight) the same:
Here are a final pair to make one spool fresh off the 3D printer:
The final weight for the pair of finished 2 part cemented up spools is 44grams. 2 grams over budget but I can live with that for the much better overall system:
SOTA HF dipole ready to roll, literally:
Quick demo showing deployment and packing away:
If anyone with their own 3D printer is interested is making use of this design Paul has made it available on Thingiverse and Youmagine.
(Obviously your wire diameter and lengths will dictate suitability)
As I was looking to resume my contesting activities but SOTA style backpacking (for the RSGB backpackers contests) I needed a lightweight portable mast that is strong enough to stand up to some Welsh Mountain top wind and hold up a decent yagi. I looked around the Internet to see if anything was available already but nothing seemed to fit the bill for me. So I decided I would make one myself.
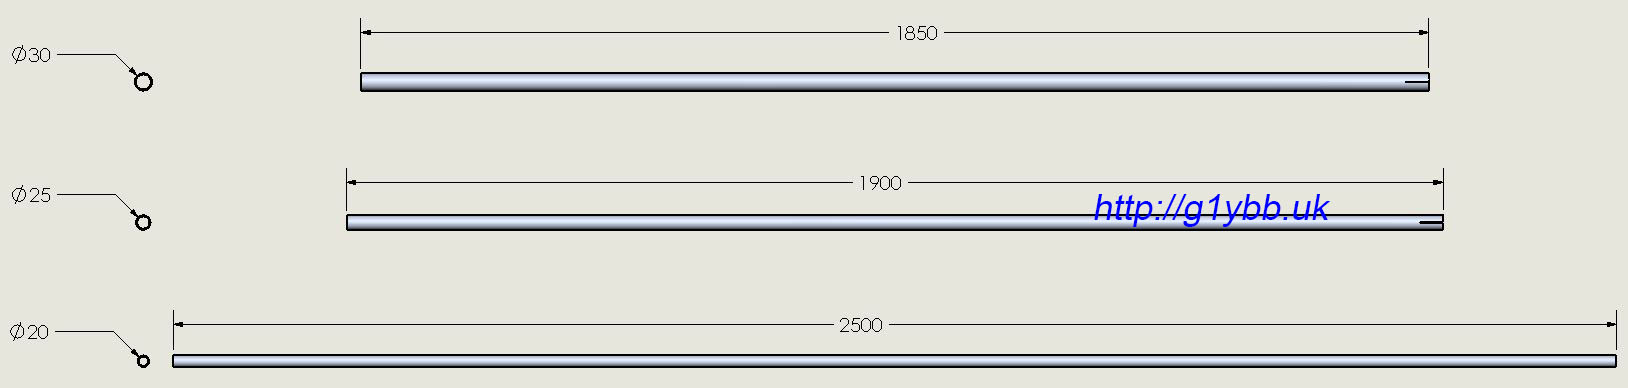
The biggest problem I had was finding tubing that was available and would telescope inside each other. The UK still mostly stocks imperial sized tubes, and each size seemed to be a fraction of a mm too big to fit in the next size up. I did find some metric tubes with a 2mm wall thickness in 5mm diameter step sizes. The sizes were 30mm, 25mm and 20mm. I would have preferred the smallest to be a little bigger like 25mm but I figured it would be OK well guyed.
I wanted the mast to be telescopically erected like I do with the SOTA fishing pole mast so I worked out how high I could reach and modelled up the mast in 3D CAD to find out what the end result would be and what length tubes to order. Also so I knew what lengths and total length of guy rope to buy. Also by applying correct materials to each item and modelling them exactly it enables me to know with pretty good accuracy what I am letting myself in for weight wise for the entire system:
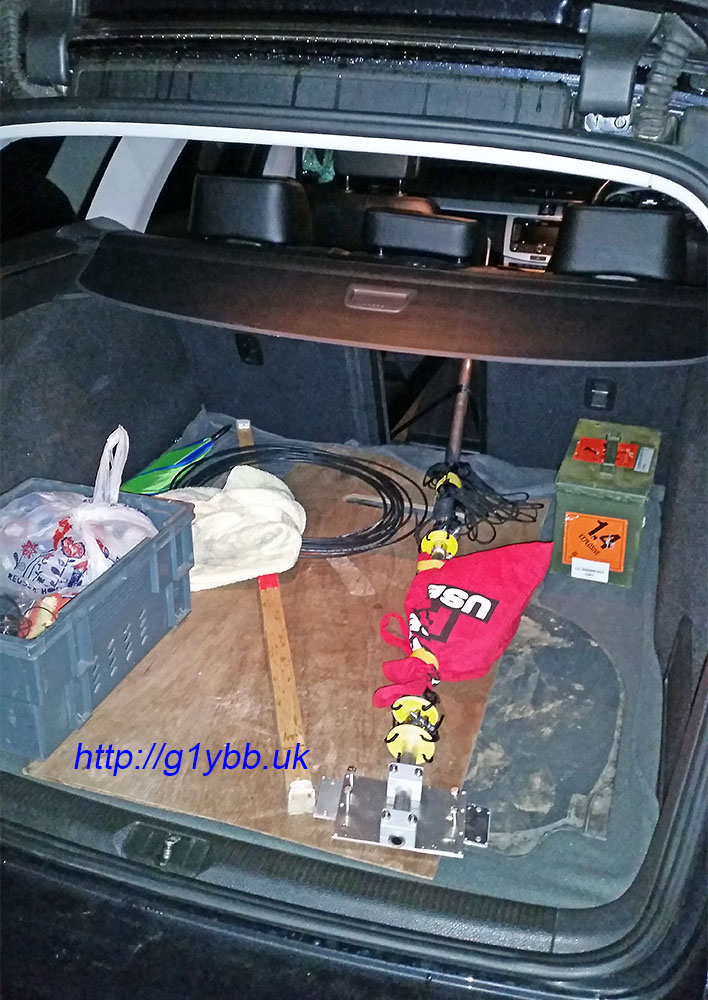
I decided to make the top section longer, both to get a little extra reach and to have a little extra to leave the antenna fittings permanently attached to reduce assembly time. It’s a little long to carry at 2.5metres but should be OK:
It does fit inside my Passat estate very nicely though:
Using these lengths and with 300mm of pole overlap a maximum height of 5.65m is achievable. Removing the thickest section enables me to keep it to the 4m limit nicely for backpackers and save about 1kg of weight:
To clamp each section I planned to slit the ends in the normal way and use jubilee clips (worm drive hose clamps). Talking to a friend he suggested a different type of hose clamp with a bolt so it would ultimately be stronger. eBay came up trumps and I ordered three clamps like this:
Then I just had to cut slits for the clamps to compress the tube down. The difference in diameters are 1mm so I needed to lose at least 3.141mm off the outer tube. Four 1mm hacksaw cuts did the job. The heavy duty hose clamps are nice and wide (20mm) which helps increase the clamping area:
I wanted 3 sets of guys for the full height mast, one at the top of each section. I would be using 4 guys rather than 3 as it suited my expected erection method. No commercially available guy rings I could find would fit so I discussed options with my friend and he offered to injection mould me some from a very strong and light plastic which would be perfect. I modelled that up and sent him the design:
More details and load test of the guy ring are here. As two rings would be on the 20mm section it would be moulded to fit that and I would enlarge the bore for the next section down with a step drill.
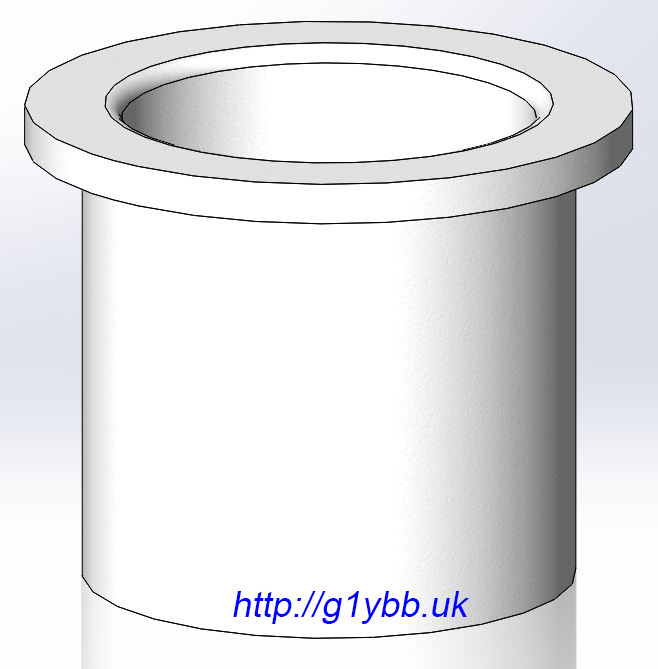
To sit the guy rings nicely I added some nylon bushes to hold them above and clear of the hose clamps and also to enable practically friction free rotation. I was able to find online an existing bush to fit the 25mm pole but not the 20mm pole. Luckily I have another friend who works in a tool room who turned me up what I needed in some nylon.
Commercially available bush, 25.5mm bore for mid section:
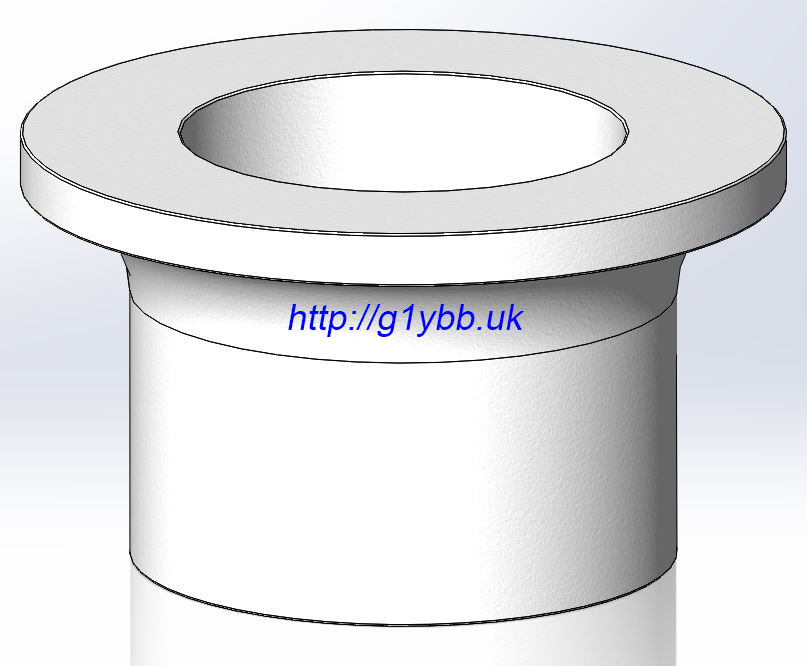
Custom made bush for 20mm top section:
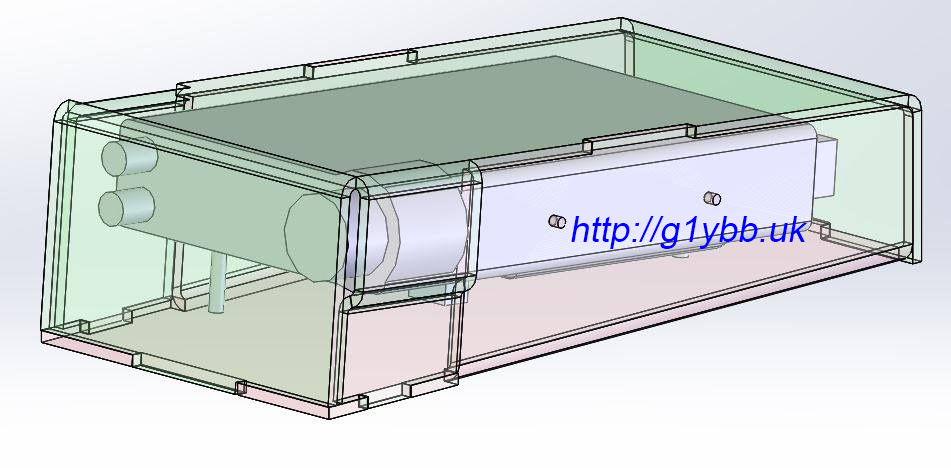
Section view of bush in use (bush in blue). The idea of the bushes are they lift the guy ring away from the hose clamps to reduce risk of guy ropes snagging on the clamp, add a low friction intermediate interface between the aluminium tube top or the hose clamp and offer a flat surface for the ring to seat on to reduce the chances of the ring jamming diagonally across the pole:
For the guys themselves I looked at various ropes and cords available and decided on 550lb paracord. It’s light and strong and not too expensive. From the 3D model I was able to buy the right amount and predict where to place them allowing me to scope out my intended site to make sure I had room to set the antenna system up:
Whilst things were coming together I decided to calculate the wind loading on the 9 element DK7ZB I was also building. The loading on the 20mm square boom alone was quite frightening at typical Welsh mountain top wind speeds and as I am using trusses to support the boom that increases the boom height above the guy point and I was concerned about the small diameter top section. So I got a short length of 5/8″ T6 alloy (the whole mast is T6) that was a perfect fit in the 20mm tube so added that to the top section to span a decent amount either side of the guy point. An M2 countersunk screw was used to just hold it in position:
Close up of the bushes and guy rings before fitting the guys, which stay with the mast to make deployment faster:
First trial erection went completely to plan, set up on my own.
The finished weight of the mast INCLUDING guy rings AND guy ropes is about 3.5kg. It’s actually currently weighing 3.7kg but that includes some aluminium blocks and plates, and stainless steel bolts, that are part of my yagi mount so not actually part of the mast. It doesn’t include the guy pegs and hammer of course. However for backpackers contests I can save nearly another 1kg by leaving the 30mm section behind and still achieve the 4m height limit. For the guy pegs I bought some 25x25x2mm aluminium extruded angle and cut them into 50cm stakes. The 4 stakes weight 387grams for all four including a bit of mud still on them.
And with a 144MHz yagi:
In order to stop it spinning in the wind as I was using Armstrong Rotator method, I came up with a simple clamping system using some 3D printed half round pressure clamps and a bicycle quick release to lock/unlock it. Arm fixed in place to the ground with a simple guy peg:
As I use my new Yaesu FT-857D for portable operations including backpacking for things like SOTA activations I wanted a way to transport it securely to keep it from getting damaged. I have seen the select knob broken off on FT-857Ds so did not want that to happen. And keeping it from getting bashed and scratched would be nice whenever possible.
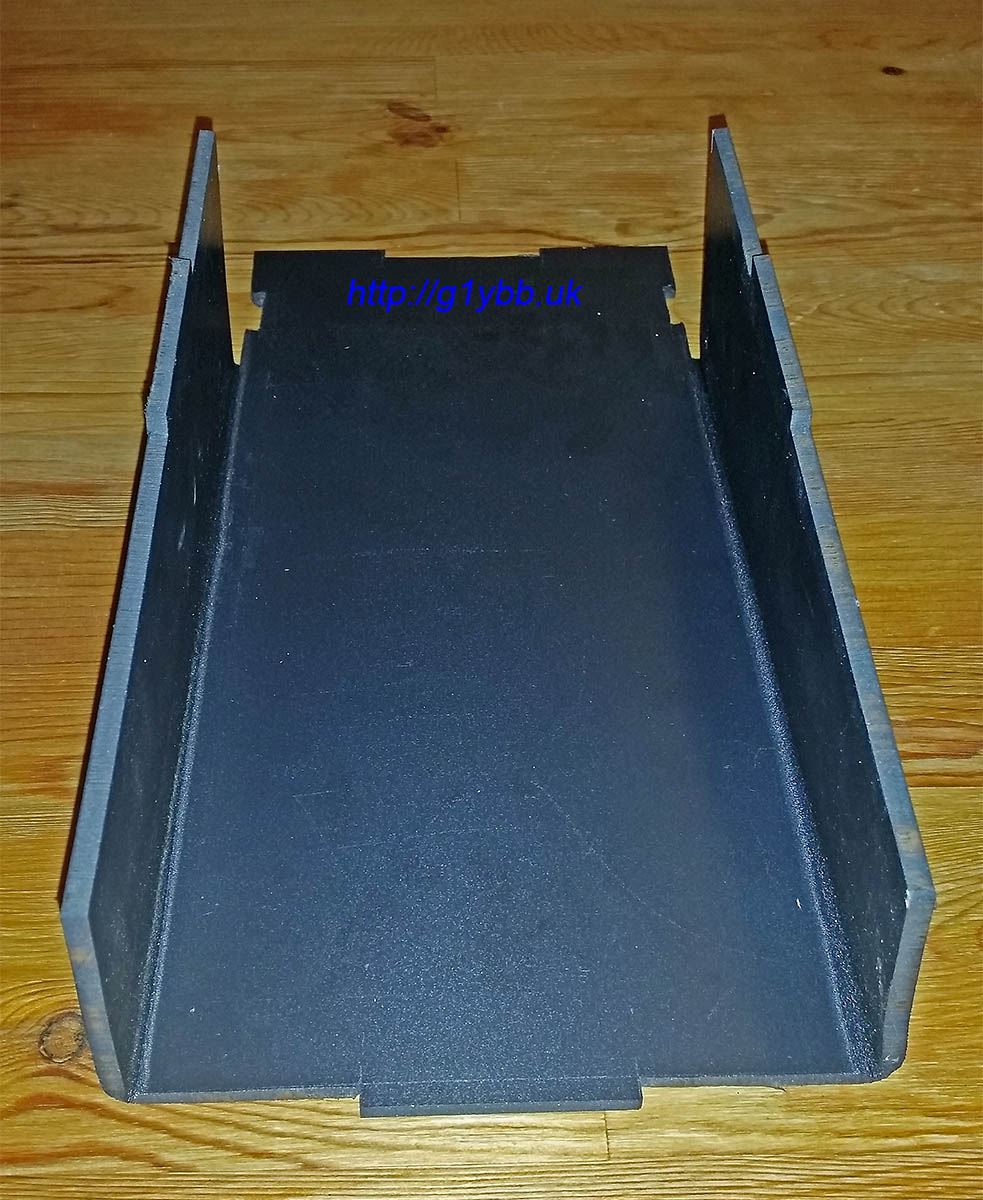
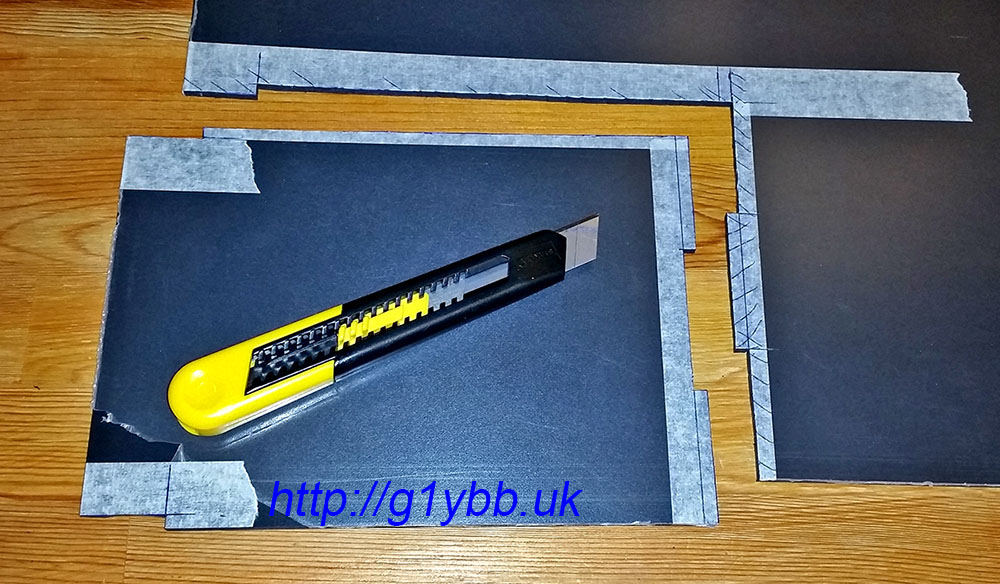
For my initial SOTA activations and portable operations I carried the FT-857D in a Lowepro camera rucksack inside my main backpacking rucksack. This kept it nice and safe but weighs over 1kg total and takes up a lot of space so I needed a better option. I didn’t like the look of any of the tube based manpack builds I saw on the internet a lot so I decided I needed to make something as I could not find a suitable lightweight container I could use. Talking with my friend he suggested some Foamex sheet that he uses as it is quite light and strong. This seemed like a plan so I drew up a two part cover using some 5mm Foamex which seemed strong enough to support the weight of the radio: The pink half will be fixed to the radio using the mobile mount screw holes and the green cover will slip on and be retained by a Velcro strap. The fixed base protection will allow it to be used on grass and stones without any damage or dirt ingress. The green cover protecting the knobs from damage in transit in the rucksack. The microphone will be retained in the space at the front, in a bublewrap bag. The 3D modelling predicted the total weight of the two parts of the protection to be about 500 grams.
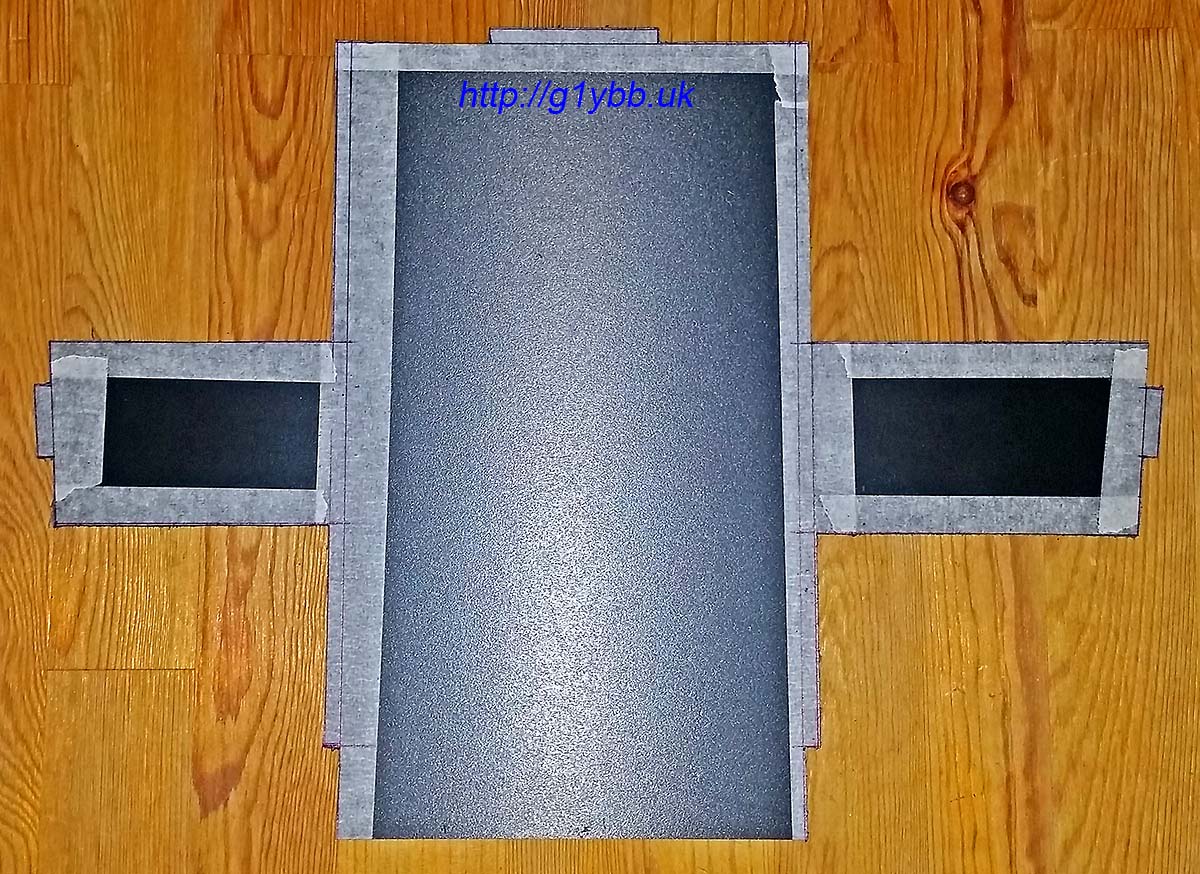
I planned to use heat to form the shape of the parts, so marked out a sheet for cutting first using masking tape:
Next I took it up to my brother and got it cut out on a bandsaw then scraped all the sharp edges off with a steel ruler (my favourite deburring tool). Next job was to fold up the sides. My brother already made me a piece of MDF to match the width of the FT-857D to fold it around. I used a heat gun to soften the foamex and fold it up, holding in shape till cooled with a glass worktop saver:
Both sides folded up:
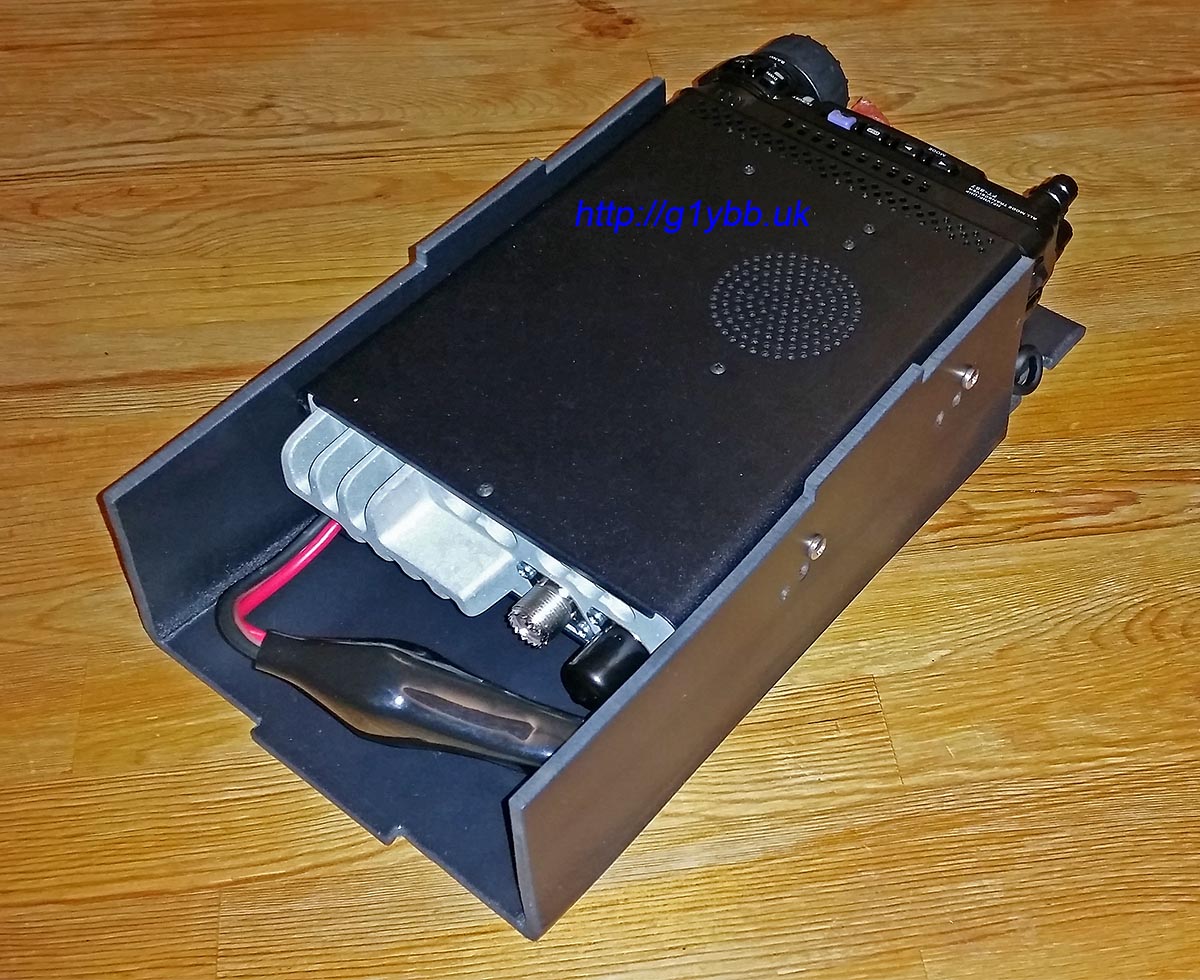
Next drill some holes in the sides to mate with the mobile mount holes on the FT-857D. The rear extension will protect the DC input filter and the front will carry the microphone:
The sides are higher than the radio for the lid to clear the band Up Down buttons when fitted. Unfortunately the foamex panels I have available were not big enough for the lid as it has flaps on four sides making it take up more real estate. So I decided to make it in two halves and cement them together. The front half will be the more complicated one as it has to go around the tuning knob bulge so I started with that half:
The folding up of this part was more complex with staggered shapes but the length of the folds were shorter so at least it was a bit easier. It took a little reheating to get the shapes to sit exactly where they needed to be so the cosmetic appearance was not as good as I would like but mechanically the material still seemed structurally sound:
As the rear half of the cover was simpler I decided to cut it out with a knife rather than take it up to my brother to cut it with a band saw. It was straightforward enough just a bit heavy on one hand and shoulder:
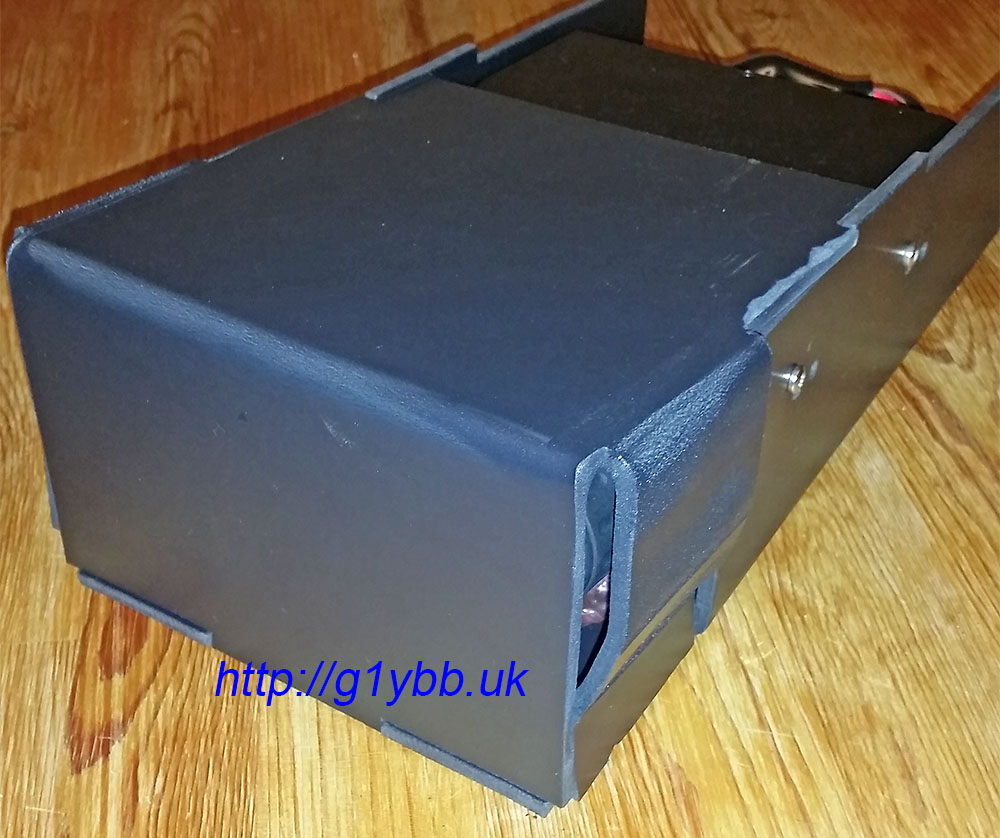
And folded up and glued to the front half:
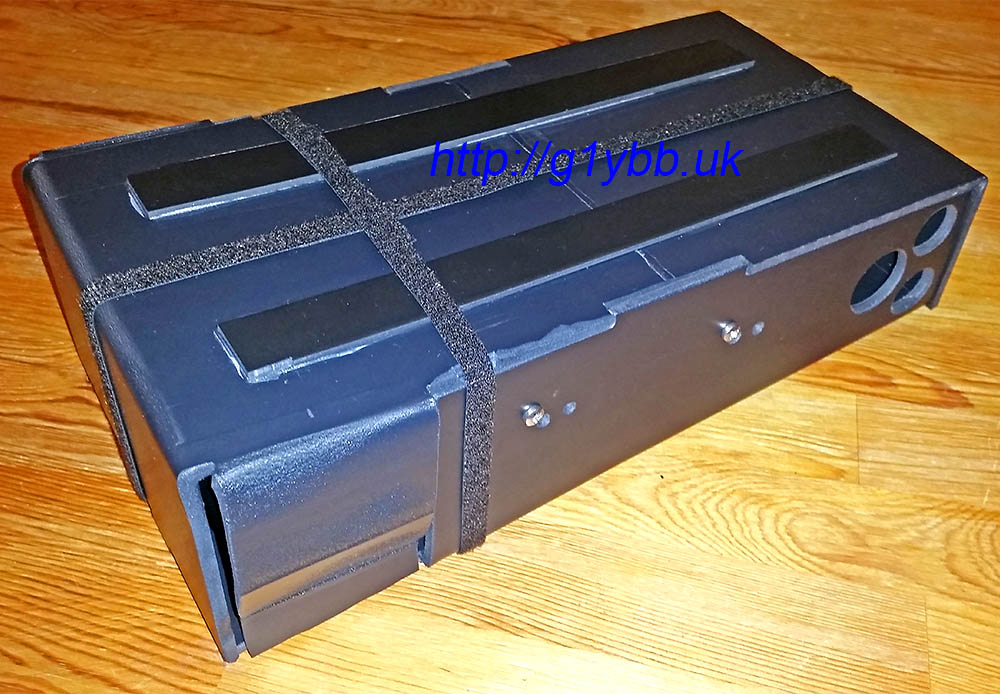
The join felt a little weak to be so I decided to glue some strips of thinner foamex along the top to strengthen it, and also make it a feature I could take advantage of. I could stand the base on the cover when operating to raise the operatin heaight and angle up and use the strengthen strips to locate the base so it didn’t slide or get knocked off. I added feet to the base to locate on the strips and finally drilled some airflow (and lightening) holes either side of the PA heat sink and along the base to recover some of the added weight from the strips. The video below shows the strips and feet in action. I decided to ditch the bubblewrap bag for the microphone and utilise the button for mic clips and drill a hole in the base for that to locate in and secure the mic in position with a small piece of foam. Finally two 10mm strips of Velcro keep the lid securely on and are located in small notches to stop the Velcro from moving in transit:
I’m looking forward to getting out and using this soon. The only cost to me was the Velcro from eBay and the glue, the foamex I am lucky that a friend had some to give me. I think the 540grams extra weight is worth the piece of mind knowing the radio should be safe and it takes up very little extra room than the radio itself and a lot less room than the current bag I have used to transport the radio. It’s not as cosmetically attractive as I would ideally like but this is the first time I have used this foamex and formed it with heat.
Finally here is a video showing how it looks in action and how it goes together for use and transport.
Edit: To assist others who may want to make their own version, I have added below the drawings I worked from to mark out and cut the two halves: Base Drawing Top Drawing
As I am using a Microsoft Surface Pro 3 for logging on some portable activations and have it on my knees when operating it means I am sat in a fairly stationary position for longer periods. I was using a foam garden kneeler as they are very light and nice and cheap. But a couple of hours on that and I had to pack up and go home due to a sore butt!
But how does it weigh up to a lightweight kneeler?
Here is my kneeler:
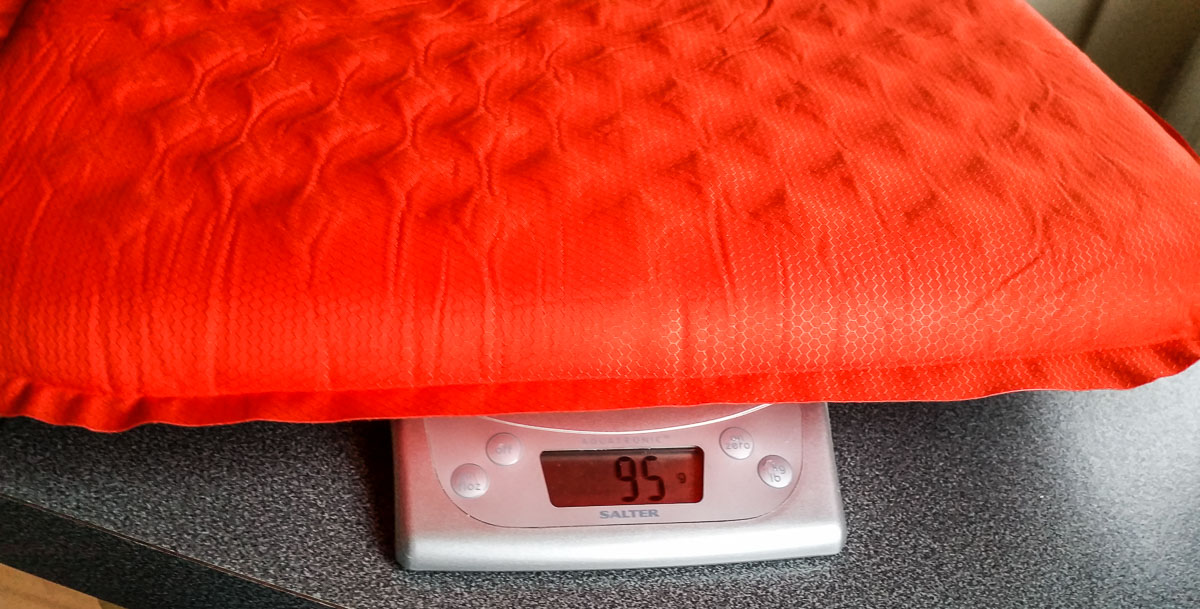
And the new comfier seat:
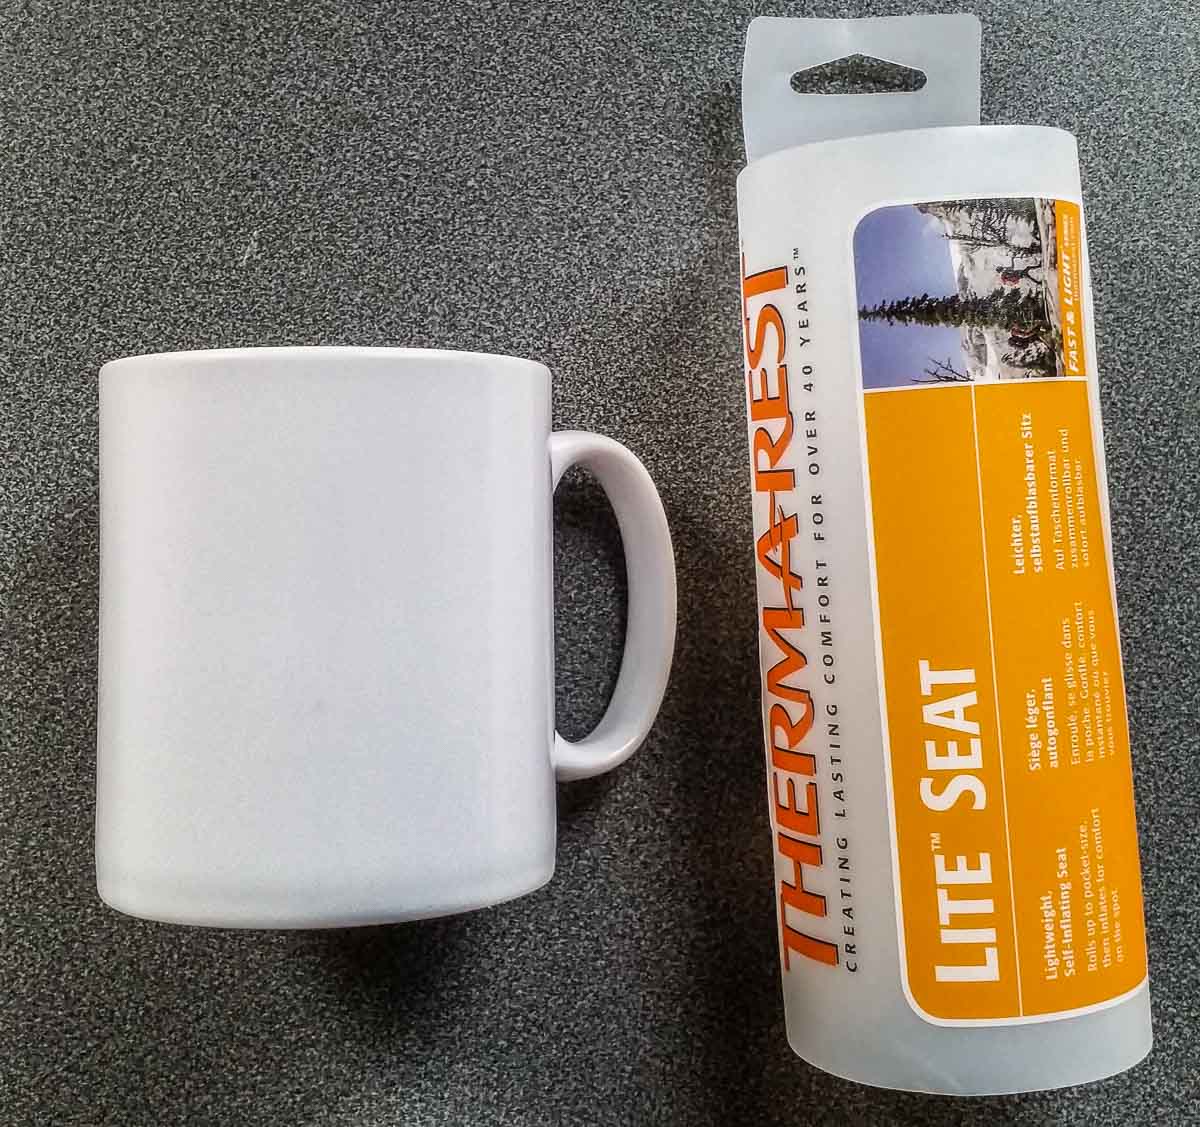
Only 9 grams heavier. But it packs down quite a bit smaller. This is the tube it came in, which I shall use to pack it, and it is pretty small. Next to a normal sized mug:
Looking forward to trying it out on my next portable SOTA activation.
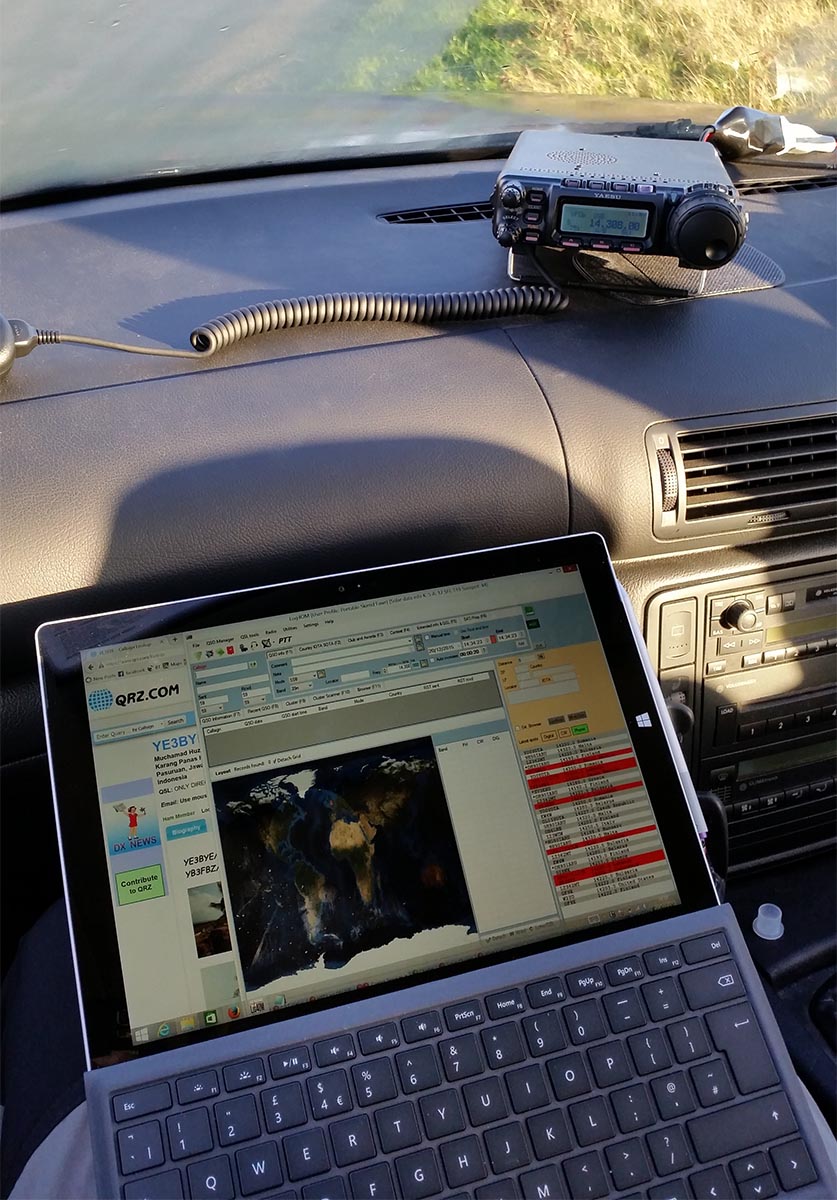
I have a drive on site North of town which is great for setting up mast systems and testing/building antennas but I have been looking for somewhere a bit closer to home and also a bit quieter on HF. Also in times of prolonged wet weather (like now!) access my usual site can be prone to getting stuck in the mud in my 2WD car. As there looked to be good activity today on 20m and 40m I decided to pop out for an hour or so to test a new site under 15 minutes drive from me that I have been considering. It’s relatively high for the area, a pretty clear take off and I was able to find a spot to pull off the road that was fairly clear of houses and power wires to erect the inverted V link dipole I take for SOTA activations:
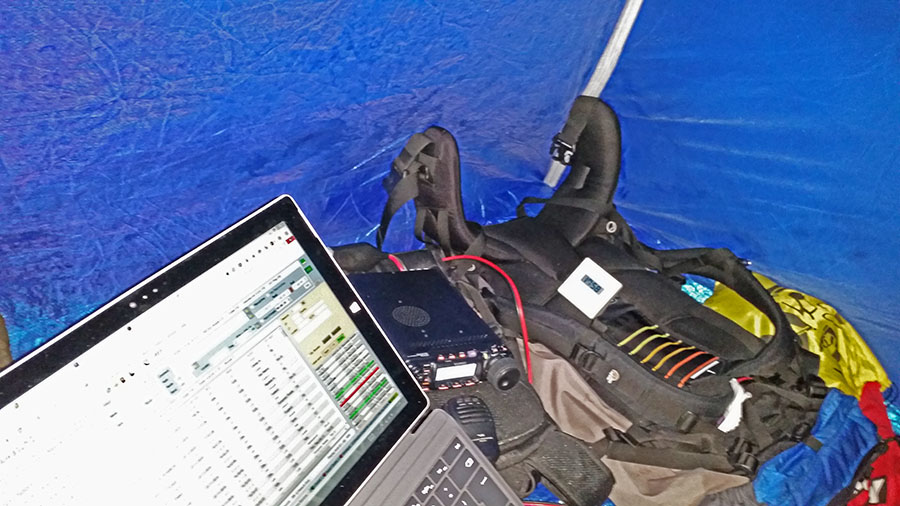
The site gets cell coverage so I had the luxury of using my Surface Pro 3 for logging with Log4OM and online lookups on qrz.com via my phone as a WiFi hotspot:
For power I used one of my 8400mAh LiFePo4 batteries I also use for SOTA activations as I don’t have my car wired up to power the radio.
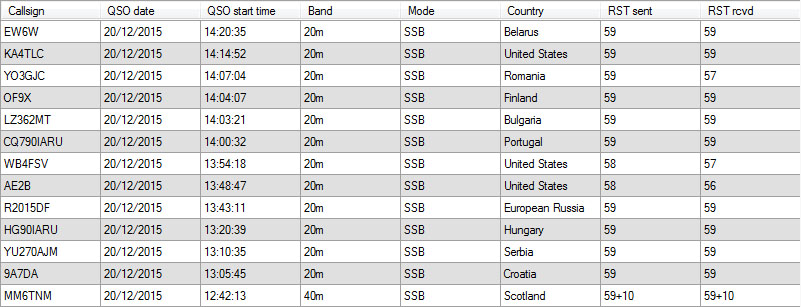
I was pleased to get no noise at all on 40m and 20m so that is a bonus. Bands were fairly busy with some strong special event stations and many calling them. I tuned around getting in where I could. I could hear several USA stations calling in strongly and managed to find a few calling to work. The battery wasn’t newly charged so I only worked for about an hour an half but it was nice to get out and try the site out. Looks promising and should be ideal for final assembly and tuning of my forthcoming cobweb antenna build.
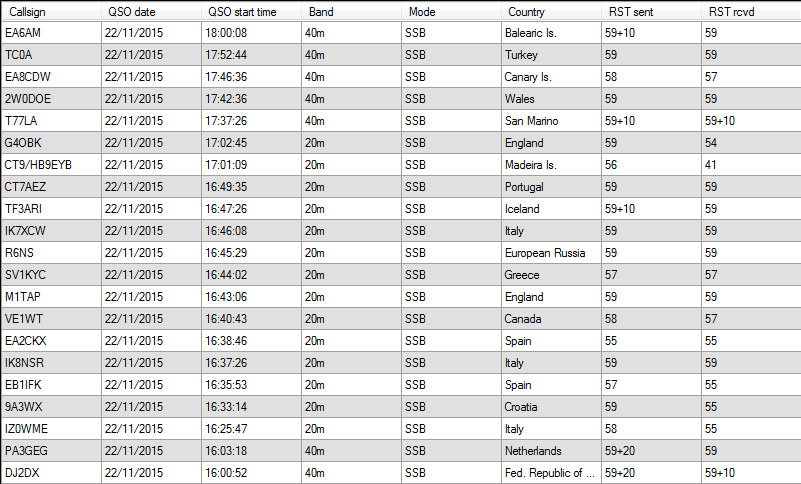
Only 13 QSOs but happy with a quick spell on the radio:
For my SOTA activations and HF portable backpacking operating I am using a 3 band link inverted V dipole and winding the dipole up onto a small round spool. Now the colder and darker months are here I was interested in the wire winders a lot of people use. My friend 3D printed me one to try out, but I did not like the kinks it puts into the wire so I decided to keep to my spool method as it keeps the wire lovely and straight. But we thought we would evolve the winder into one suitable for the 4 string guys I use to keep the mast up.Up to date I have been looping them up and tying the loops with a loose overhand knot. This works quite well and adds no weight at all. However it can be fiddly with gloves and although unfurls nicely 90% of the time but sometimes does get a knot or small tangle, which I can do without now winter is upon us.
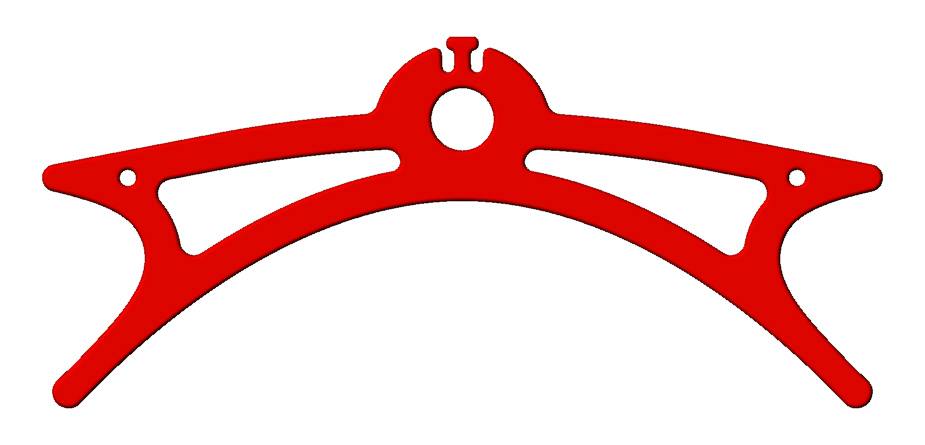
The initial design used was based on one download from a 3D print site, but I wanted to make some improvements by extending the length and deepening the scoop in the middle and adding some function for an elastic loop to keep the string tidy when wound up.
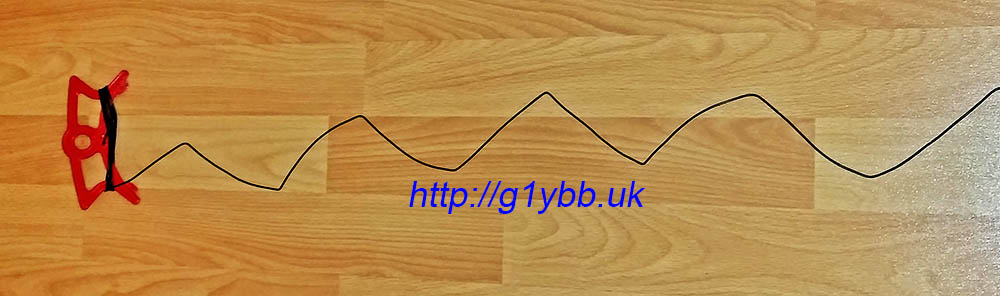
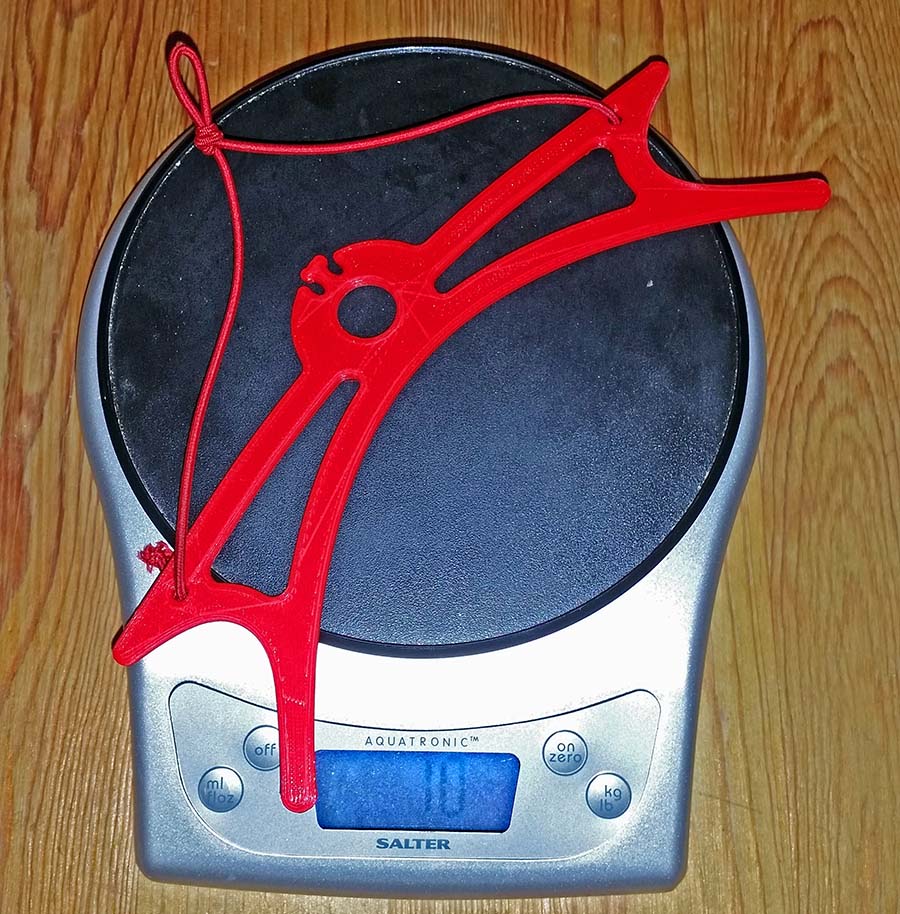
This is the model Paul came up with during our discussions. Deep winding Vees and deep scoop, but with minimal weight. It will be printed in PLA not worring about it’s longevity as will not be outside for long at a time and a nice bright conspicuous red:
And here is it dimensioned up:
To use these winders you need to wind them in a figure of 8 fashion both to unwind nicely and also to not introduce twists like this:
This is how they should be wound:
And when wound like that this is how easily they are unwound:
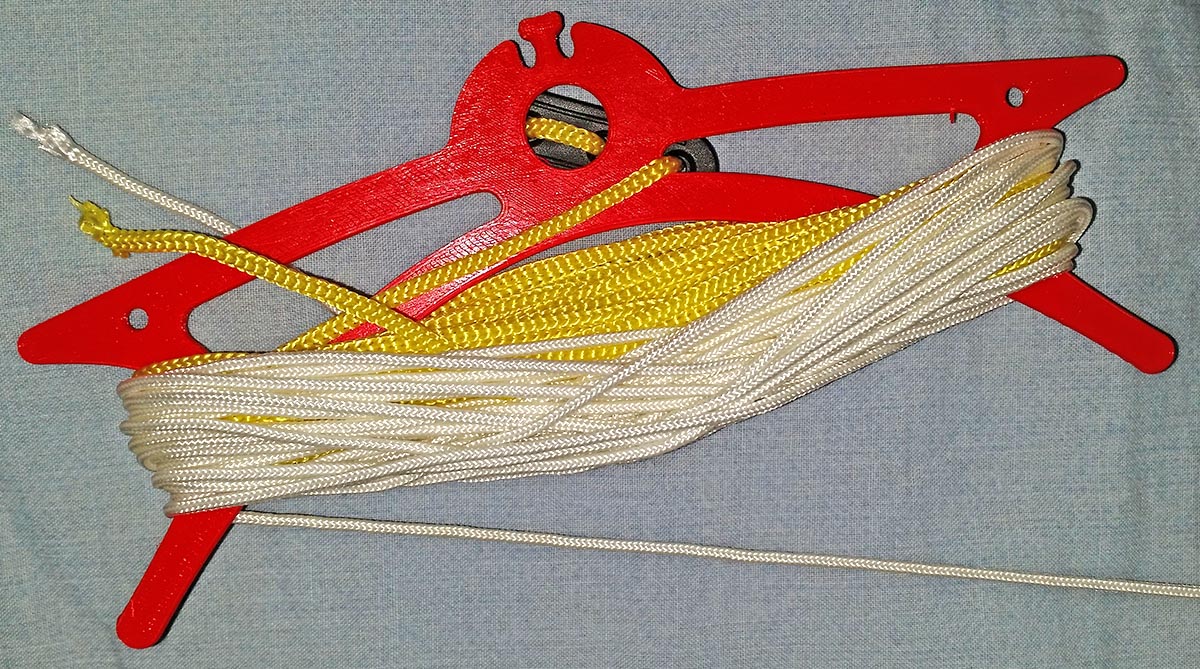
To retain the string nicely some elastic cord from eBay was added. A loop tied in the middle to make fitting and removal of it easy. Finished bare winder weighing in at 10 grams which tied up with the 3D model prediction:
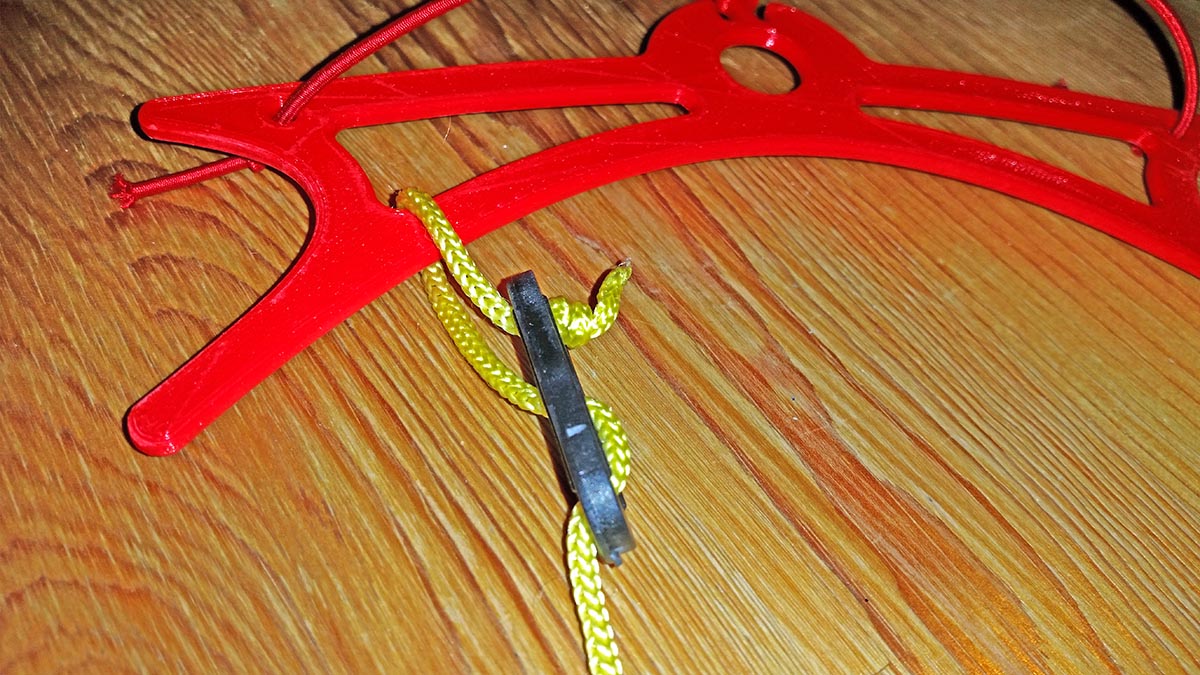
To save having to tidy them up and possibly misplace these in the field I have attached the guy through one of the loops in the frame in the same loop that will go around the guy peg. This will actually also help me to slide the tensioner up the line easily with gloves on as I like to pack them away with the tensioner at the bottom of the guy:
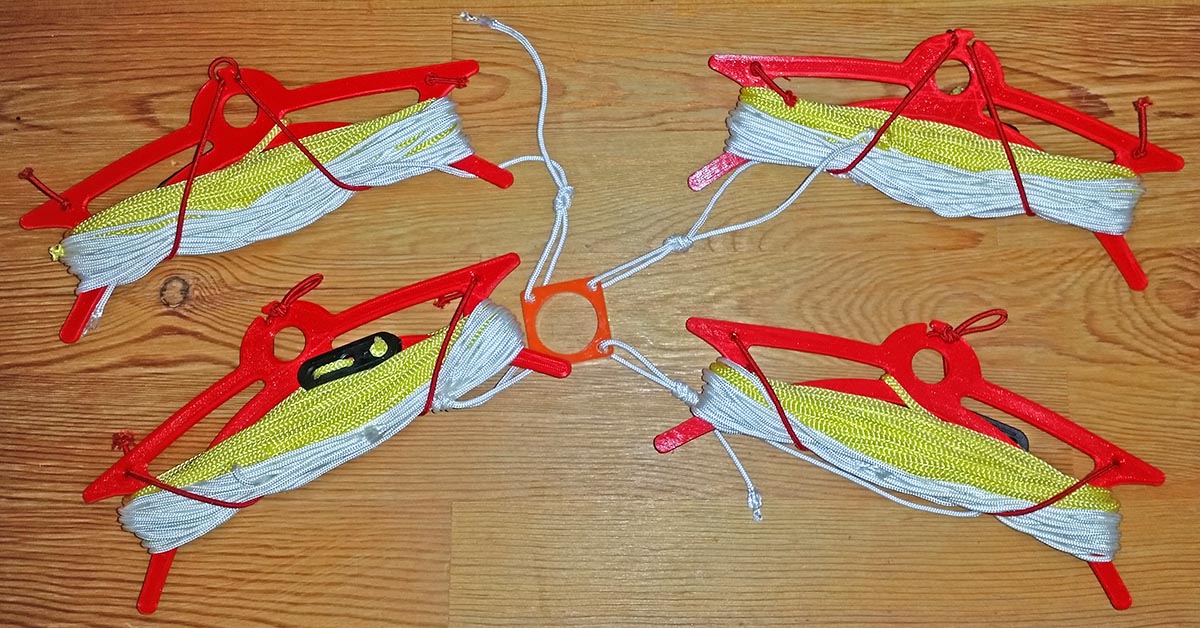
All four guys tidy and ready to be deployed quickly. The longer part of my guys are the white cord, the last 3metres are in hi vis yellow to hopefully reduce chance of them being tripped over:
These are nothing new of course but it was nice to make them exactly to my requirements. Similar winders can be bought from places like SOTAbeams etc, though this unit is similar in size to the midi winder SOTAbeams sell but a third of the weight and the deep arch allows the string to lie nicely and has loads more capacity than my guys need and they guy an 8 metre fishing pole.
If anyone with their own 3D printer is interested is making use of this design my friend Paul has made it available on Thingiverse and Youmagine.
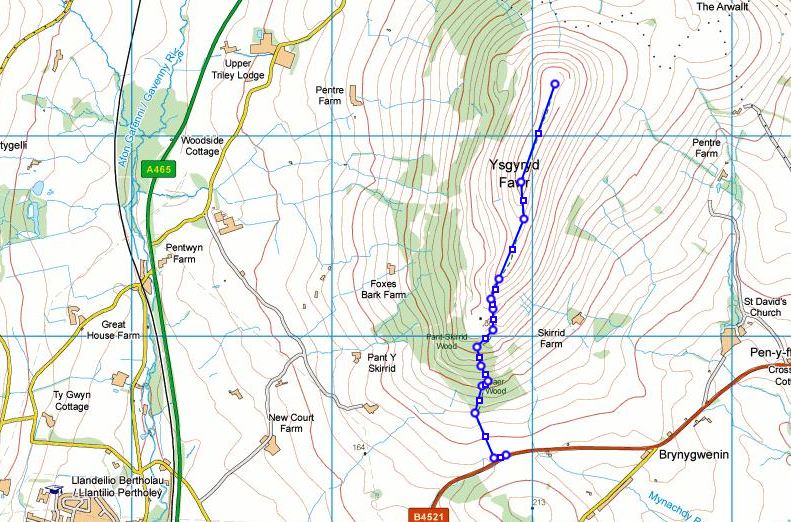
Been a while since I have been out due to other commitments and various reasons, but I had the chance of heading up to Skirrid Fawr GW/SW-106 to activate it for the first time (for me). As it was a Sunday afternoon the car park was packed as ever, even though I left it later in the afternoon. But I managed to squeeze in at the car park found at SO329164 and head up the usual path. This takes you up through the trees (at any junctions go up) and to a gate by a stone wall. Turn right here and head up again taking a left up some steps a couple hundred metres after. Up some stone steps then go right and onto the ridge. Easy to find your way up this one even in complete white out. The walk is 1.3 miles and a height gain of 277m, reasonably steep in places but not too bad even with my 40lb sack.
As I was getting rained on I donned my waterproof trousers on the ridge not wanting to sit for some hours in cold wet trousers. Luckily shortly after it stopped raining. Nearly always works! By now it was not that far from sunset and I managed to grab a couple of nice views.
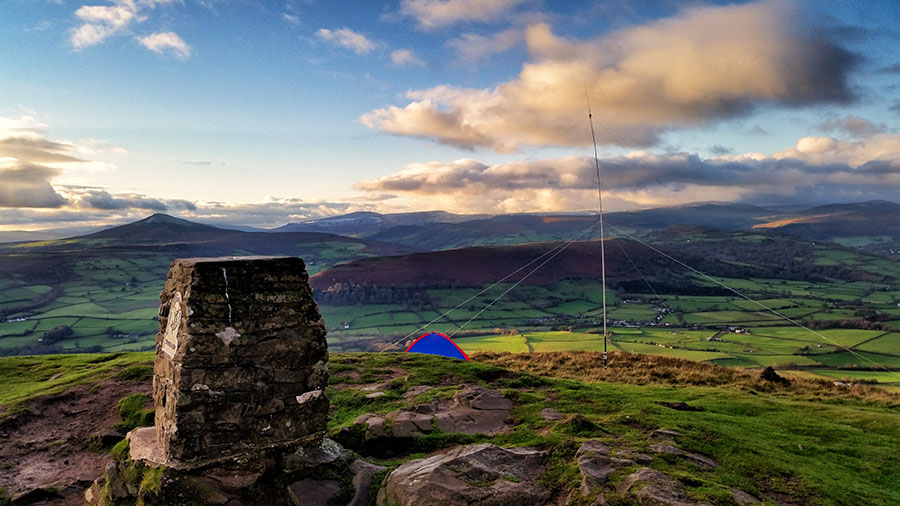
Looking West from the summit over where I set up the station.
View back along the ridge I just ascended.
There is a nice little area West of the summit where you can set up and be out of the way of the main of the foot traffic. As it was getting on I only had one set of visitors that I heard. Though once the headphones were on there may have been more.
As there is pretty decent mobile internet access from Skirrid I decided to road test my new Microsoft Surface Pro 3 using the phone as a WiFi hotspot. This worked out well. I ended up being there about 2¼ hours and over that time the Galaxy S5 went from a full charge (at home) to about 75% battery power. That included taking the photos on this page and also syncing those photos and my Log4OM files via Dropbox. I was able to keep an eye on the SOTA alert page (for what it was worth!) and use the lookup on the logging program Log4OM. I did disable the instant upload of the QSO information in case of typos. The integral fold out stand for the Surface Pro 3 was good as it hokked over my knees and kept the keyboard and screen at a suitable place to use. As the text is quite small on the Surface I was introduced to the joys of steamed up glasses when coming back into the beach shelter after and antenna tweak. Quite pleased with the Surface Pro 3 as it still has 70% battery power left.
I started on 40m hoping to get some inter G SOTA and WAB trig chasers but things were very slow even after self spotting. An activation during the ARRL Sweepstakes Contest was possibly not one of my better ideas. I worked a couple of stations on 40m then I kept getting someone moving onto my frequency and they seemed oblivious to me. I then noticed when I transmitted the SWR bar graph was going up. Normally I have no reading on my link dipole. I checked outside and saw a couple of sections of the fishing pole had retracted and the ends of the dipole were on the ground. After sorting that out I decided to try 20m. The band was full of the ARRL contesters and as I wasn’t prepared with the complex exchange data I tried to avoid them. I managed to find a clearish frequency and struggled along with slow QSO rate despite spotting myself again until a contester came on frequency that definitely wasn’t there before for about an hour. I tried 40m again and worked a few more before I quit. I noticed that in all the time I was there only 3 other SOTA spots popped up and none of those on a band or mode I could chase.
The main reason I packed in was my butt was killing me. The Surface Pro was great but it meant staying in one position all the time and I need a better seat than the garden kneeler I have. I was starting to feel the chill too, though inside the shelter was pretty comfortable compared to the wind chill outside. Tonight’s lesson learnt is no matter how windy or wet it is, no matter how stiff your fingers are, it IS worth the time to pack your guy strings away the way you normally do, that never ever has a tangle OR you will spend ages breaking your back in the kitchen later untangling an impossible jumble.
Overall 21 QSOs which is a bit disappointing but a few new countries worked.