As I had a terrible job managing DXlog RTTY setup on IC-7610 (NOT DXlog’s fault – it’s the RTTY side that is the issue!) and I know others have given up, I thought I would share what I did and my settings.
I AM NOT AN EXPERT – BUT – I have got it working very well in the end.
To start, this is on Windows 11 Version 24H2, however, I got it working on Windows 7 SP1 prior to this, noted all my settings down and got it working on Windows 11.
DXlog I am running V2.6.11 which as I write is not the current version but it is not broken, I shan’t fix it just yet!
I’m sure those running N1MM+ or WinTest etc can find similar settings. As said the biggest issue I had was knowing what settings to use.
Radio end.
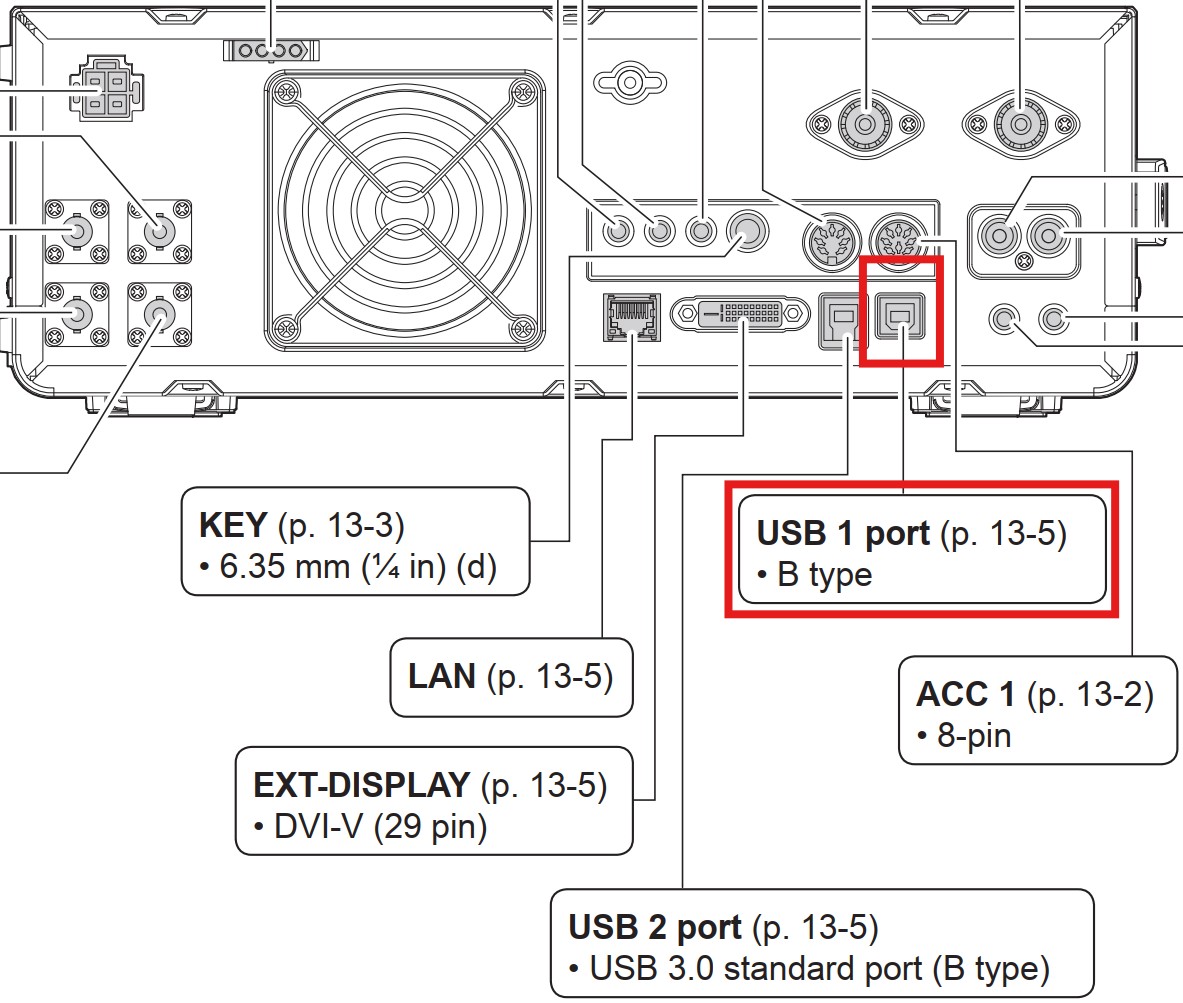
Starting at the Icom IC-7610 end I am using a single USB cable for everything. This is using USB port 1 on the IC-7610:
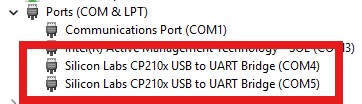
When active that gives me these two COM ports:
Yours will be different most likely but I think if yours were say COM2 and COM3 then wherever I use COM4 you would use COM2, and same for my COM5 v your COM3.
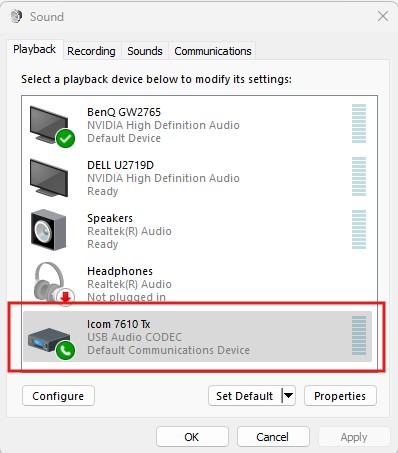
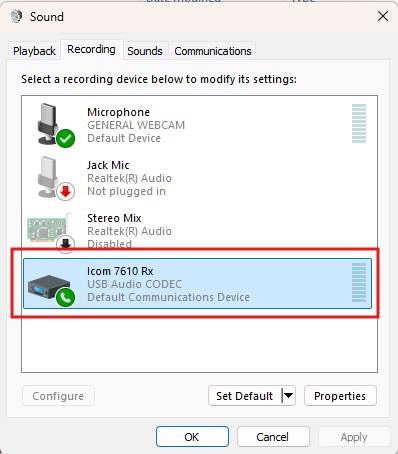
In Windows Control Panel/Sound, I have renamed the default device names for the IC-7610 to something sensible that I can recognise:
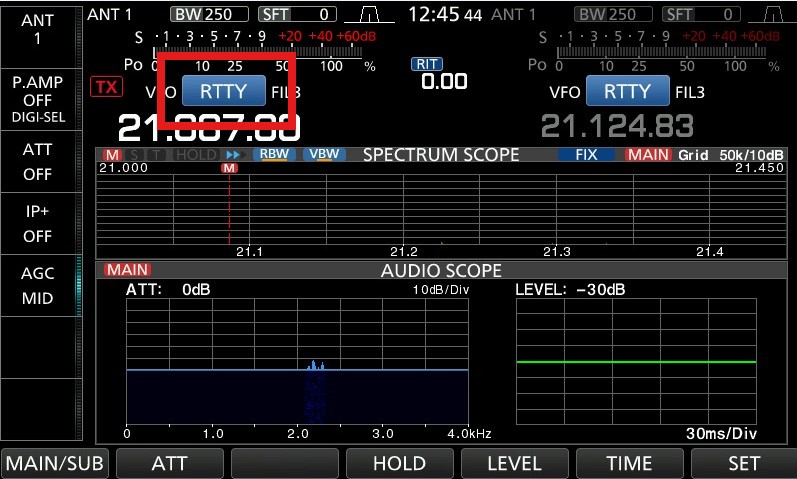
I had my first success (after walking away to calm down more than once!) using the radio’s RTTY mode which is FSK keying. I have since managed to get AFSK working but I don’t use that on the IC-7610.
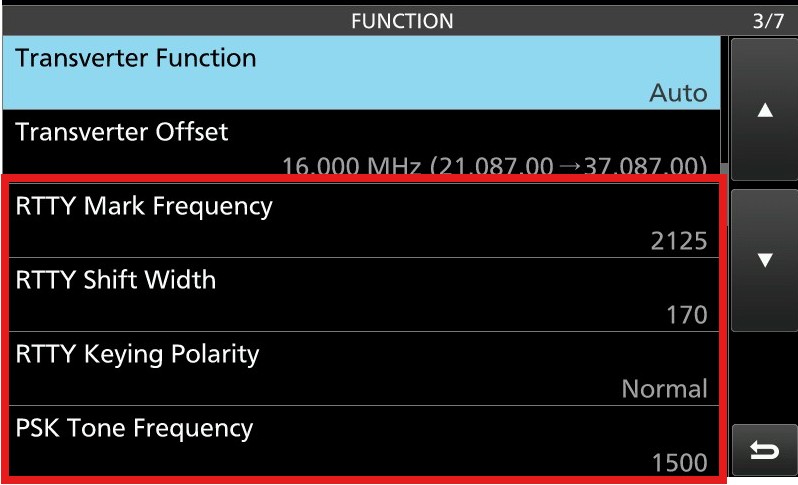
And these settings for RTTY are important (certainly the first 3, I haven’t touched the bottom one). Yours will probably already be set the same by default:
This setting I believe enables CAT to work on the first of the two COM ports the IC-7610 creates and RTTY to use the the 2nd COM port the IC-7610 works. It’s certainly how my radio is set and I have CAT control and RTTY working!
The following settings I didn’t cover in my own document to make RTTY work as I had already made some settings previous;y getting FT8 and CW etc working via the PC. So these may or may not have any effect: PC end – DXLog & MMTTY.
Again, I am not claiming to be an expert on the IC-7610 or its settings, but these are taken from my working well setup.
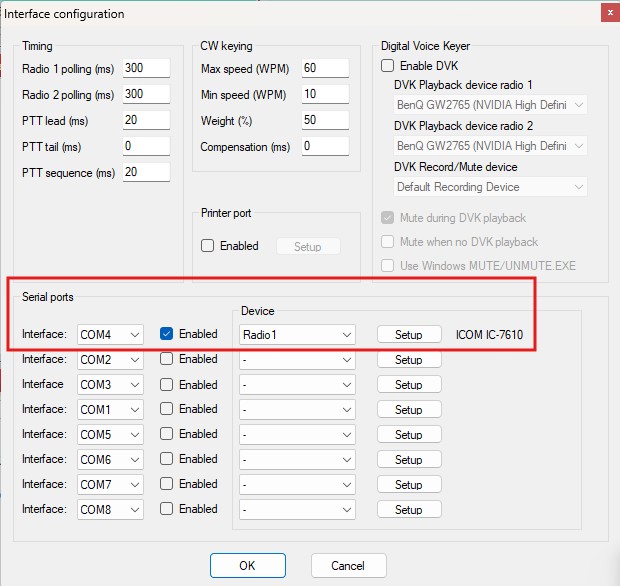
Firstly, this shows the single radio entry in DXlog configuration using the first COM port my IC-7610 creates, COM4:
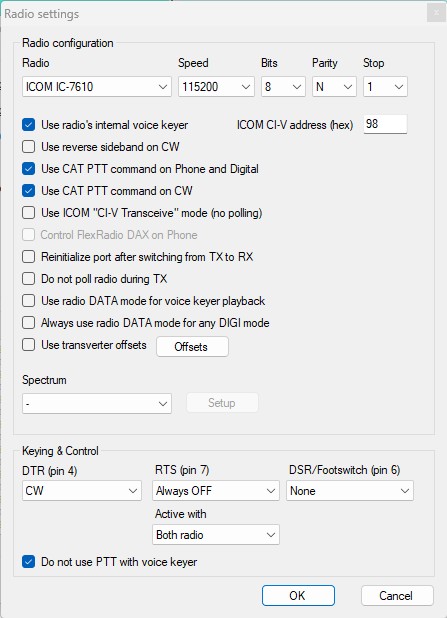
And the settings from clicking the Setup button on screen above:
The MMTTY version I use is the engine version downloaded from here: https://hamsoft.ca/pages/mmtty.php
and the Engine only version because I am running inside DXlog:
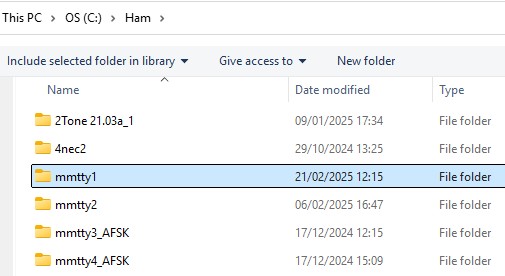
This is UNZIPped into a folder on C: drive. No installer, just UNZIP. You can see that I have actually 4 folders. You can unzip the engine into multiple folders and when you choose that folder from DXlog and settings made are saved ONLY inside that folder. You can see I made 2 extra folders when I was getting AFSK working. That way my working MMTTY1 and MMTTY2 didn’t get broken! I have two FSK folders and two AFSK folder because I tried to get dual rx/tx going so I could run on TRX1 and S&P on TRX2 but I couldn’t tx on TRX2 so I just use the one RX now, but I have left the folders there in case. You will also notice I have a 2Tone folder there, which I use as my 2nd decoder on RX1. I won’t cover setting that up, but it went quite well and is highly recommended.
To use FSK you need to add a small program (actually a DLL) called ExtFSK into each of the MMTTY folders for FSK to work. You will find the ZIP file download right at the bottom of this page: https://hamsoft.ca/pages/mmtty/ext-fsk.php
Just UNZIP the files into your MMTTY folder above.
In DXLog RTTY settings I have these settings made. I have highlighted the settings for getting going with just one MMTTY instance for TRX on RTTY. For 2nd decoder if you leave as default MMVARI (I don’t have that that I know of) I see only the one decoder for MMTTY:
With the settings above made and opening an RTTY contest in DXlog you should see an MMTTY window like below appear. If not, in DXlog go to Windows/Digital Modes and tick next to MMTTY Radio 1: Mine looks like the above as I ticked in the settings window “Only show FFT spectrum, waterfall and XY scope”. I did this to save space. I never touch the settings that are visible other wise so decided I didn’t need them.
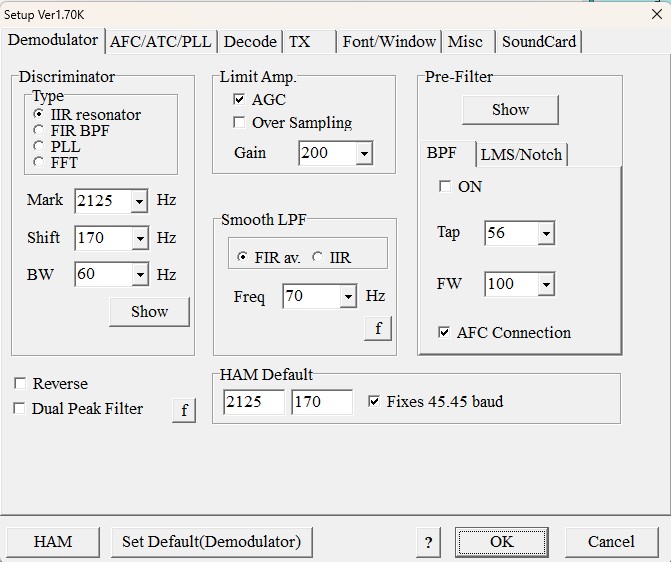
So on the window above click Option(O) then Setup. This takes you to all the settings on 7 tabs. These are my settings and may not be perfect but I am making QSOs!
Demodulator tab:
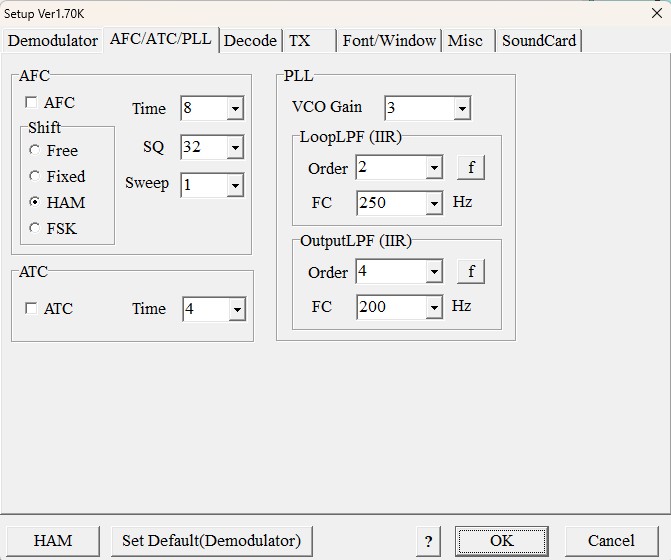
AFC/ATC/PLL Tab:
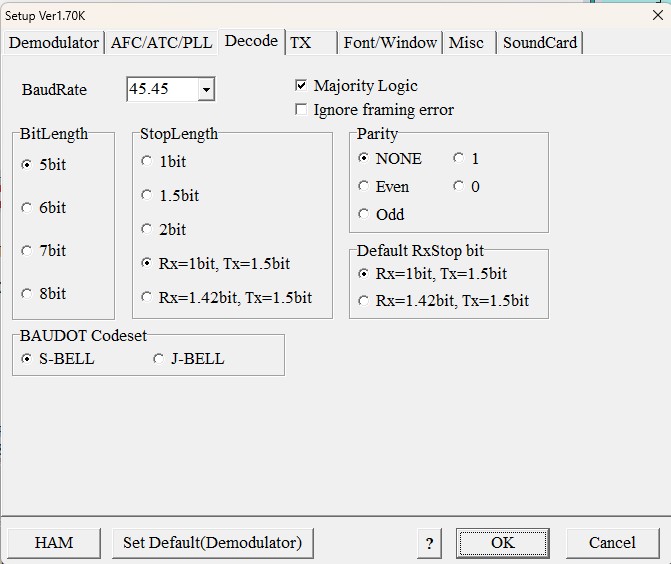
Decode Tab:
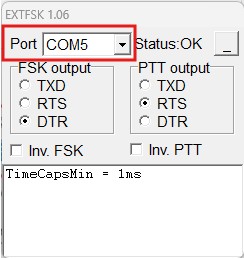
On this next tab TX, you need to select EXTFSK as shown from near the bottom of the list of possible COM ports:
When you select EXTFSK as above, you should see a small window appear to make some settings. Here you can see I have selected the 2nd COM port COM5 that my IC-7610 creates. Also check the FSK output and PTT output as if you have set yours identical to mine they probably need to match up:
Font/Window tab:
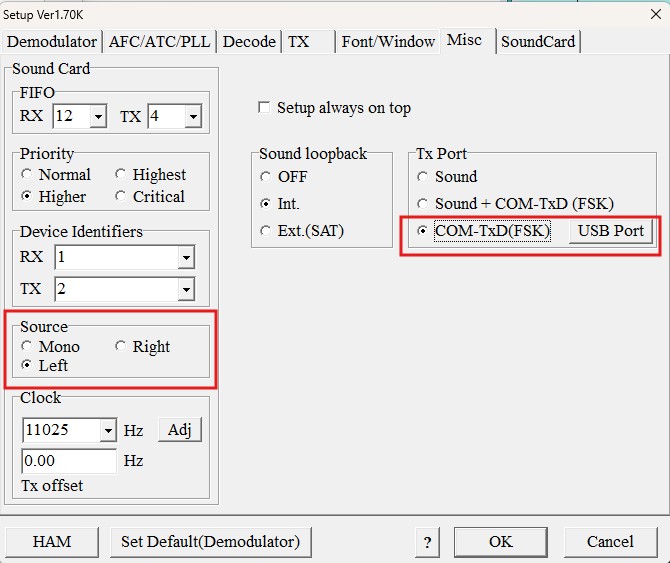
On the Misc tab need to set as highlights for COM-TxD(FSK). For source you can probably leave as Mono. I have told my windows to make the sound card for the radio to stereo for dual rx. For single rx default and mono should be fine:
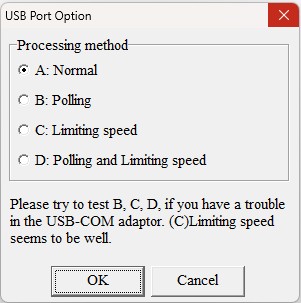
Clicking the USB Port button above looks like this:
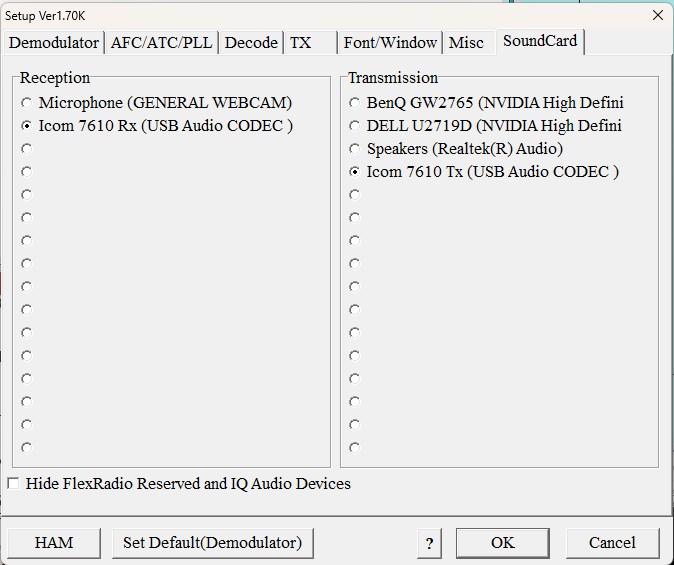
And the final settings tab, Soundcard:
One final setting that I was told to do when I was struggling to make it work is to right click in the decode window and tick the 2125 setting as shown. I’m not sure if that is essential now but I still have it set like that!
This is the end of the settings.
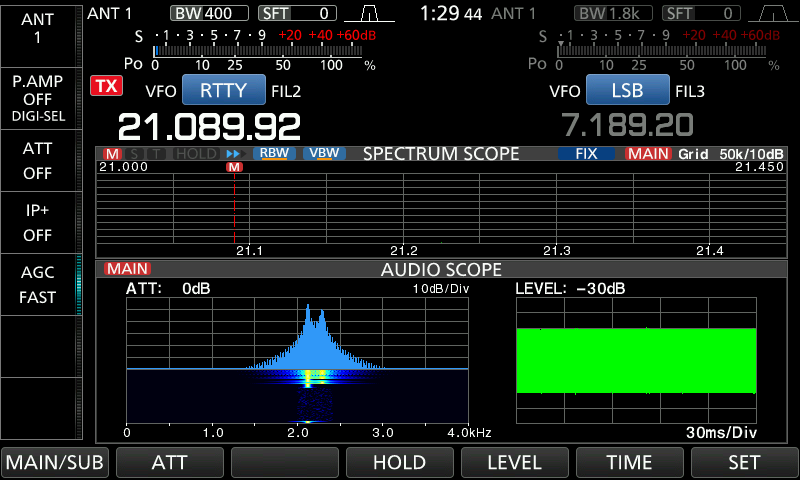
If you tx now from DXlog either via macro key or via ALT K and the free type window you should see something like this twin peak signal on your radio and hear the two tones going:
If you can find an RTTY signal on air you can use the inbuilt decoder in the IC-7610 to decode it and check MMTTY is decoding something the same!
You will see garbage like in my image above the last one. That is what MMTTY has decoded with no antenna connected to me IC-7610.
I hope this helps get more people going on RTTY as I for one found it VERY hard!
Welcome to your new callsign. Congratulations on getting your shiny new callsign! And welcome to the Amateur Radio hobby. You may be wondering what to do with it now you have it! The foundation training cannot cover even a small part of the many facets of the hobby so I thought I would share a few of my thoughts, experiences and some of the threads in radio that I am aware of. There are many more I don’t! This is a hobby where the World literally is your oyster.
The facets I mention below are no particular order other than they are the things I thought of.
Online Callsign Databases.
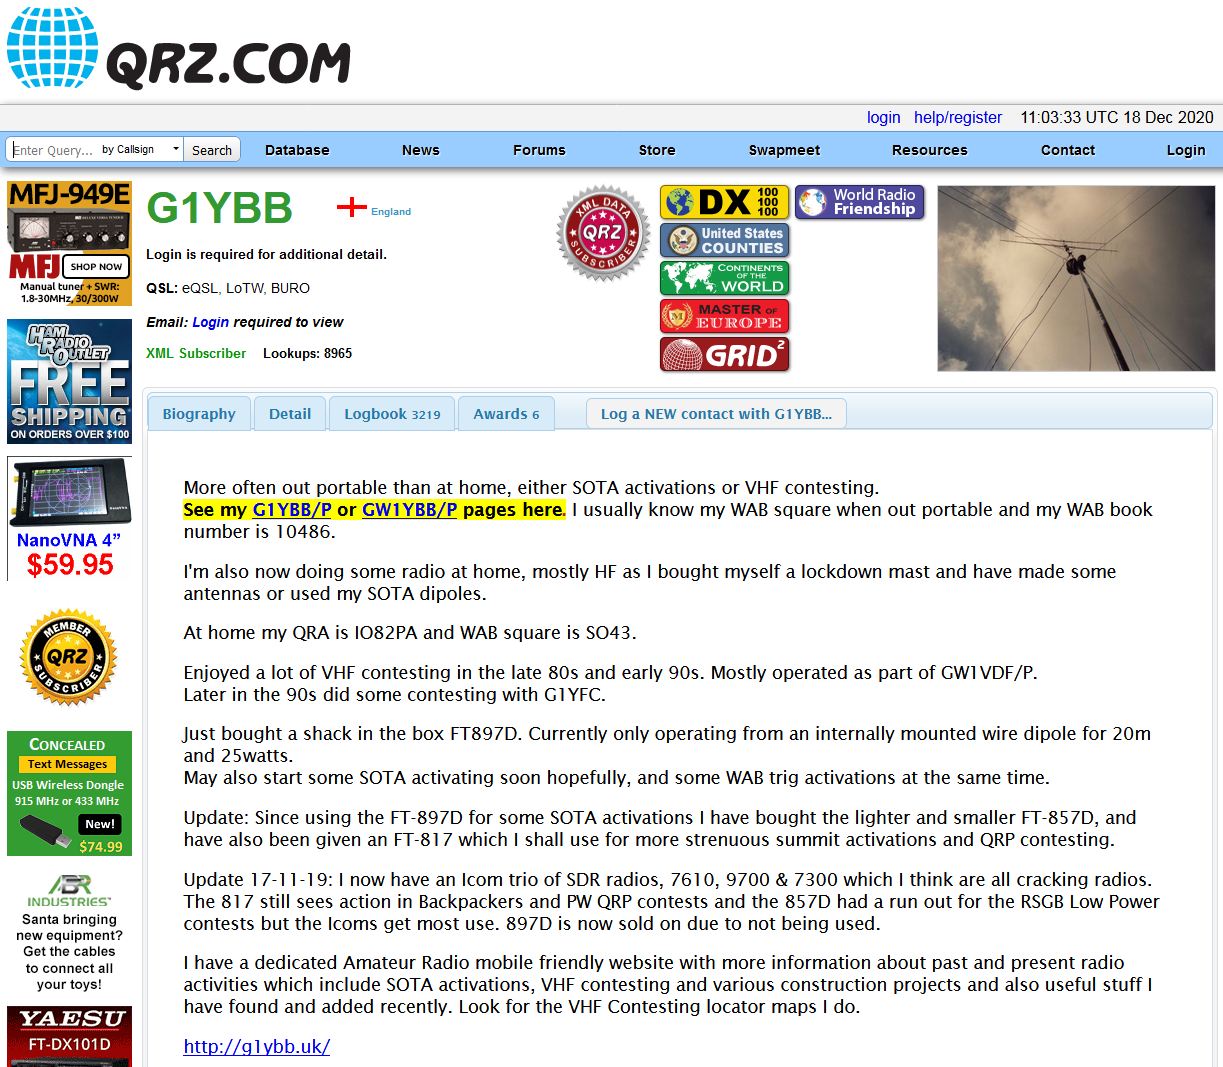
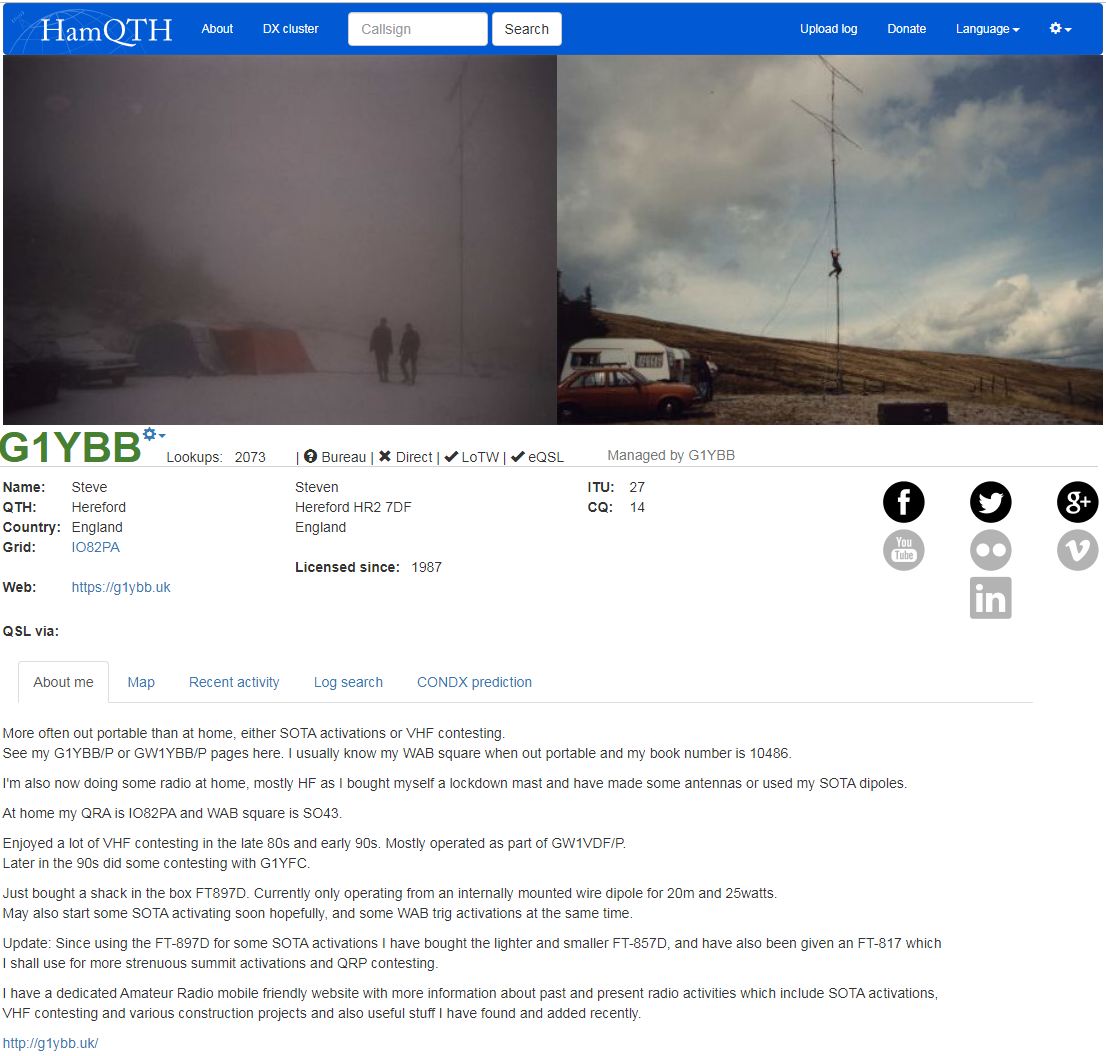
A great place to start is to get your new callsign registered on the online lookup sites. This is free and many people will look you up when they hear you on the radio, either manually or automatically with their logging software. The most used site is probably https://www.qrz.com but I would also recommend setting up accounts on https://www.hamqth.com and https://www.qrzcq.com as well. HamQTH and QRZCQ you just sign up with your callsign, on QRZ you need to make an account with your callsign as the user name and post to be added to the database forum Add My Call Sign to QRZ – Database Helpers Forum.
The following images are my entries on those three sites: Locator squares.
You will notice on the HamQTH and QRZCQ pages my locator IO82PA is stated. It’s very handy to know that and state it on your profiles. All or part of it is used in contests and data modes and grid square collection (more later on that).
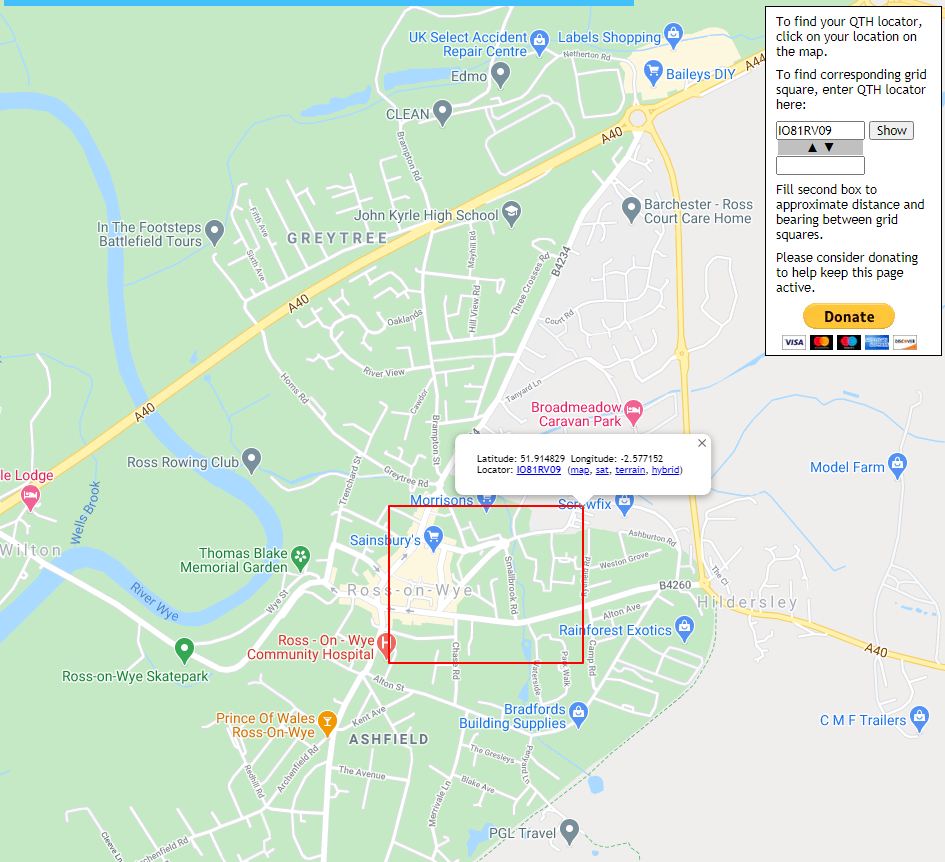
To find it is really easy now with many web based help pages. I use this one: https://k7fry.com/grid/?qth=IO82PA&t=n
Clicking that link will take you to my locator square as an example, but you just need to zoom & drag the map to your house, click the map on it and then use the first 6 characters (as a rule 6 is plenty). For example if I lived in Ross-On-Wye and clicked my house there a box pops up containing my house and tells me the locator is IO81RV09 so I would use IO81RV:
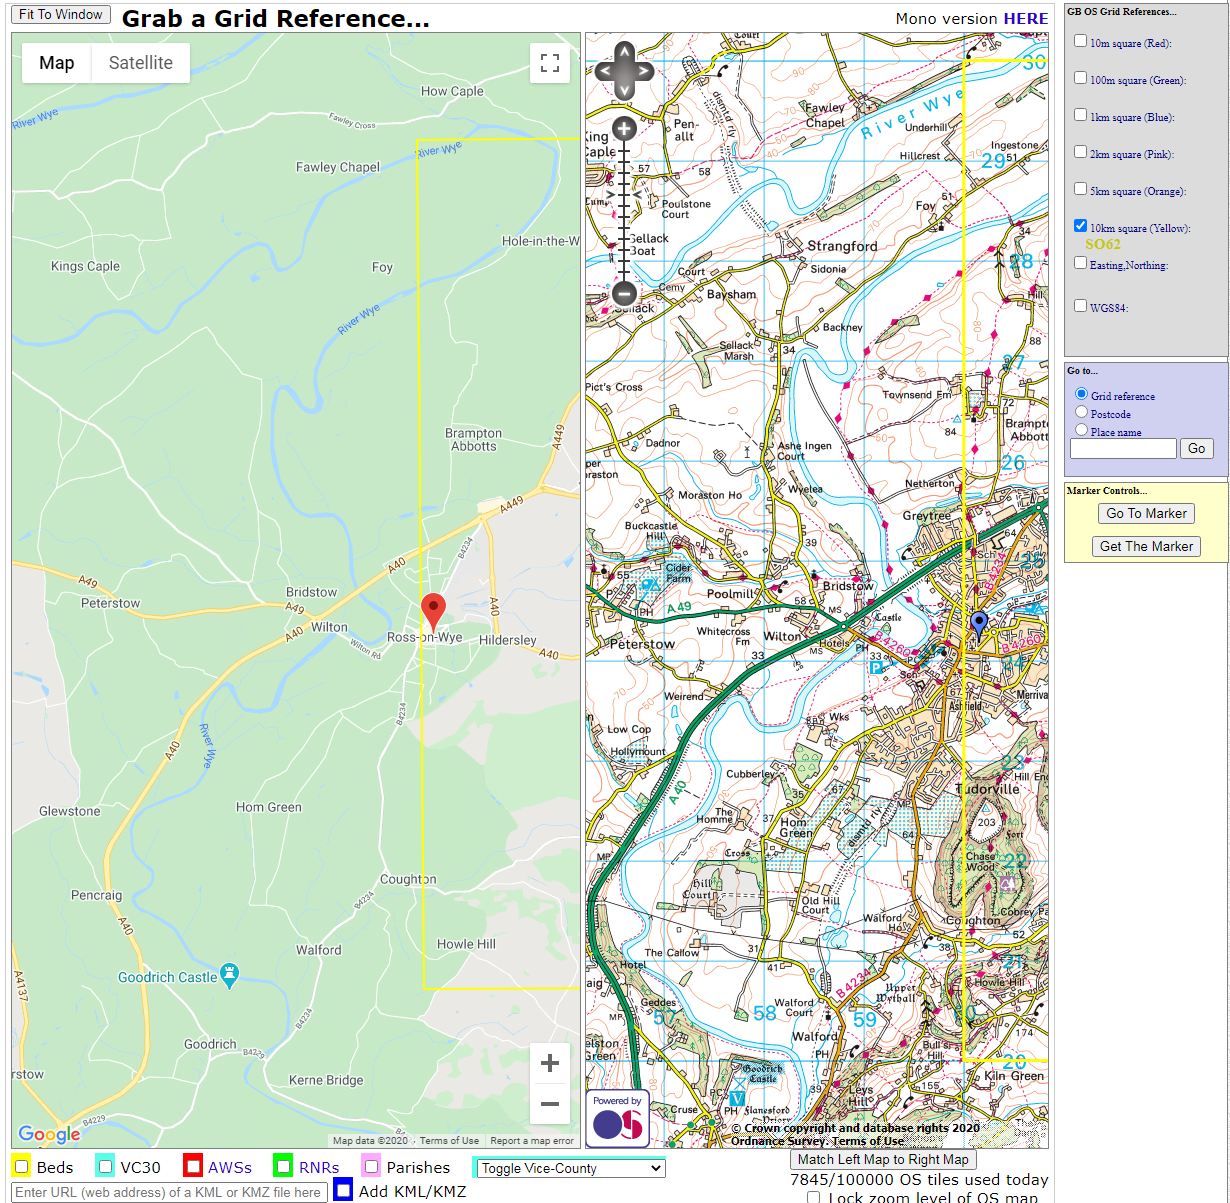
Another square worth knowing is your WAB (Worked All Britain) square as you may be asked this. This is just the 4 figure OS grid reference of your location. Again the internet makes this dead easy to find. On this site: https://www.bnhs.co.uk/2019/technology/grabagridref/gagr.php#map
I scroll the map again to my house in Ross-On-Wye, click the button “Get the mark” on the right hand side of the page and drag that to my house. Tick the “10km square (yellow)” tick box on the top right side of the page and your WAB square is shown, here it’s SO62: You are now pre-armed with information that sometimes catches out new hams that haven’t been told about it.
Logging.
I am a big fan of computer logging. It’s an easy and efficient way to log your QSOs. There are many advantages to this, many linked to some of the activities below. We hams like to spend all our money of radio stuff so some hams generously make free logging software available. I like and use one called Log4OM https://www.log4om.com/
This is very rich in features, too many to go into here, but I did write some pages on setting it up for portable operating, much of which is applicable to just setting up for your basic callsign: https://g1ybb.uk/portable-logging-with-log4om-and-online-log-sites/
Here is a screen grab of Log4OM. I have heard a station PE1EWR on air or he called me so I have put his callsign in the box. The software has looked him up on qrz.com and has filled in his name and locator for me and also pulled down the photograph he has on qrz.com. Also it is showing me where in the world he is and a closer zoomed in map of his location, based on his given 6 figure locator. You can see why your locator is an extremely useful piece of information. From that locator Log4OM is also telling me Frank is 434km from my house (really it’s centre to centre of our locator squares):
Log4OM can also upload your QSOs to the online logging sites automatically, even in real time as you log the QSOs, or at a later date from imports from other software like for example contest logging programs. Most of these are mentioned in my link above on Log4OM setup.
QSLs and eQSLs.
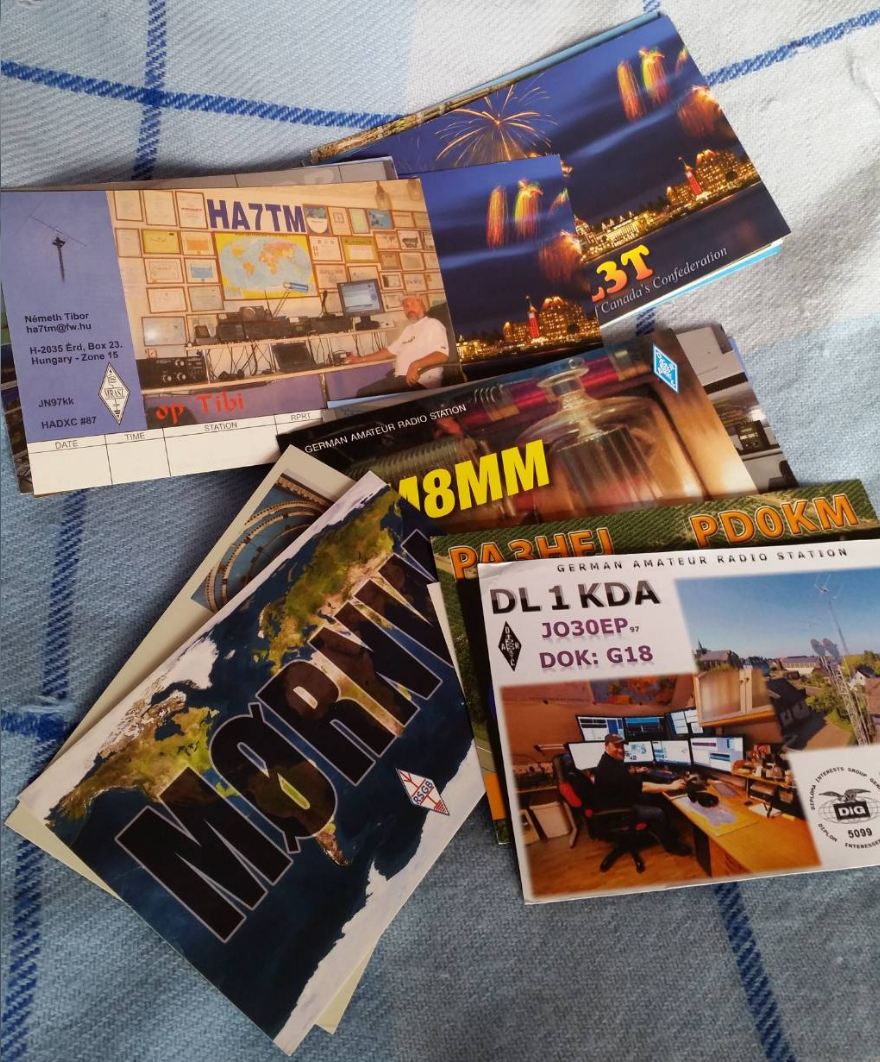
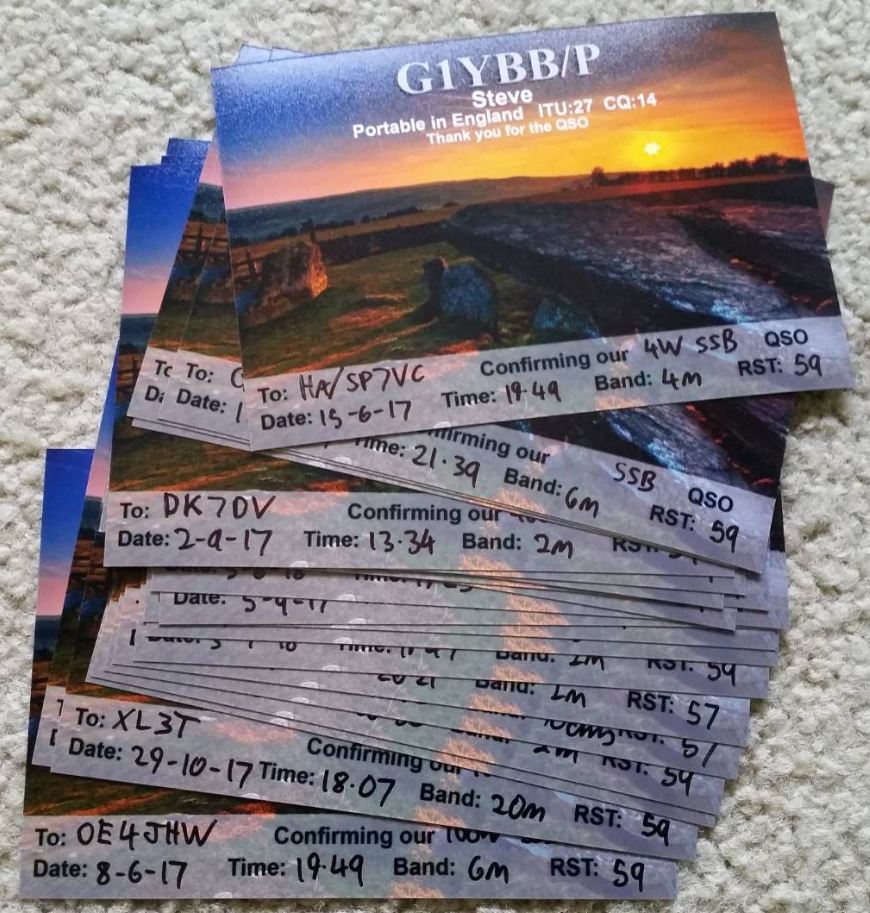
Not everyone’s cup of tea but many people like to exchange and collect QSL cards (confirmation of QSO) as the final act of completion of a QSO or to confirm a country or state for awards, or just because they like to do it. These historically are paper, like postcards but are also now widely done in digital form via the internet known as eQSLs.
As posting actual cards to many places would be expensive all the radio societies around the world run a service called the QSL Bureau. You can send QSL cards in bulk to you local bureau and they will distribute them around the world and the Bureau at the destination end will send them to individual hams. It is a very slow process but is a good option if QSL cards appeal to you. Personally I don’t collect them BUT as people do like to collect QSL cards if they send to me I will always reciprocate. Here is a batch of cards I received recently: And here is a batch of mine before going to the bureau:
For UK hams to make use of the bureau you need to be a member of the RSGB. The bureau information is here: https://rsgb.org/main/operating/qsl-bureau/
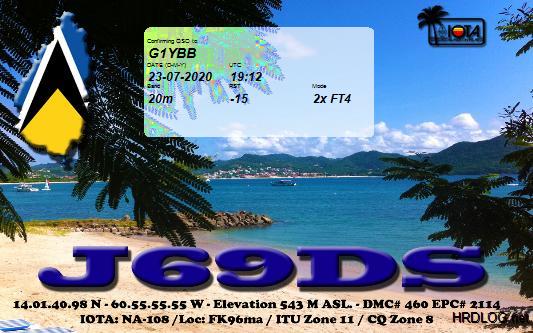
eQSLs are a much quicker process and can sometimes be exchanged literally within seconds of a QSO if both stations are logging online and uploading the QSOs in real time to the eQSL sites. Log4OM can do this. The main ones I use for eQSLs are eQSL https://www.eqsl.cc/qslcard/Index.cfm and HRDlog https://www.hrdlog.net/
A couple of sample EQSLs I have received:
Ok behind the sceens type of stuff out of the way, we need a radio!
Radios.
This has to be the most commonly asked question. What radio should I get that I can afford. Or another classic is “what is the best radio to get?”.
There is no answer to that question really without knowing a budget and interests. But you may not yet have found your radio interests so the answer is almost impossible to know.
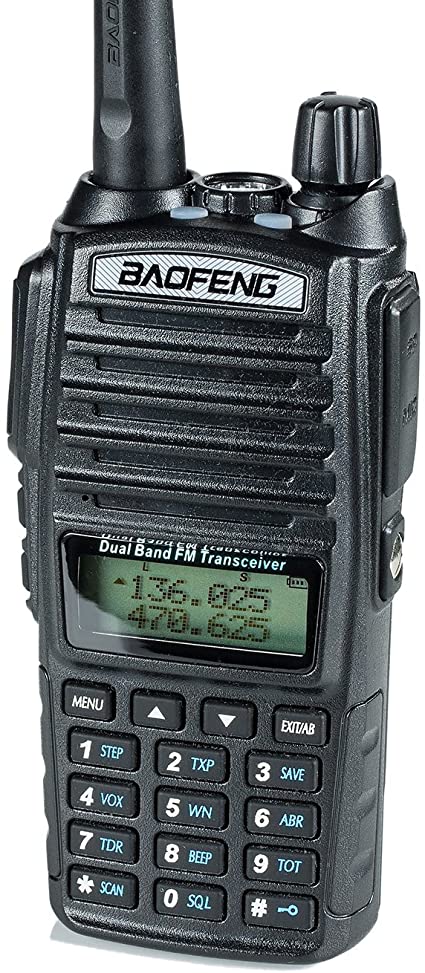
My advice is nearly always to buy a multimode radio if you can afford it. This means you can access FM for simplex and repeater QSOS like you would on the seemingly ubiquitous FM handheld but also opens up that world of other opportunities like SSB and CW, data modes, basically everything. For those who want an FM handheld I personally usually advise getting one of the really cheap Baofeng ones. The keyboard warriors will slate these but I have had no issues with mine and for only a few tenners you can be on 144/432MHz FM and save more tenners for a multimode! Multimode radio wise there is a vast assortment. For a first time radio I usually recommend a secondhand shack-in-a-box radio like a Yaesu FT857D or FT-897D. These have all the HF bands, 144MHz and 432MHz in one small unit and allow you to access all the most active bands and literally work the world on HF even with 10W on a foundation licence. Secondhand they will be in the reach of most budgets, probably starting around £350 and upwards. Whilst I now have dedicated HF radios and VHF/UHF/SHF radios I still love my FT-817 and FT-857D for certain portable operating where size is paramount. There are newer shack-in-a-box radios that have better interfacing to a computer such as the FT-991A.
Join your local club.
A great way to pick up tips, learn new things and even get on the air before you have your own radio gear is to join your local club. Admittedly as I type this in the middle of the Covid19 pandemic it’s not as easy as usual but many clubs are having meetings via Zoom etc. Many clubs have a club station that (in normal times) can be operated by members and meetings that ntroduce you to new things. There is a club finder tool on the RSGB website: https://rsgb.org/main/clubs/club-finder/
FM Repeaters.
These are very often most people’s first experience into amateur radio. Most areas have a local repeater in the vicinity that can be reached with a cheap hand held radio like the Baofeng. Repeater access is a little more involved than in ‘my day’ with a simple tone burst but the information is out there to get the job done.
The following links are a list of UK 144MHz and 432MHz repeaters, with details on how to set up your radio for access: https://ukrepeater.net/repeaterlist.htm?filter=2M https://ukrepeater.net/repeaterlist.htm?filter=70CM
You will often find most repeaters have someone who monitors it most of the time and is always willing to answer calls. As it’s FM and usually with squelch set you can have the radio monitoring in the background listening for people and respond to them. The range you can speak to people is the range of the repeater which is usually much further than you could do with a handheld on its own but limited to a local area, like Herfordshire for my local repeater for example.
SSB and CW.
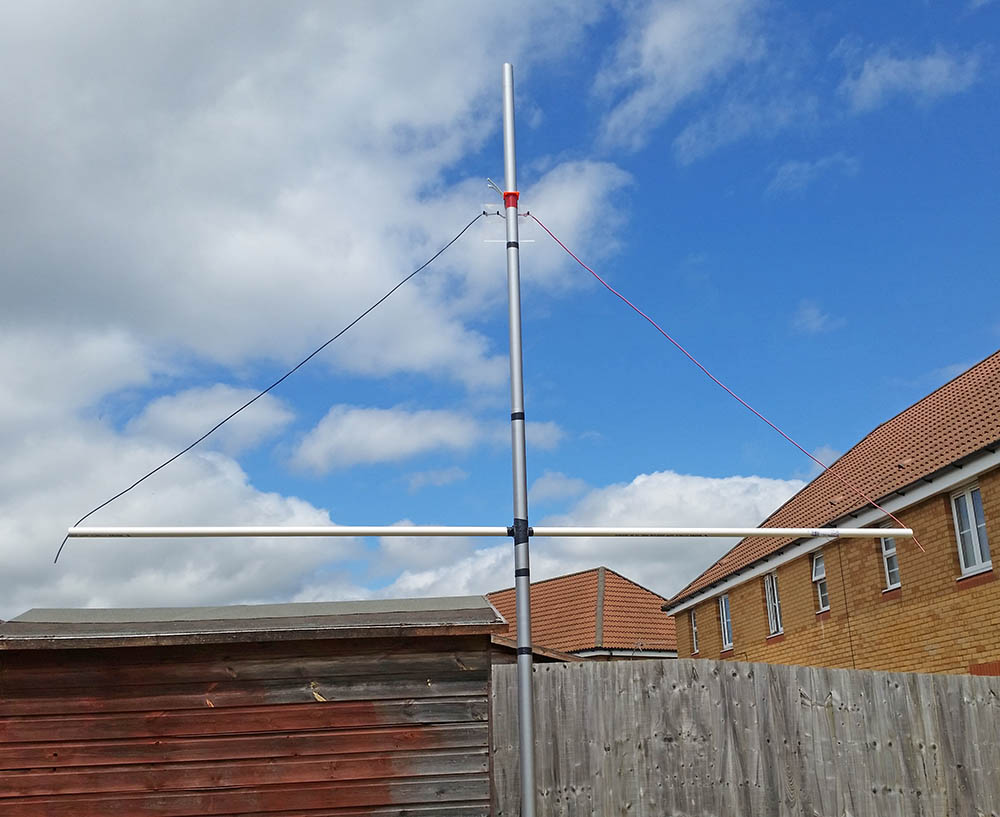
These are mode often known as weak signal modes and where I like to do my operating. On HF you can speak literally all over the world and on VHF your range is vastly extended to 100s of km. 1000s with good conditions. This is usually because we use directional antennas to increase the range. This is a home made 9 element beam I made for 144MHz:
On HF though you can use bits of wire. This picture is an inverted V dipole made for 50MHz but I have made bigger versions for HF:
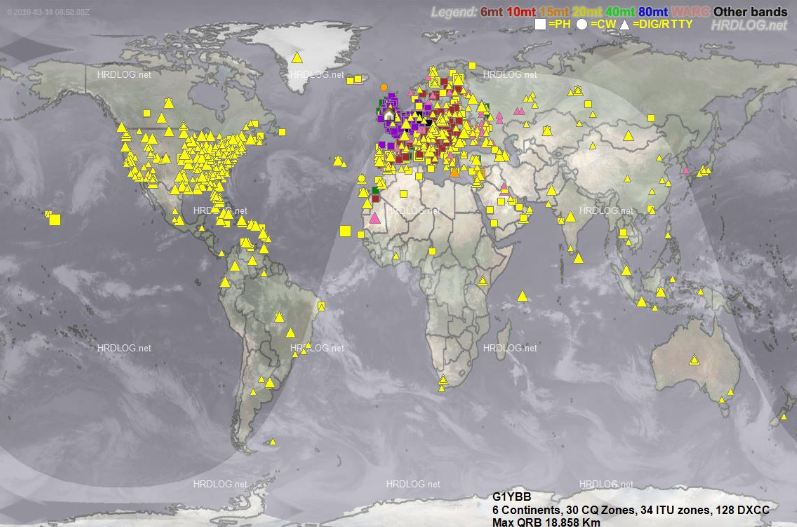
This is a map of QSOs I have made, mostly on SSB or a derived data mode, some CW on mostly bits of wire. The map itself was generated by HRDlog, one of the sites mentioned above and from logged QSOs uploaded with Log4OM:
Contesting.
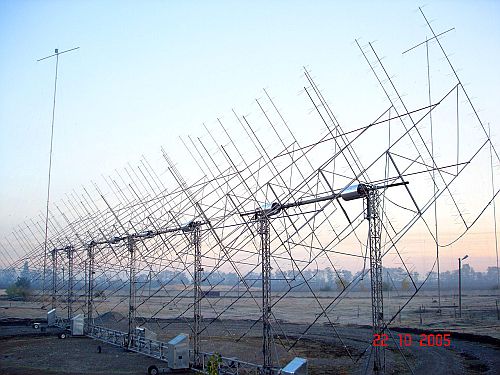
Contests are organised events with a given start time and end time and the object is basically to contact as many other hams as possible in the time. This is probably how I spend most of my on air time. I like the competitive element and enjoy improving my skill to do better. As HF is world wide there is usually a contest to be heard most weekends. On VHF and up there are also many contests through the year.
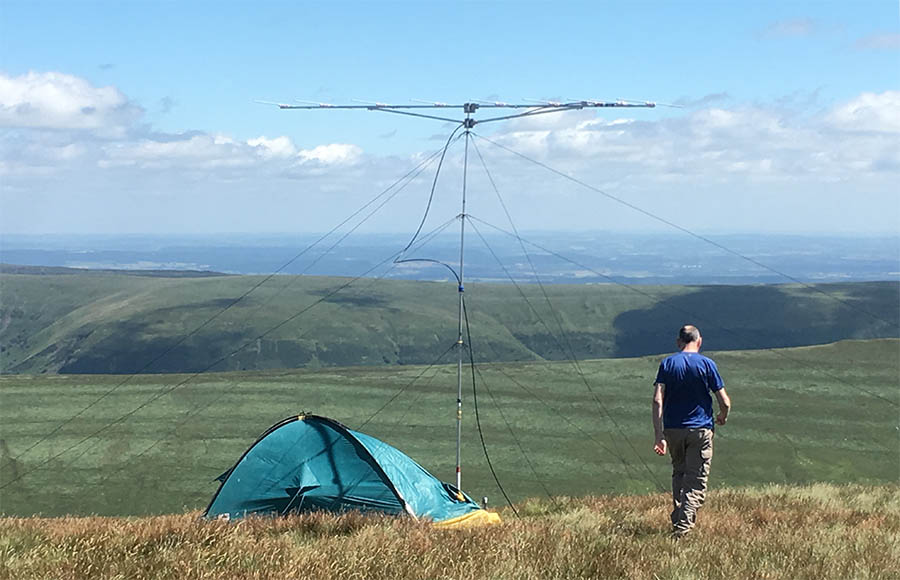
You don’t have to enter to take part, you can merely ‘give points away’ which is just answering the call of the stations who are hoping to win. Because contest stations want to do well they usually build high performing stations which means that a ‘normal’ station can be heard much further afield than normal so it can be a great way to make further QSOs. This is a common 144MHz style of contest setup: With a big antenna system and great spot at the other end, you can be heard a long way off.
The RSGB run a lot of contests each year, here are the VHF and HF calendars respectively: https://www.rsgbcc.org/cgi-bin/readcal.pl https://www.rsgbcc.org/hf/
For most of the VHF contests you only need to know that all important 6 figure locator like IO82PA and usually give the other station a signal report and serial number. The serial number is just the number of stations you have spoken to in that contest so far. If you get interested in this look up your local club in the results lists to see if they are active. They would be glad to have you aboard!
Signals from Space.
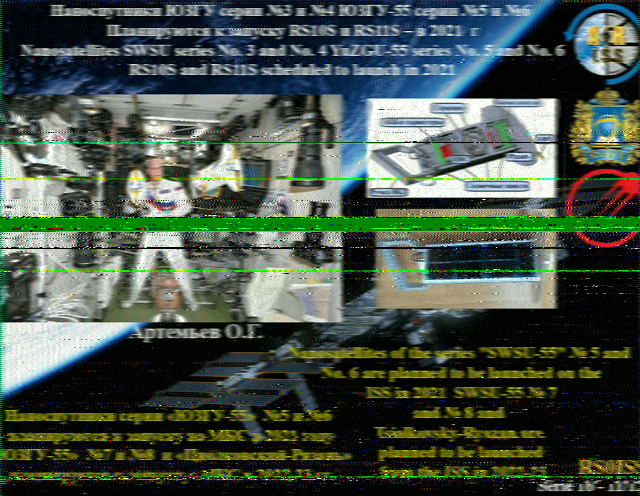
This is something I have only done recently and I think it’s really cool. The ISS (International Space Station) often transmits SSTV (slow scan TV) images as it passes overhead and these can be received with your little Baofeng 144MHz FM handheld in the garden and decoded with your smart phone running an app (I use Robot36 on my Android phone) held by the speaker of the Baofeng. These are a couple of pictures I decoded that way: I find this really cool.
Lots of useful information here: https://amsat-uk.org/beginners/iss-sstv/
Construction.
One of the great facets of this hobby for me is home construction. I prefer to let the Japanese make the radios, they are pretty good at it. But other things we can build ourselves. If I am not actually contesting, odds are I am building antennas for contesting. In the contest station above I built the tallest stack in the middle. A few of my projects are 9 element 2m yagi, 6m moxon, 20m moxon, 80m inverted V dipole, 20/30/40m link inverted V dipole.
There are many many plans for antennas on the web, literally any antenna you can think of.
This is a great low cost way to learn and experiment, and also get on more bands. Nothing beats the feeling of working new DX on an antenna you made!
SOTA and WAB.
SOTA (summits on the air) and WAB (Worked all Britain) are a couple of schemes that encourage people to be active on the bands. SOTA has activators and chasers. An activator takes his radio gear to a SOTA summit (hills and mountains) and makes QSOs with other people, chasers look for people on SOTA summits. Both can be rewarding and can introduce you to new places. Each activation gets you points and if you keep going can earn you an award. Info here: https://www.sota.org.uk/
WAB is similar but is based on collecting those WAB squares I mentioned earlier. Also trig points can be collected. More info here: http://wab.intermip.net/default.php
There are also other schemes like HEMA which are similar to SOTA. Loads to look out for!
Data Modes.
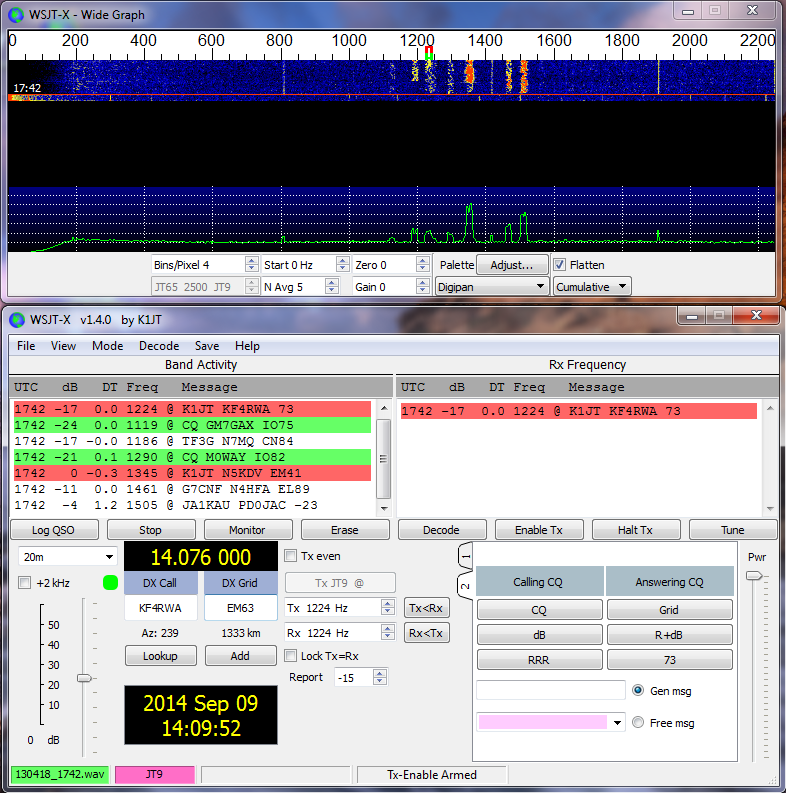
This is a hot newish mode devised for extra weak signal communication. It is done by connecting your computer to the radio and the computer sends tones to the computer which at the other end can be decoded at really low signal levels. On one hand it has led to lots of people sat on the data frequency instead of getting on the SSB or CW sections and working DX but on the other hand it is very family friendly as you are not shouting into a mic or tapping away on a CW key. Also the DX possibilities are excellent. The most often used program to do the data modes is WSJT-X found here: https://physics.princeton.edu/pulsar/k1jt/wsjtx.html
Looks complicated but once running it’s pretty easy to use. Plenty of how-tos on Youtube etc.
You can link it to your logging software to automatically log the QSOs. My setup is such that you make the QSO in WSJT-X. Once comepleted it prompts me to log it, which I do. It sends the QSO details straight to Lo4OM. Log4OM then (after a short delay to correct anything) automatically uploads the QSOs to the logging sites and often in a minute or so an email arrives to tell me the other station has confirmed! Awesome.
Here is an appalling quality video (two monitors wide compressed into small video size) of that happening in real time:
EME.
EME means Earth Moon Earth. basically you point your antenna at the moon, so does someone else and you use the moon as a reflector to bounce the signals to each other and get a QSO much further across the Earth than you could directly. Generally for this you need more power than the foundation licence so it is something that can make moving up through the licence levels worthwhile. It can be done with a good yagi for 144MHz (probably the busiest band maybe) and 100W if you have a big station the other end. The below image is an EME array built by RN6BN. Wow.
Chasing Awards.
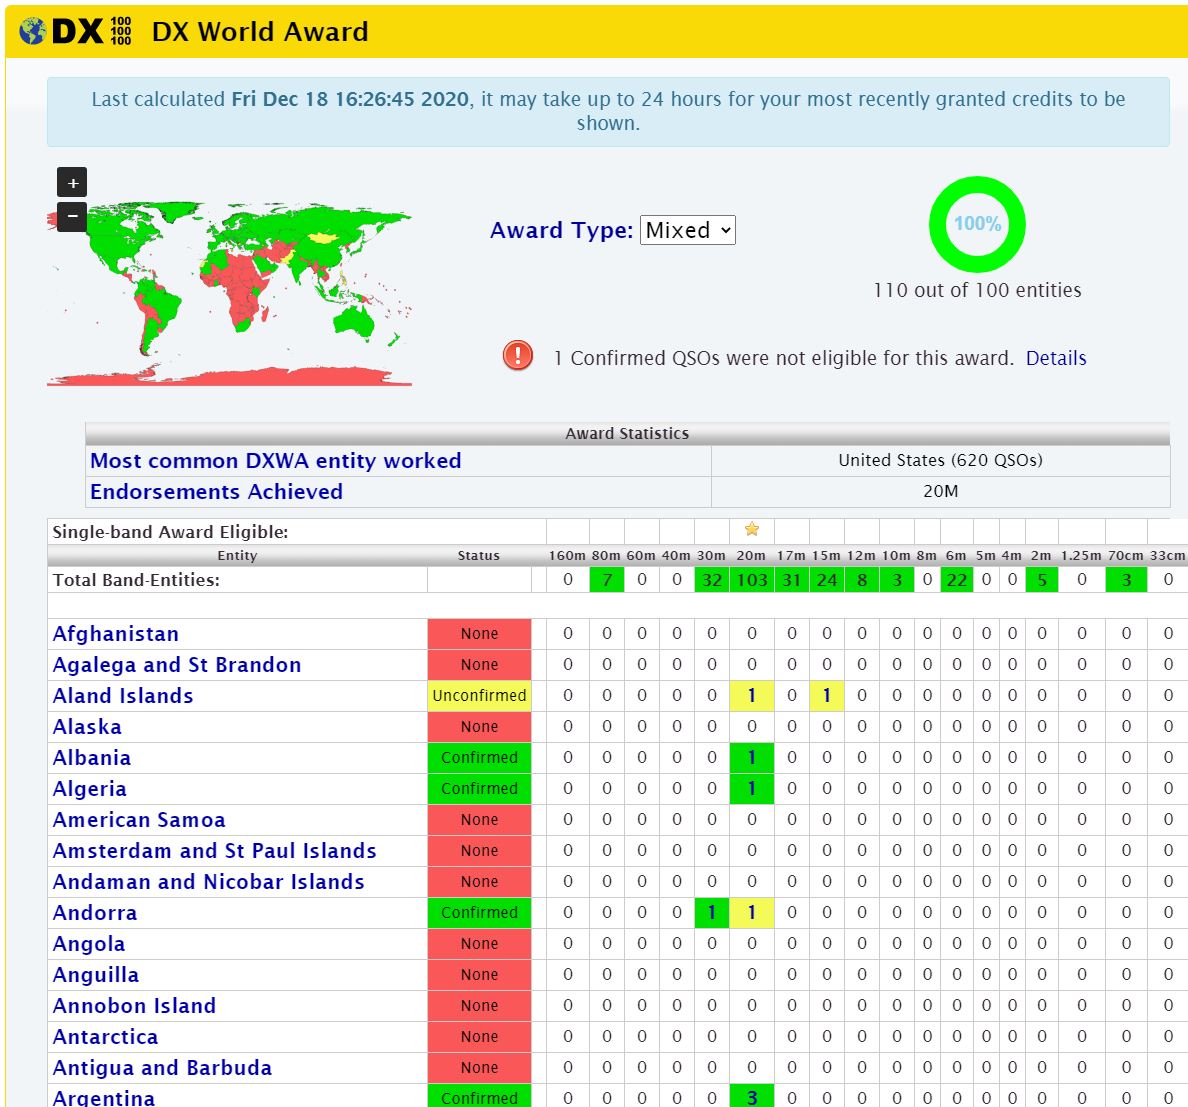
Another thing people like to do is collect things that go towards awards. This can be DXCC (Countries) US States, Grid squares, IOTA (Islands On the Air) and so on. A benefit of the online logging sites and logging software as a lot of this can be done pretty much automatically. It relies on the other person confirming the QSO but other than that is pretty painless but can add an element of hunting for the next one.
For example, I just need Alaska to get my worked all States:
But I have managed to get my first 100 DXCC:
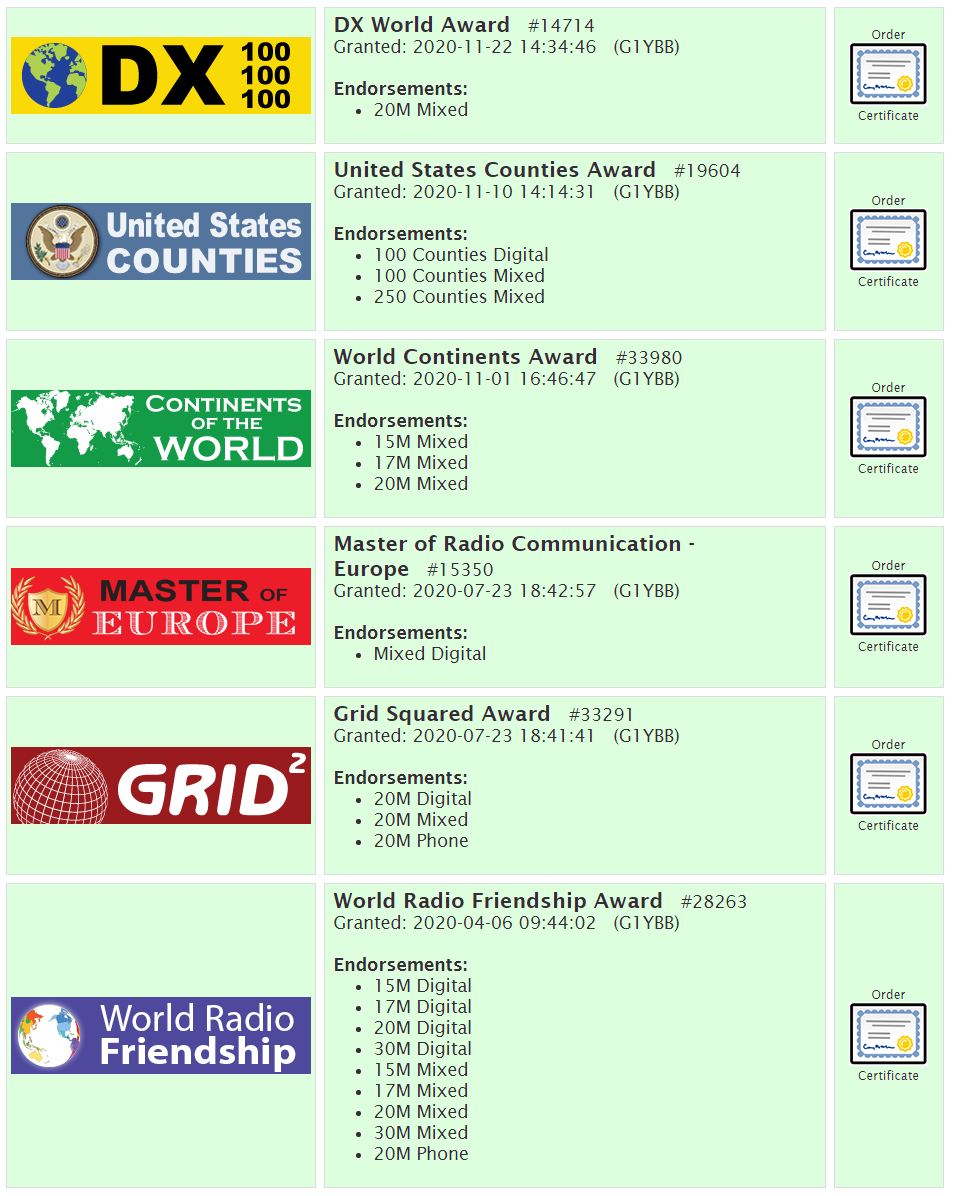
On my qrz.com profile awards tab you can see all the awards I have gathered just from having QSOs and uploading them all: As you can see from the images these are attainable on a per band basis so there is always a new challenge to chase!
These are just a few tasters to share some of the avenues of radio that a newly licenced ham could find interesting.
Also check out the RSGB Beyond Exams page for other practical progression via the RSGB.
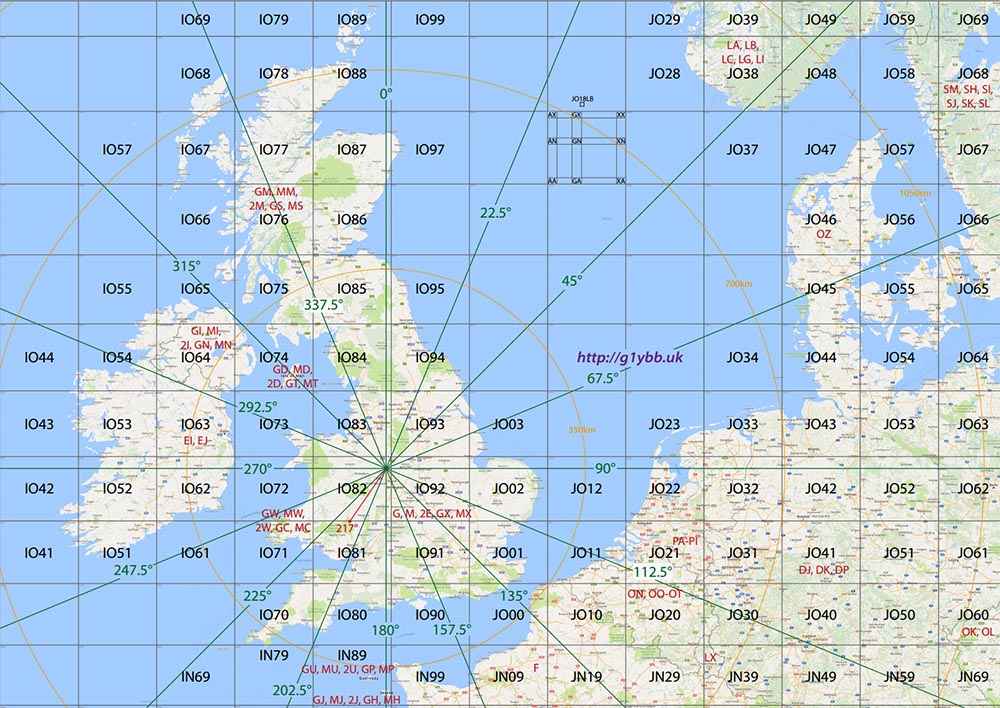
With the introduction of the B2 scoring system in 2017 I decided it was time to update my VHF contesting map that I use to help me aim the beam and find multipliers and bonus squares when out portable.
I have beam heading marked centred on my portable locations. They are close enough together at this scale to us just one point.
I usually take an A4 print of this map with me to refer to but the PDF file is fairly high resolution and should be printable at least A3 size at decent quality. Here is a 100% view of the map to see the detail:
You can download it if you wish but if you wanted one centred on your location you can always email me (my email is on the home page here). The annotations are all done in vector layers and can easily moved around to suit. Here is my PDF for a look but it’s probably only any use to David G4ASR and other portable stations in my area.
Edit:
Several people have asked for a copy of the map centred on their locator so one of these below may be of use for you. The centre point of the beam headings covers a couple of squares around the actual centre so one near yours. If not you can always email me.
NEW MAPS APPEAR AT THE TOP. Below those is a sorted list of previous maps, and below those are 2017 B2 (boooo hissss) maps.
As not everyone is familiar with the process of entering RSGB contests using the online system and generating their logs from within Minos I thought I would do a basic run through of the process.
First up, I HIGHLY recommend logging the actual contest as you go with a computer, and Minos I think is one of the best for VHF contests. It does not do any HF contests. If you are search and pouncing you don’t even need to be able to type quickly as you can listen to the running station and pre-fill in their details ready before you call and only have to type in the report and serial. Added bonus is once you have entered their locator it gives you their beam heading from you too.
This page is quite long as I have gone through each step with a picture to hopefully make it dead easy for the first time user to get going.
Anyway, let’s get it downloaded and installed…
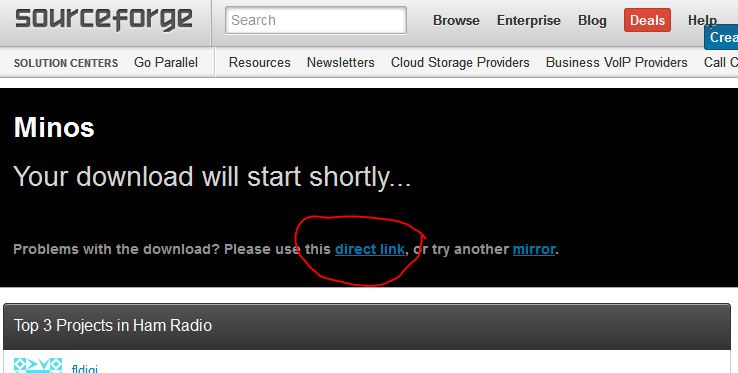
THIS LINK should download the latest version from the main Sourceforge page. If the download does not start automatically click the circled link below:
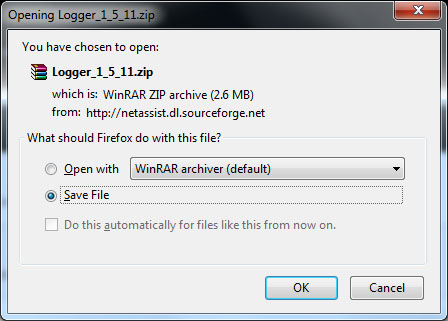
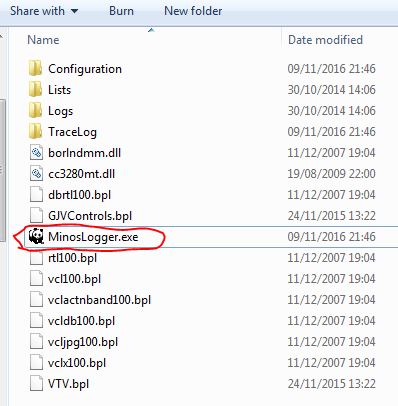
You should see the below (version number may change of course). Ensure you know where it is being saved! Once saved double click the ZIP file and extract the files, this time choosing a suitable folder as the program not not need an install sequence so you can run it directly from the folder it is extracted to. To run Minos you just need to double click the MinosLogger.exe:
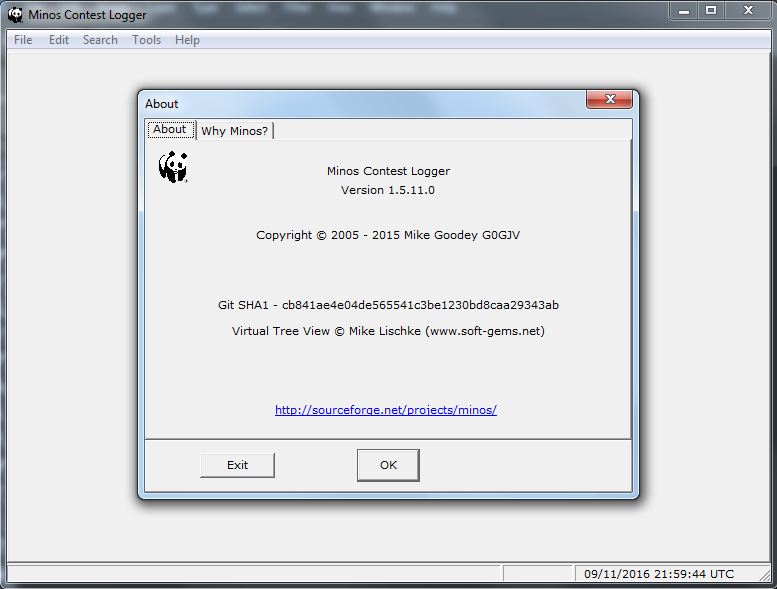
Once running you need to click OK on the opening screen:
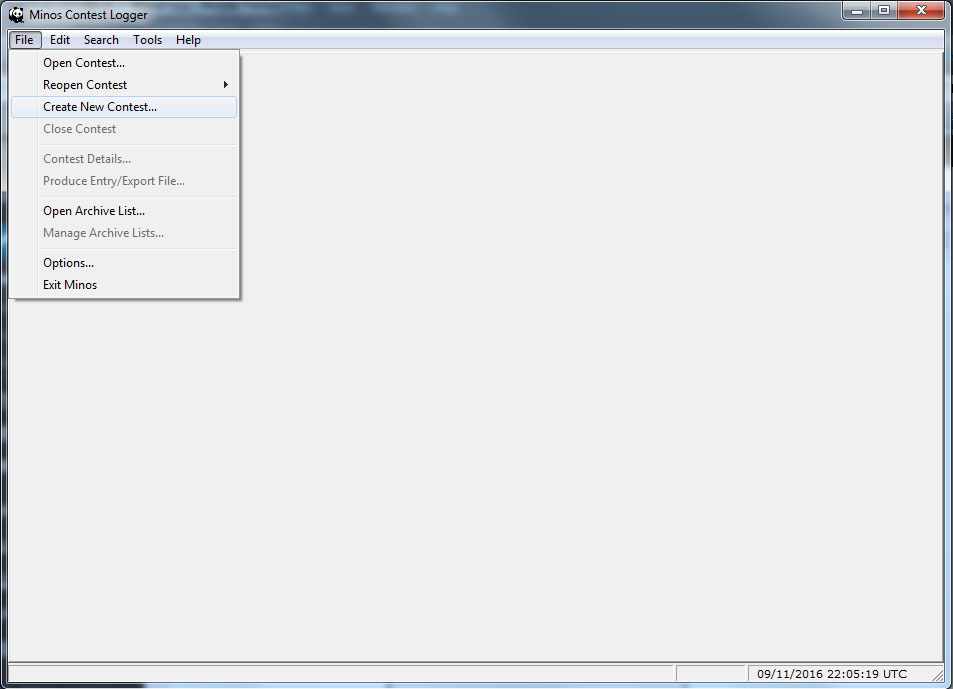
You’ll probably end up at a blank screen:
Go to File/Create new contest:
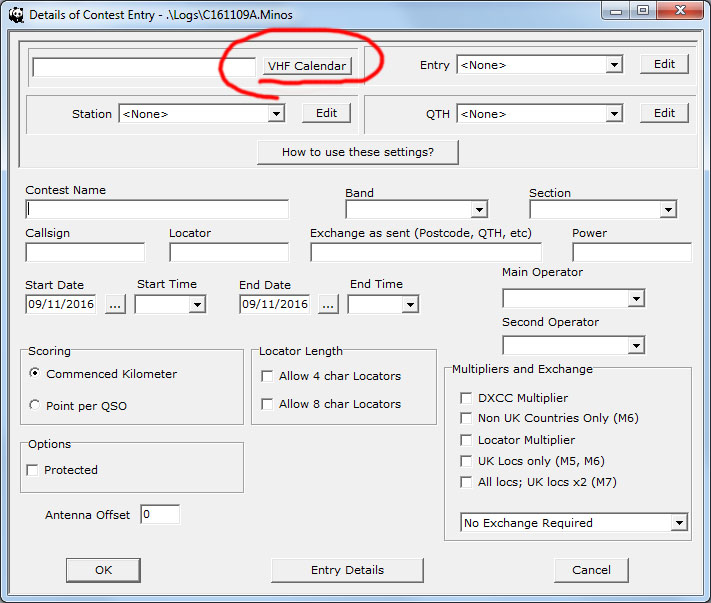
Ideally you want to be online now as Minos will download the current contest calendar making choosing the contest you want to enter a breeze and set up the scoring system ready for you. Click the VHF Calendar button:
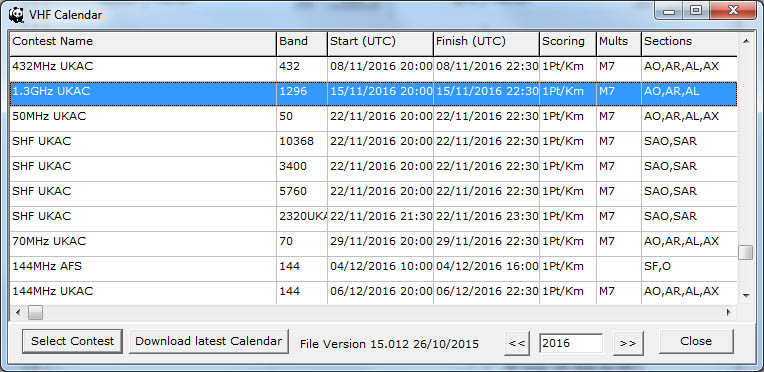
Once that is downloaded the calendar pops up with the next contest selected (in blue) but I am going to click on the 144MHz UKAC at the bottom and click Select Contest:
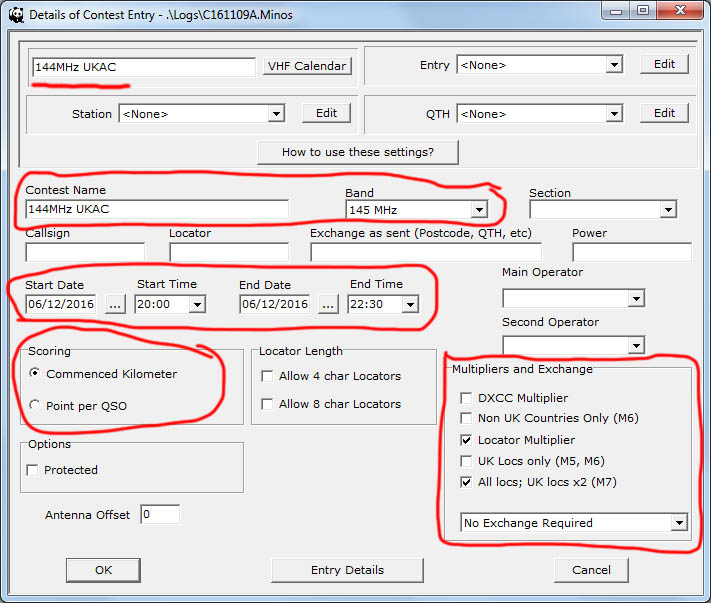
Once done all the relevant details are pre-filled in for you, date and start end times, and all scoring information:
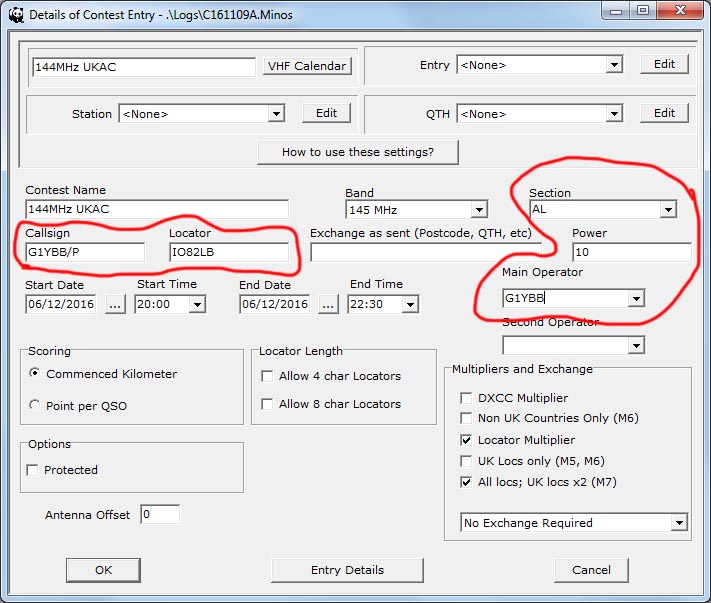
Next fill in the station details for this contest. Here I have filled in for operating portable. Note that if you are operating portable it will set the main operator to the portable callsign so you need to delete the /P. Not a problem if you are operating as a fixed station:
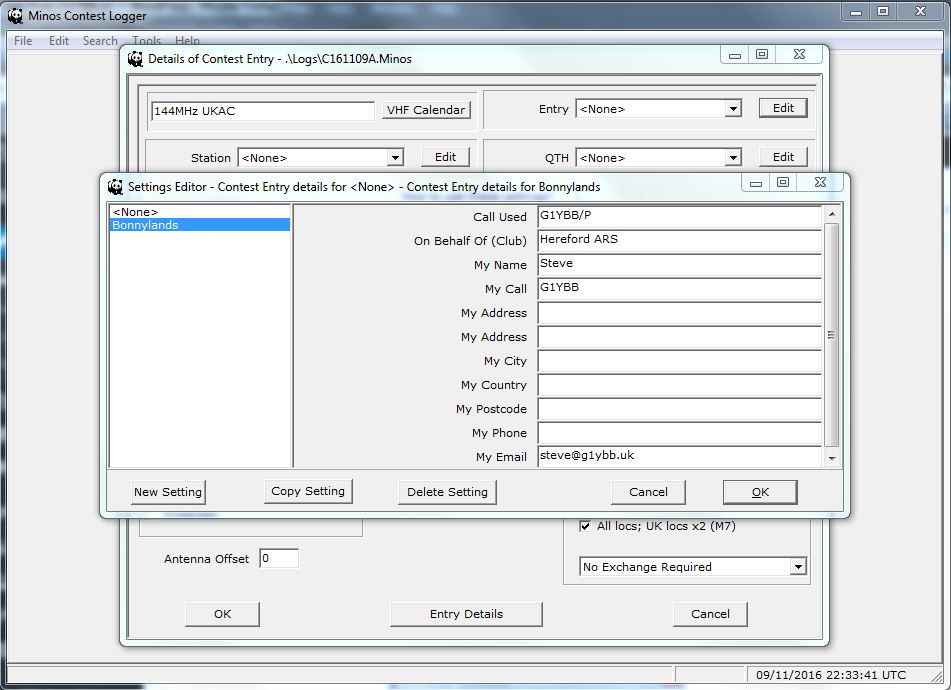
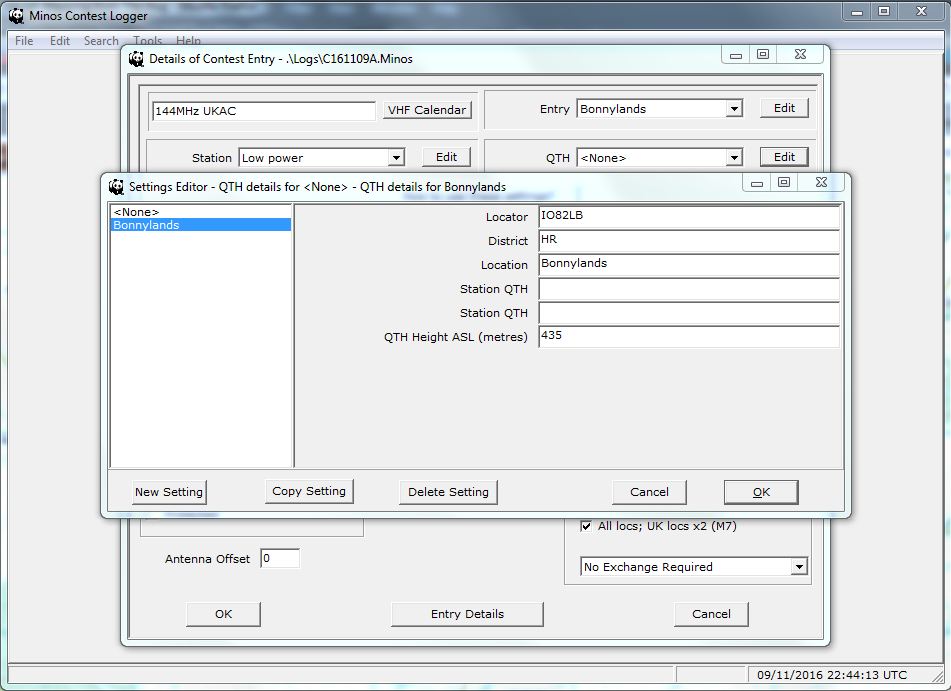
Next set up the Entry section. Click the edit button (top right) then click the New Setting button, give it a suitable name like “Home station” and fill in the relevant details and click OK:
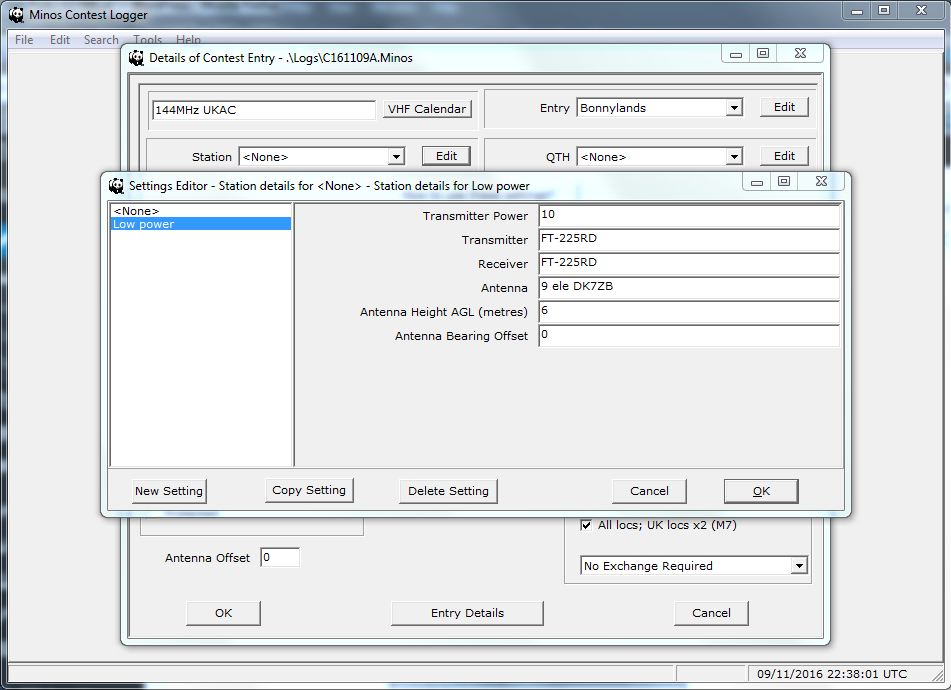
Next repeat for Station. Here you enter the equipment details so a suitable name might be Low Power:
And finally the QTH details:
You should now look like the below. The Entry Details button is probably best used after the contest, it is where you can add comments about the contest itself. So now hit OK:
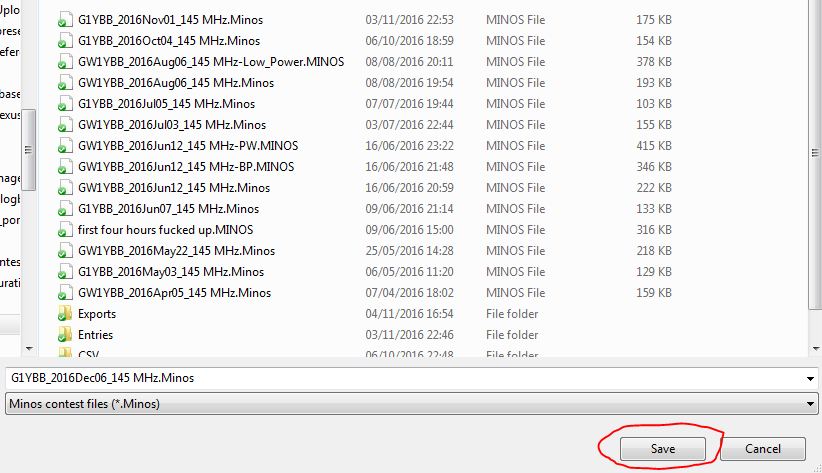
You will be asked to save the new contest. Choose the Logs folder chosen on extracting the ZIP file. I usually accept the default filename:
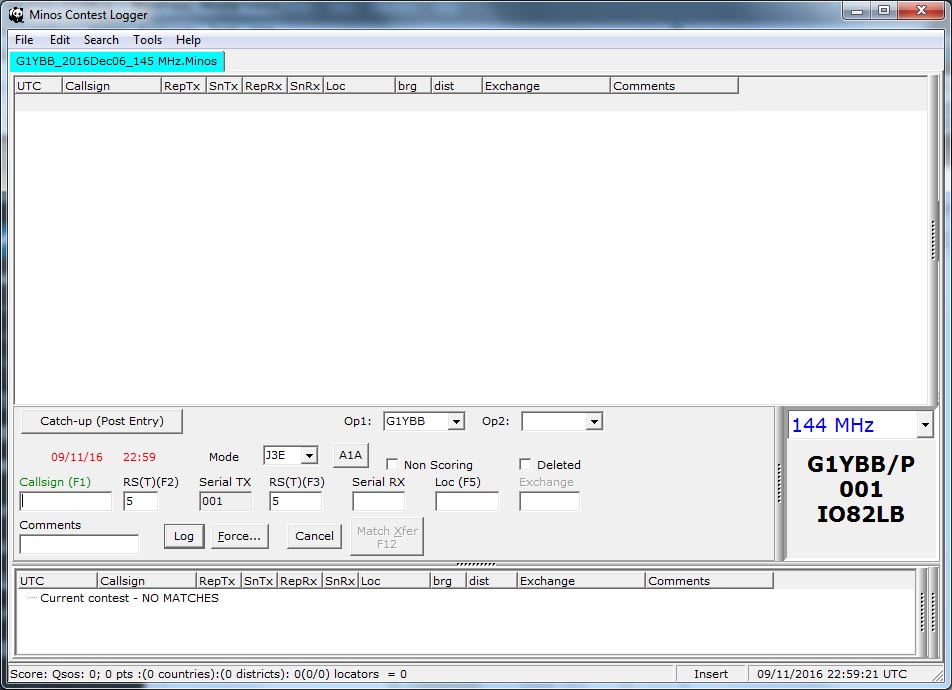
Once saved you will now be in the default layout contest entry window:
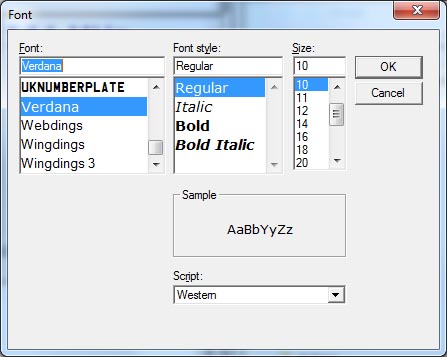
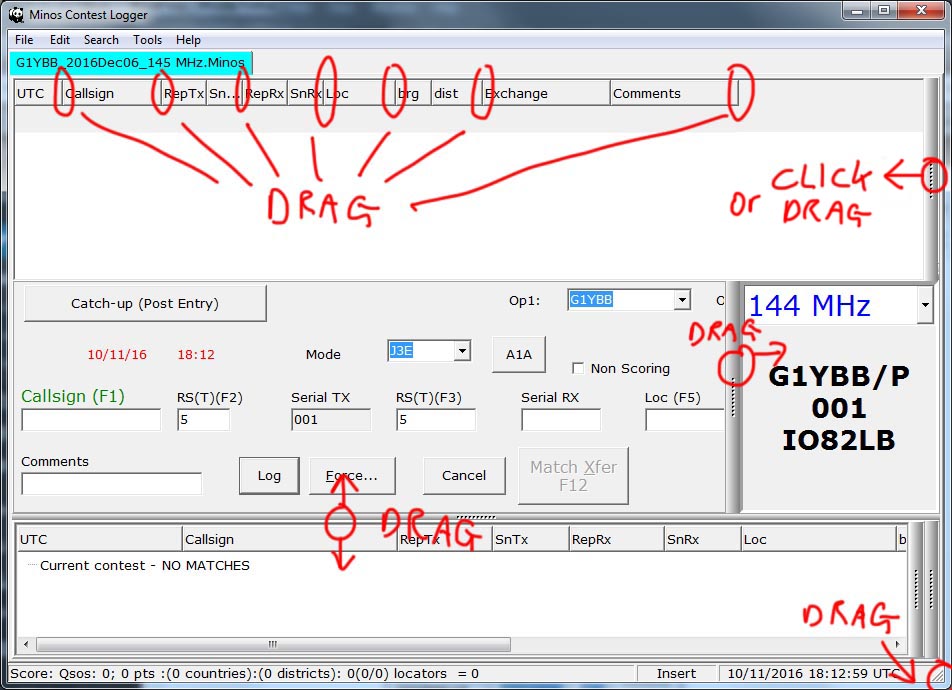
Now you want to arrange the screen to suit your tastes. If you are starting to need longer arms like me, or have a hi-res tablet like me, the writing may he hard to read. Minos is very good in that you can fix that! Go to Tools/Select Font… and you can change the default Verdana size 8 to a bigger font size:
Now would be a good time to re-arrange the screen:
To this:
We’re now ready to roll.
NOTE: If the time is showing in red as above the contest has not yet started. If your PC time and date and time zone/daylight saving is all set correctly, the date and time will turn black when the contest starts, and back to red when it is over.
Contest use is easy. The cursor defaults to the callsign field. Type in the callsign there. ENTER moves you to the next empty field.
The fields are ordered in this order:
Callsign of station you are working
Signal report you give them
Your serial number you are giving them
The signal report they give you
Their serial number they gave you
Their locator square
Their district (if applicable)
If entering information out of sequence like when the other station shuffles the order up or when you are pre-filling callsign and locator when search and pouncing, ENTER moves through the unfilled fields in sequence, looping around at the end. Once all the fields are entered correctly ENTER will log the QSO and put cursor back in the callsign box. TAB will also move through the fields but I like to use ENTER.
If you lose the QSO for any reason or change your mind about calling in pressing ESCAPE will clear all fields and start over in the callsign field.
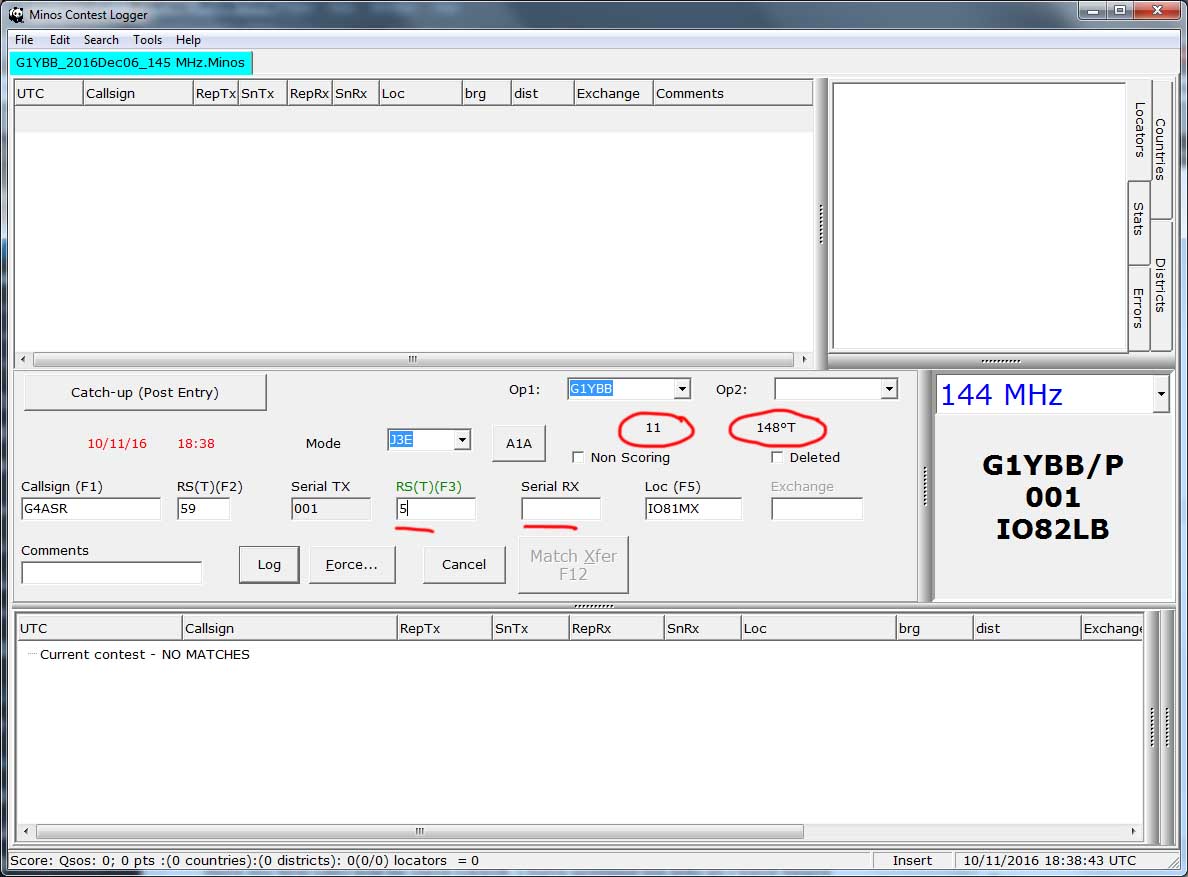
Here my first QSO will be Dave G4ASR. I have prefilled his info as I have heard him running, he is 59 with me so filled that in too, I just need to call in and get my report and serial from him. Circled in red is his distance from my site in km and the beam heading to his location: The middle right hand box is a visual aid to always know your current serial number to issue and your call (handy if you often work portable as G and GW !) and locator.
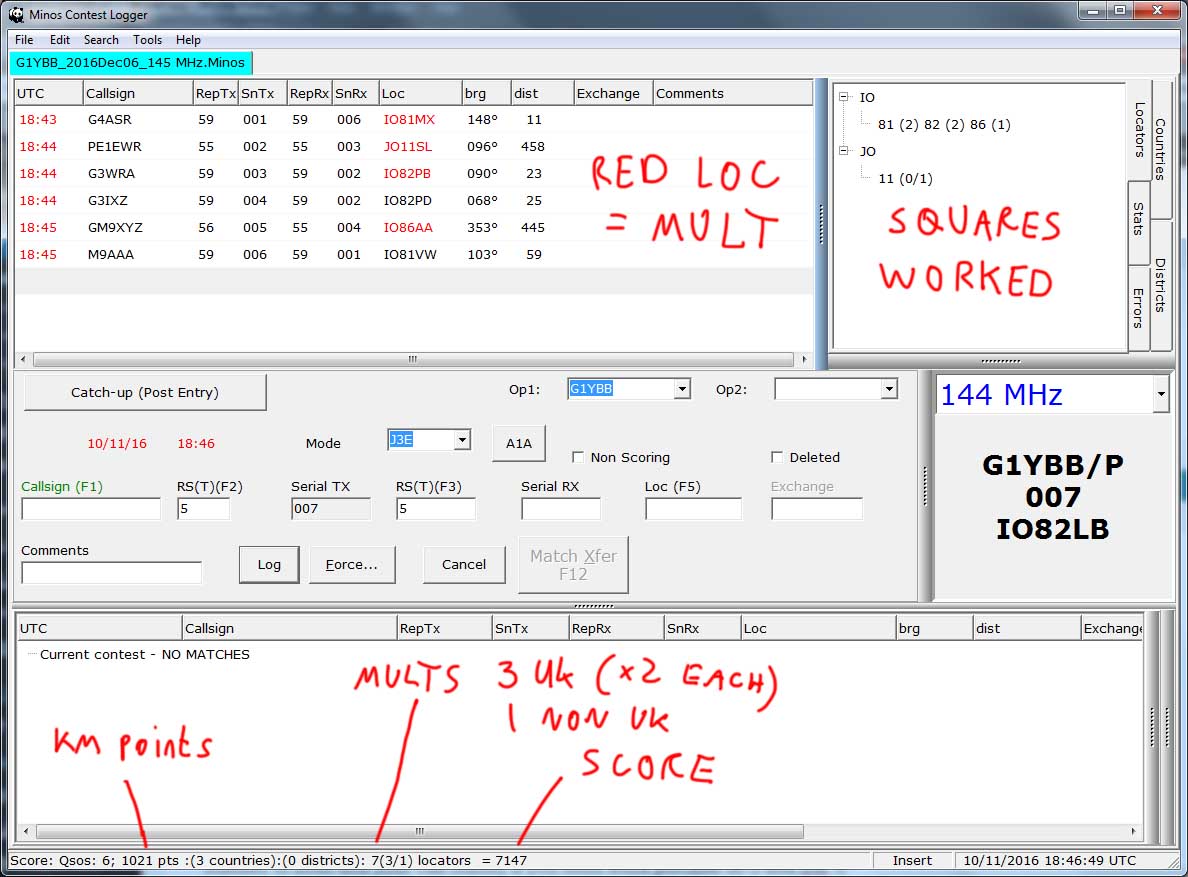
Here with a few more QSOs logged with useful information detailed:
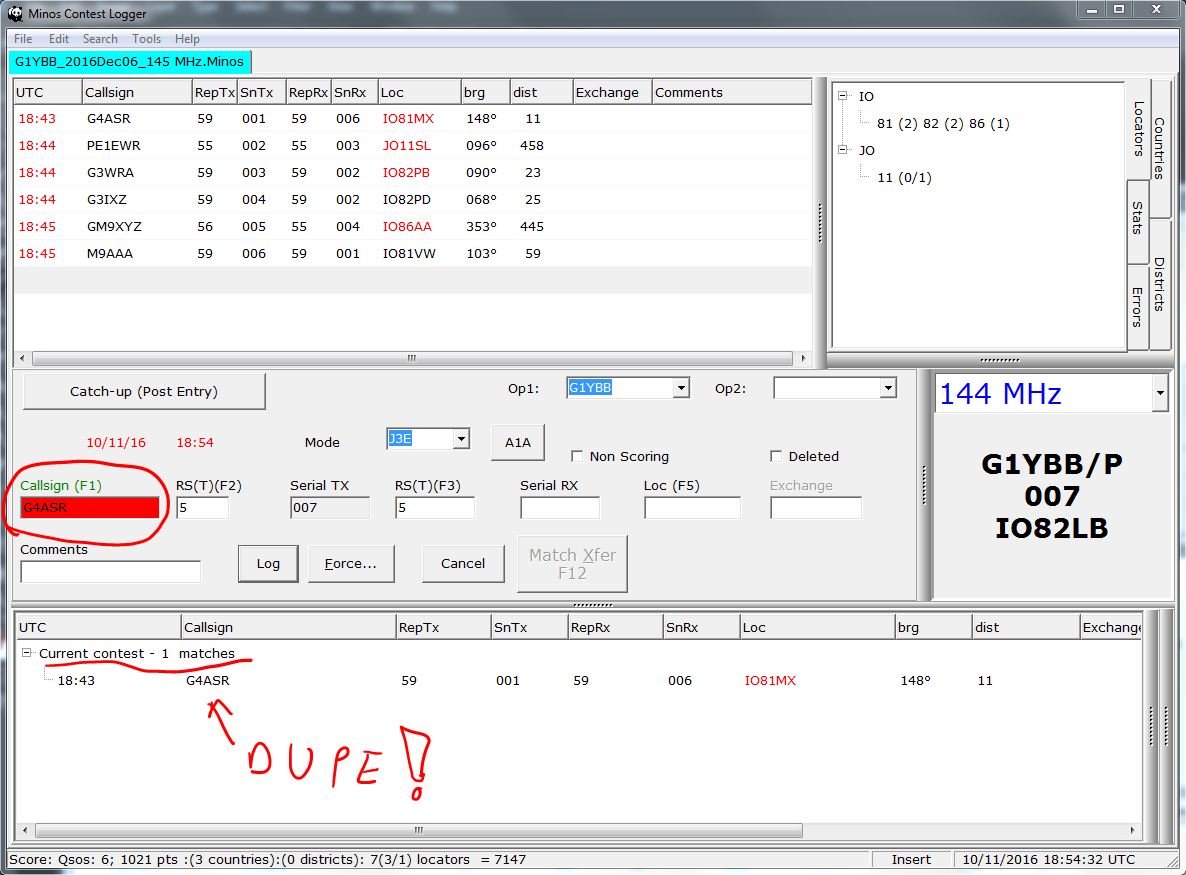
If you try and work someone or someone calls you and you have worked before you will get a red highlight in the callsign box and the matching QSO shown at the bottom. Time to press ESCAPE and move on or tell him we have worked before:
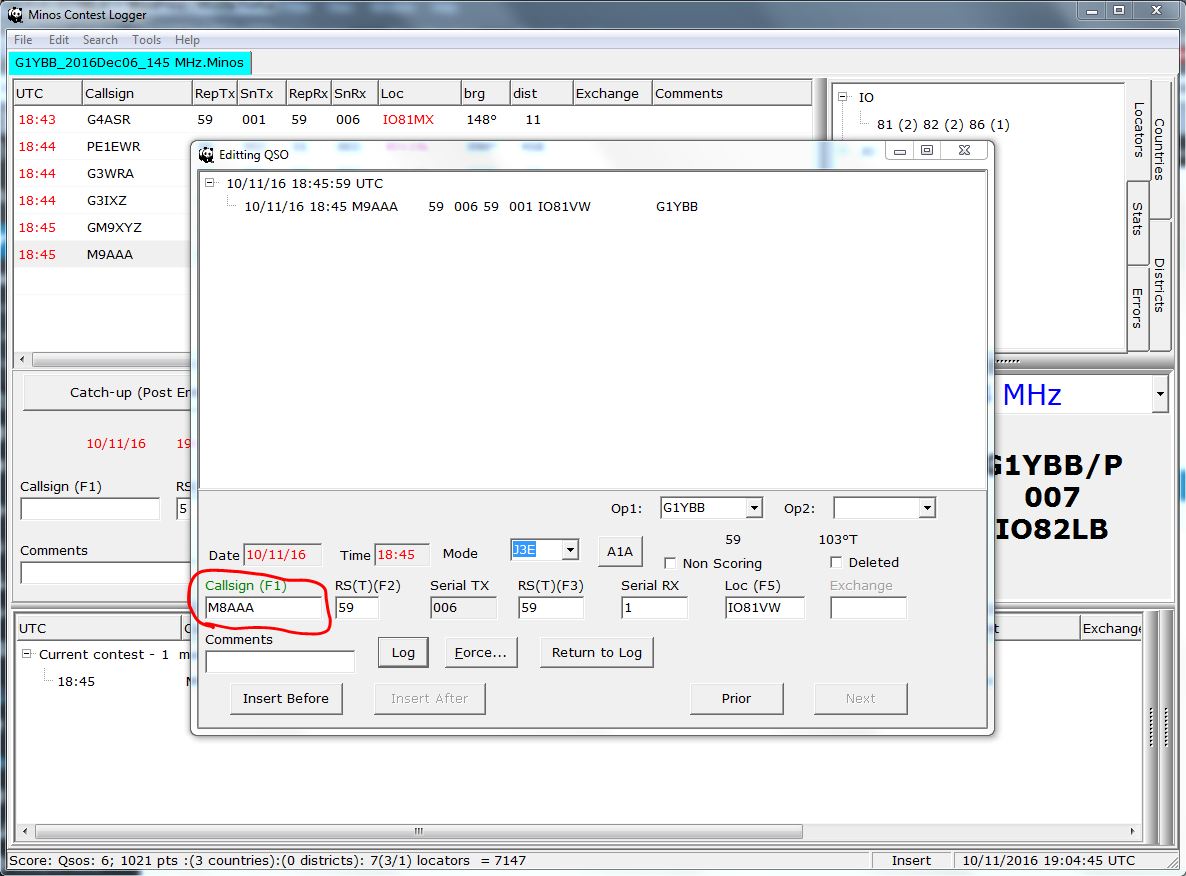
If you make a typo but you have logged the QSO you can correct it. Double click on the QSO line in the top window and you will see this window. When logging M8AAA I pressed 9 next to it by mistake, so I can edit it here:
Click the Return to Log button and click OK at this requester:
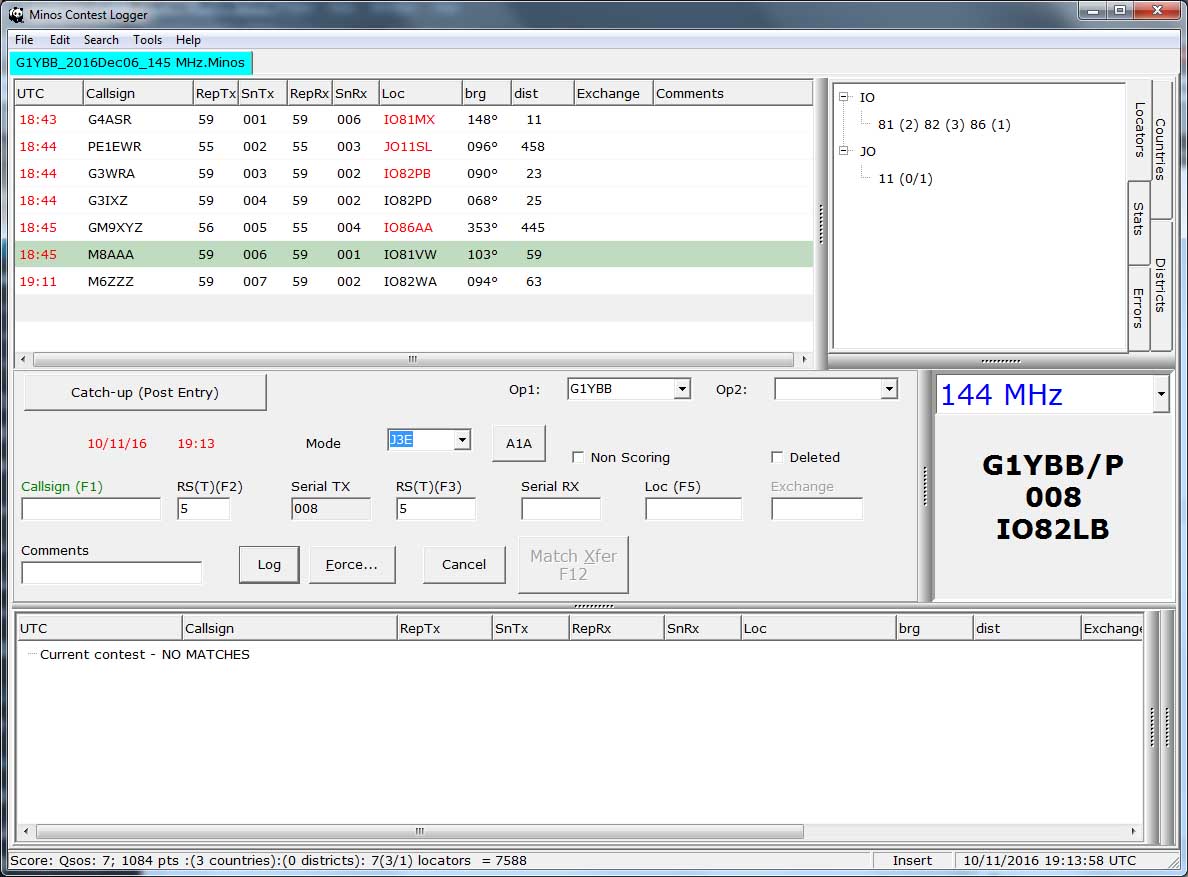
That QSO line will turn green which just means it has been edited. Here I have made the edit and now worked another station too:
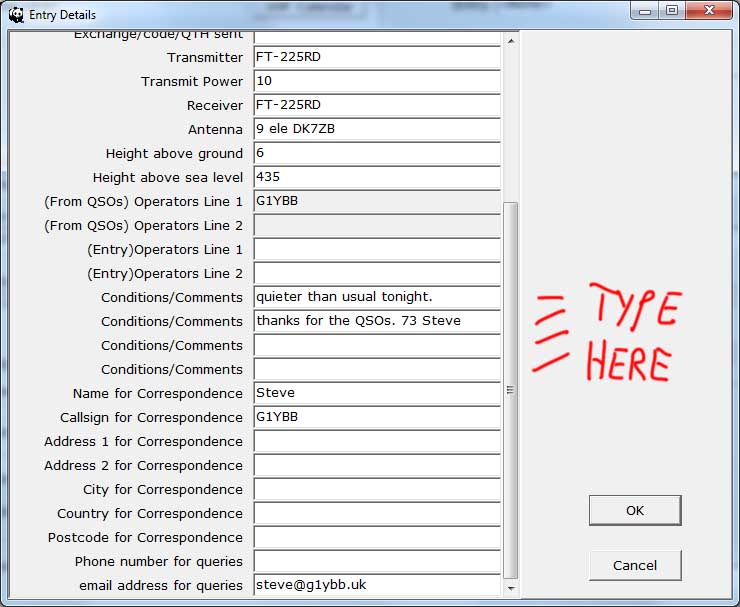
OK, now we have worked the contest and it’s time to generate the entry file. Start by entering some comments if you wish by going to File/Contest details, and then clicking the Entry Details button at bottom of the screen that pops up:
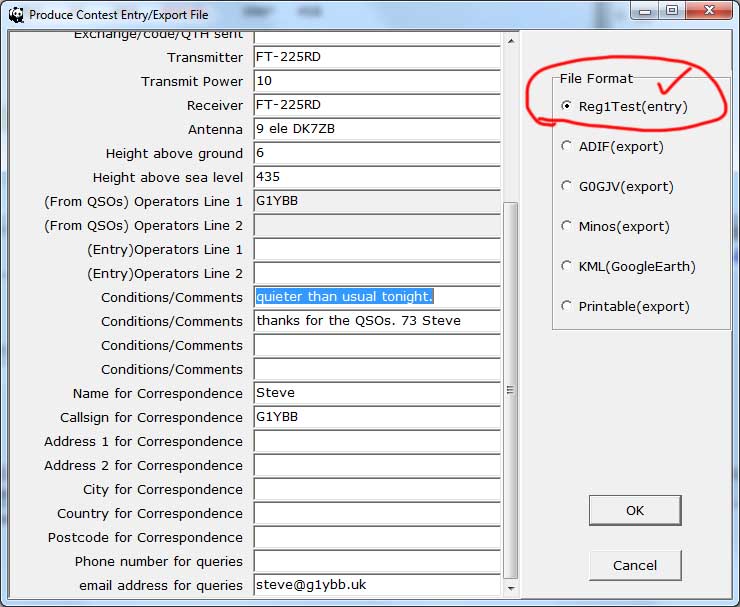
Click OK twice to get back to the main screen and choose File/Produce Entry_Export file. You’ll get another chance to edit the contest entry details here but can click OK as it should default to the correct Regedit format:
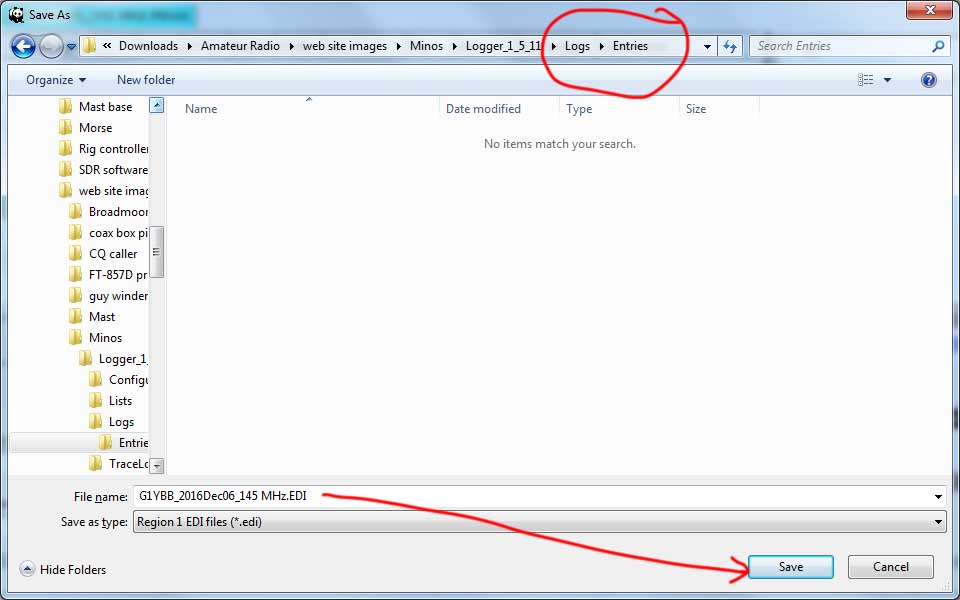
Next you are asked where to save the entry file. I have a subfolder below Logs called Entries so I know which is what. I use the default filename:
That’s it done. Now to upload it to the RSGB site.
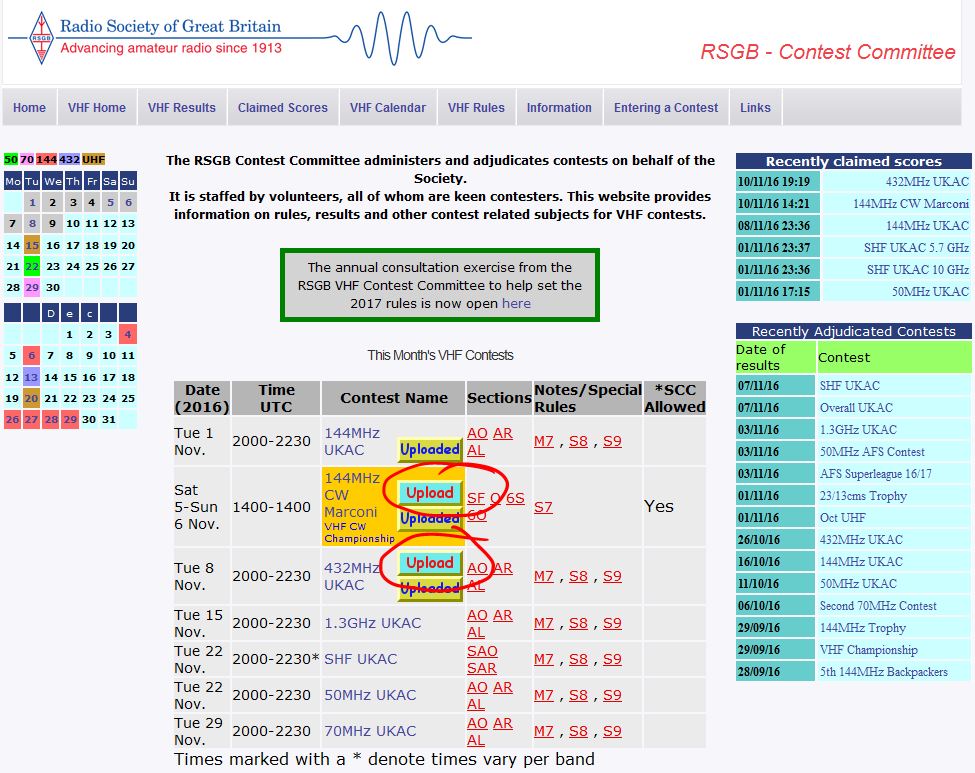
This link to the RGSB VHFCC site will take you to the current month’s VHF and up contests which will have an upload button for the recent contests:
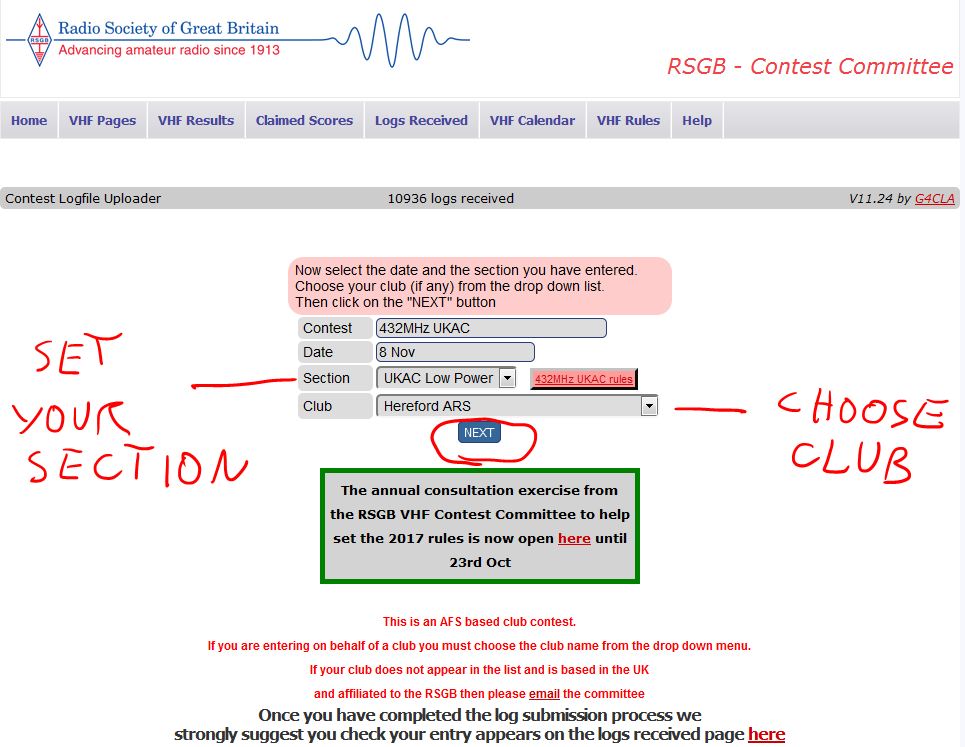
Clicking the upload button for the contest you just participated in takes you to a page like this (144MHz UKAC is closed right now so 432MHz is being used to demo) Set your power section and choose your club to enter on behalf of then click Next:
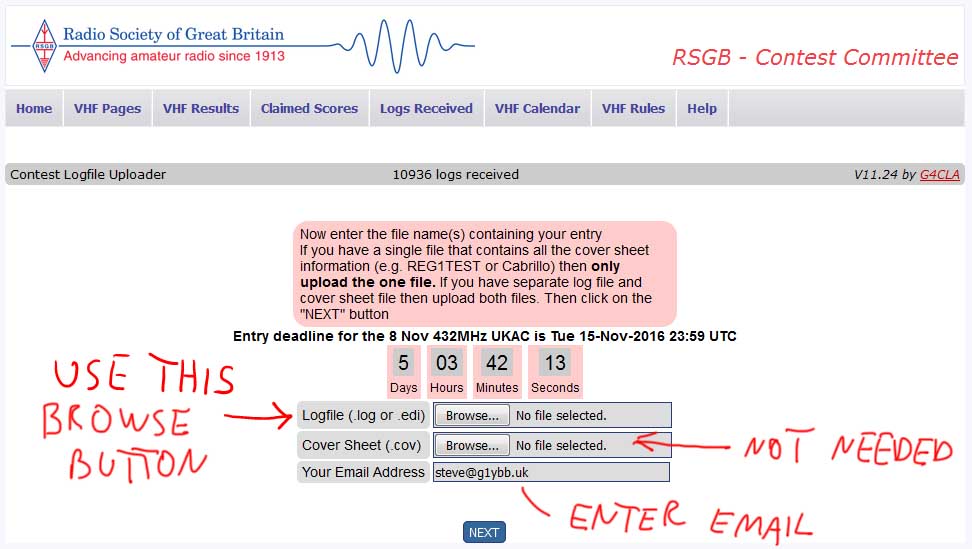
Now you actually upload the entry you just created. Click on the marked browse button and find the log EDI file created earlier. You can ignore the cover sheet browse button. Enter the SAME email address as in the entry details (else you will trigger a bug, as I found out…) and click Next:
Your entry is now uploaded. Follow the option to enter a claimed score on the next page and everything will be filled in for you. I will screen grab next actual entry.
You should soon receive an email telling you your entry was received.
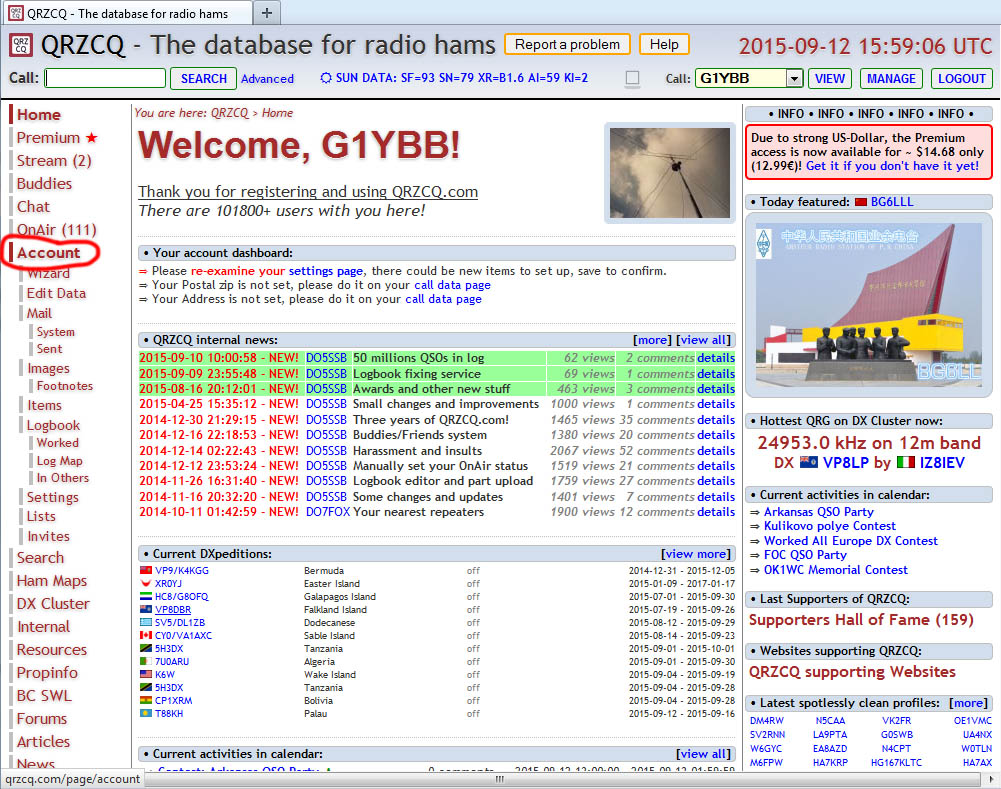
In order for your QSOs worked when not at home to appear correctly on QRZCQ.COM you need to add the portable and alternative callsigns to your QRZCQ.COM account.
Assuming you have your main account set to your normal callsign (eg G1YBB), to add a portable callsign in your home country (eg G1YBB/P), or an overseas country where you add a prefix or suffix for the country you are working from (eg G1YBB/VP2) is quite straight forward.
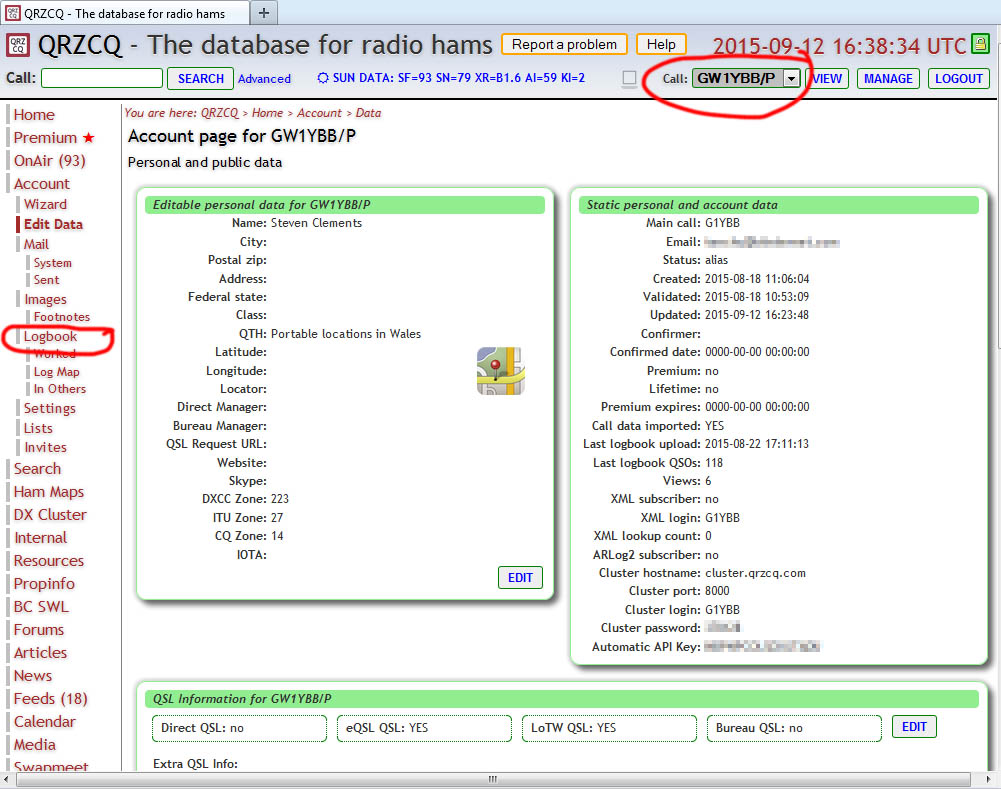
Once logged in go to “Account” on the menu on the left:
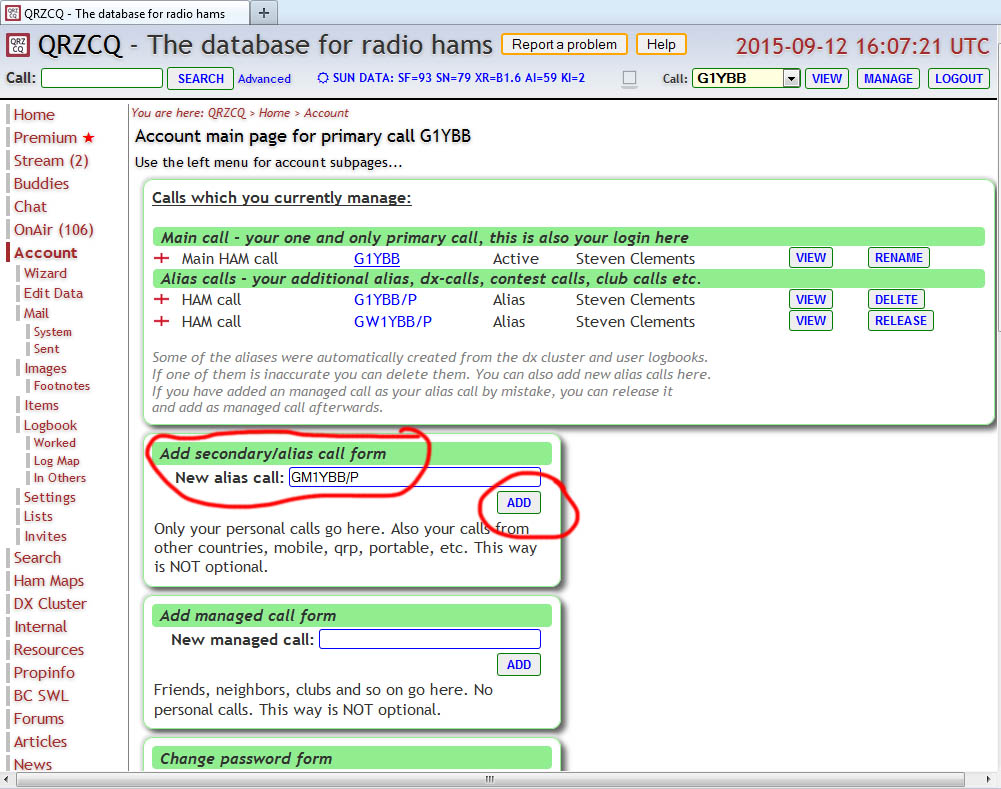
Then for your portable or DX callsign just enter it into the box for a secondary/alias call form and click “ADD”:
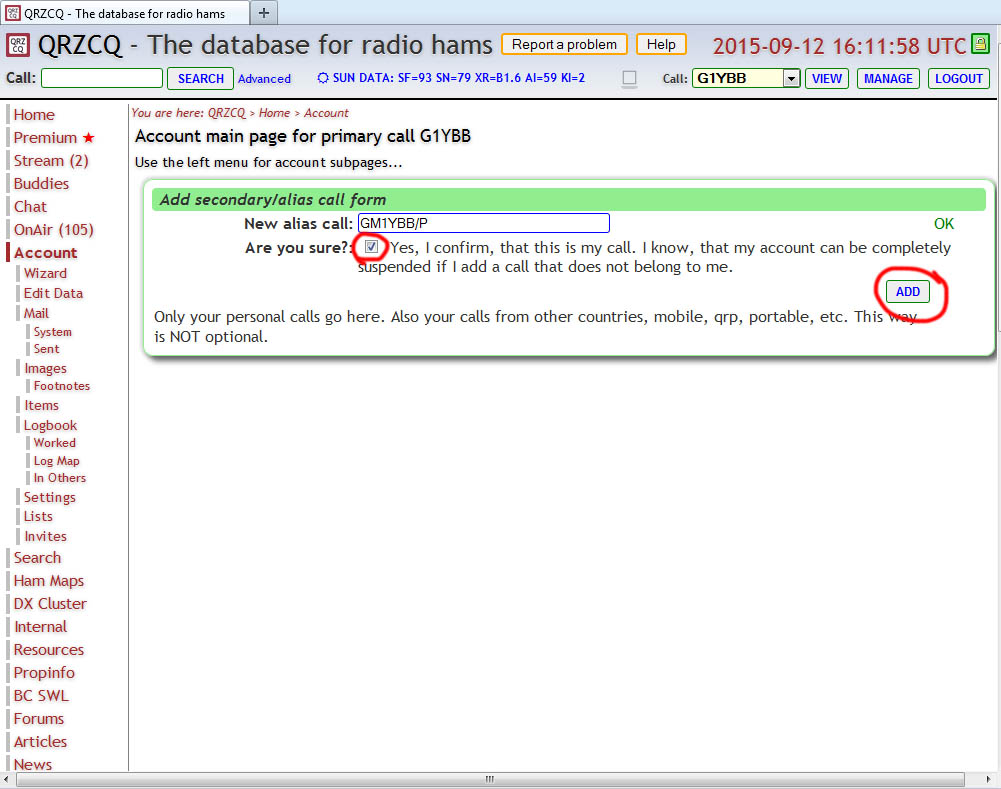
Tick the confirmation that the callsign belongs to you and click “ADD”:
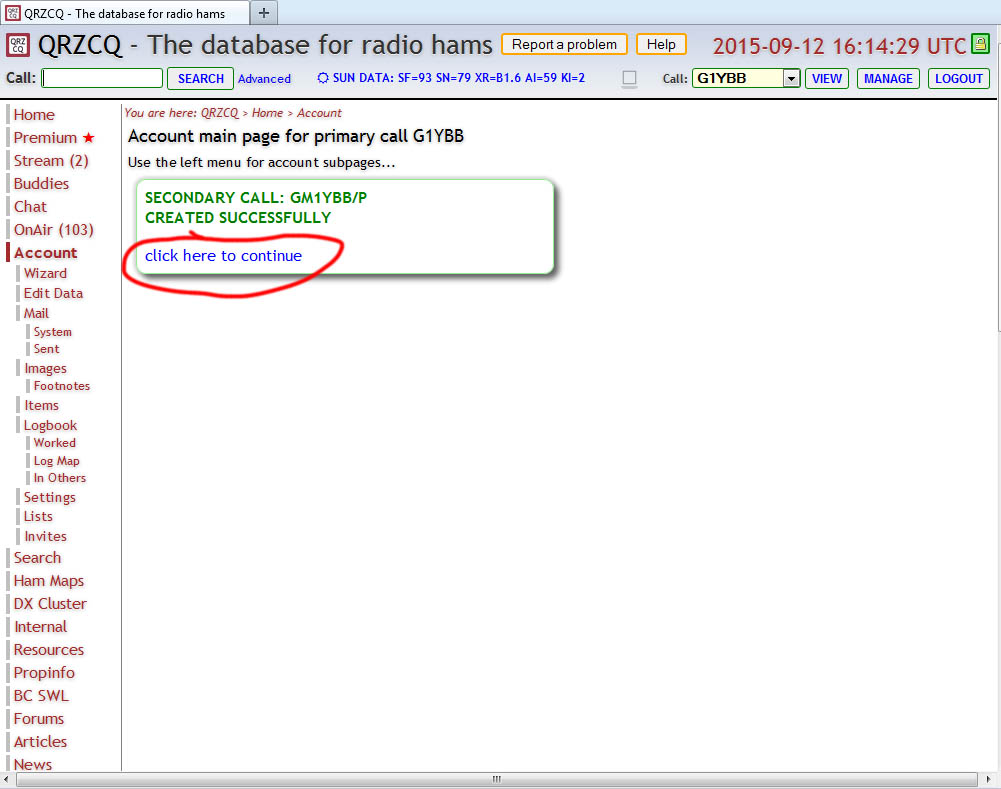
Callsign is created. Click “click here to continue” to see your new callsign:
New GM1YBB/P callsign in my list. For some reason QRZCQ.COM won’t let me change my GW1YBB/P DXCC setting from England, so the England flag shows, yet set the Scottish callsign correctly. I must report that:
Log4OM does not support QRZCQ.COm so I cannot advise on your software settings if your software supports it. So I am uploading the exports ADIF files created by Log4OM.
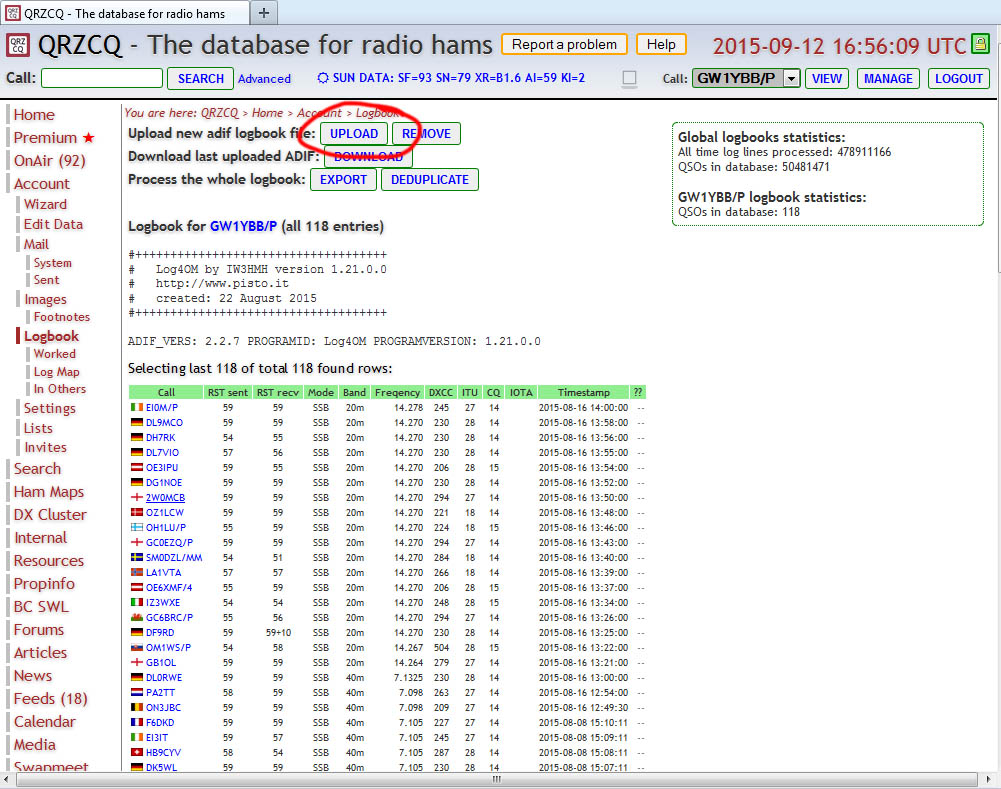
Use the callsign picker top right to select which callsign you wish to upload QSOs to. I am going to add some older ones to GW1YBB/P:
Once you have selected the callsign, click the “Logbook” menu item on the left:
There you can choose the “Upload” button:
The rest is self explanatory. Repeat the process (using the callsign picker) to upload ADIF for your other callsigns.
In order for your QSOs worked when not at home to appear correctly on ClubLog you need to add the portable and alternative callsigns to your ClubLog account.
Assuming you have your main account set to your normal callsign (eg G1YBB), to add a portable callsign in your home country (eg G1YBB/P), or an overseas country where you add a prefix or suffix for the country you are working from (eg G1YBB/VP2) is quite straight forward.
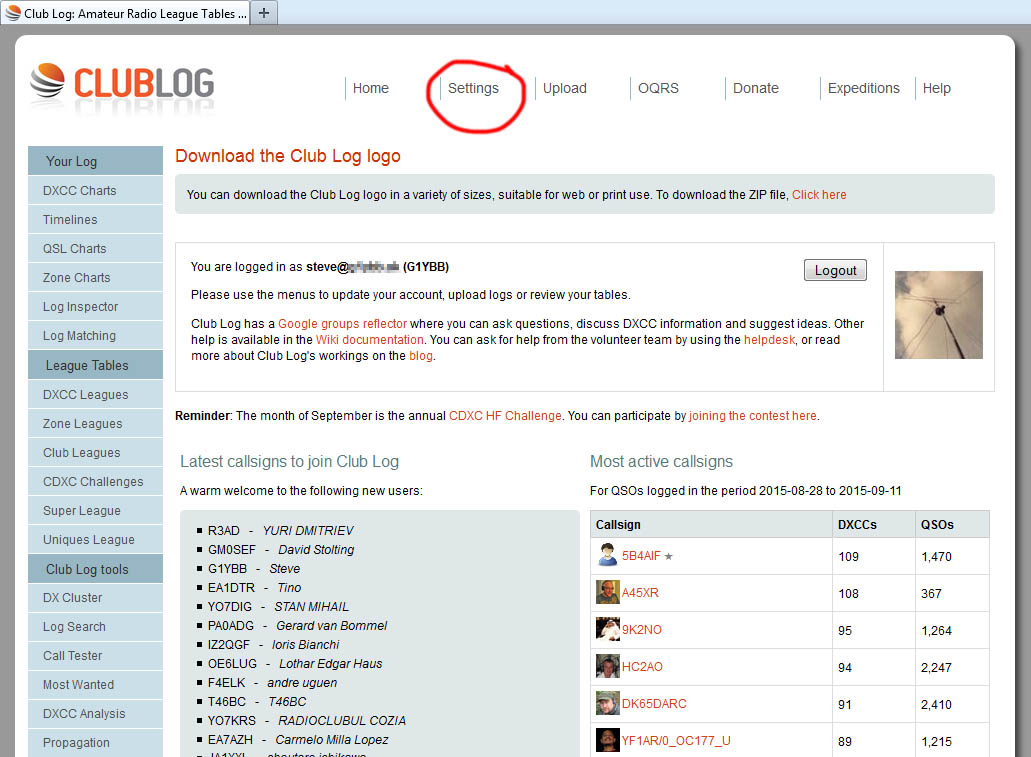
Once logged in go to the “Settings” at the top of the page:
Then click on “Callsigns”:
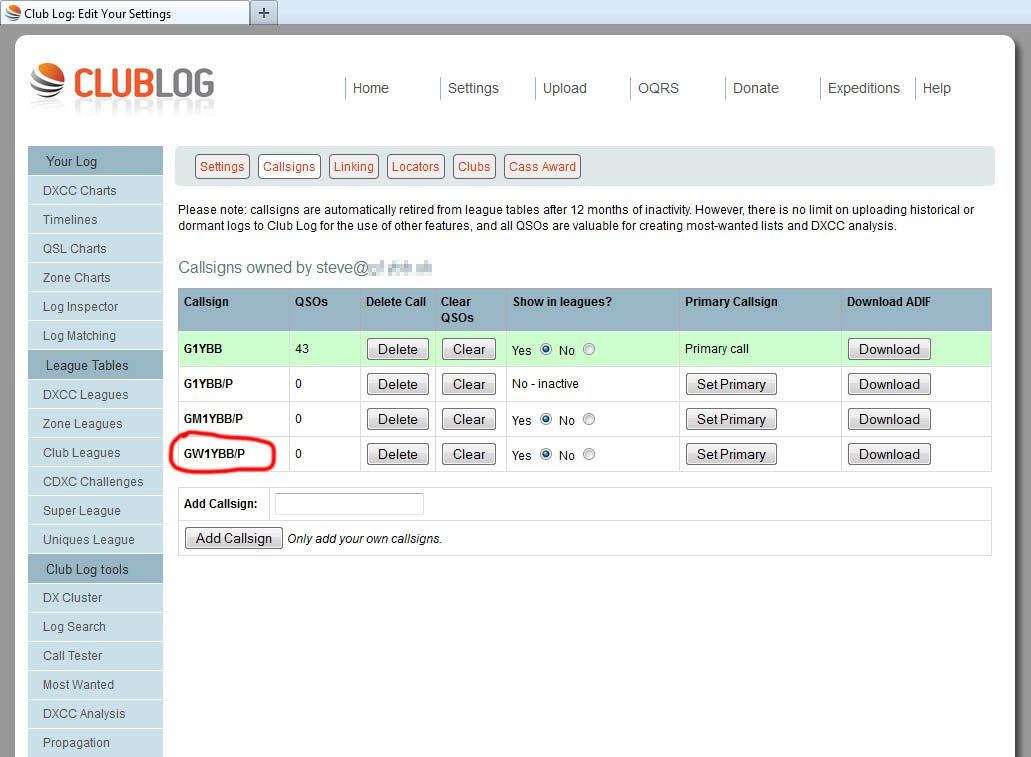
ClubLog have made it very easy to add a callsign. Just type in carefully your portable callsign and click “Add Callsign”:
Done! Repeat for other variations as required. You can link your home country portable callsign to your home callsign if required for the ClubLog awards tables. I haven’t done this as yet.
ClubLog is now ready to accept your QSOs directed to the correct logbook via your logging software.
In Log4OM each callsign configuration you have set up will have it’s own HamQTH setting although some are common. Setting up multiple configurations for Log4OM is shown here.
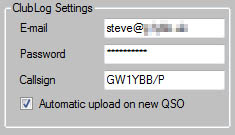
Enter the email and password you use to log in to the ClubLog site. That is used for ALL variations of your station locations and callsigns. The unique part that identifies where your logging software uploads the QSOs is the callsign which must match one of the callsigns set up on your ClubLog site.
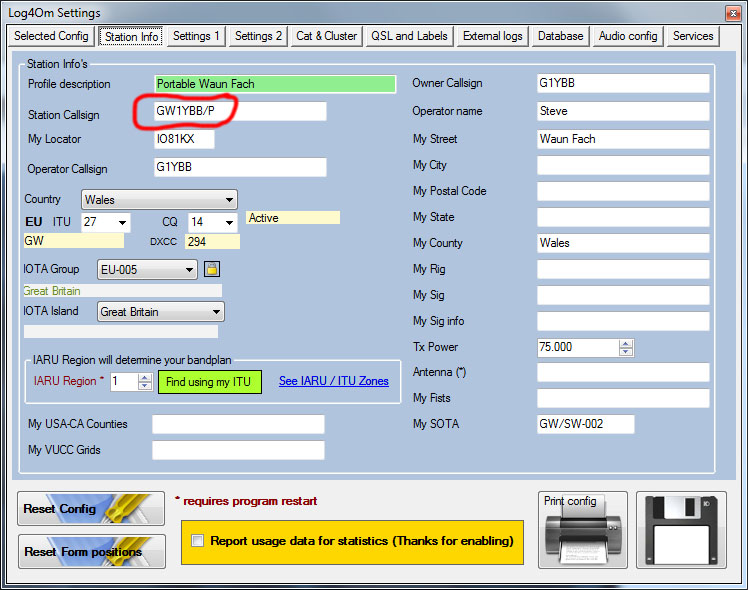
Here is the info entered into the Log4OM settings for my GW1YBB/P Waun Fach configuration:
Just change the callsign to suit on each configuration and QSOs will upload to correct log on HamQTH.
In order for your QSOs worked when not at home to appear correctly on HamQTH you need to add the portable and alternative callsigns to your HamQTH account.
Assuming you have your main account set to your normal callsign (eg G1YBB), to add a portable callsign in your home country (eg G1YBB/P), or an overseas country where you add a prefix or suffix for the country you are working from (eg G1YBB/VP2) is quite straight forward.
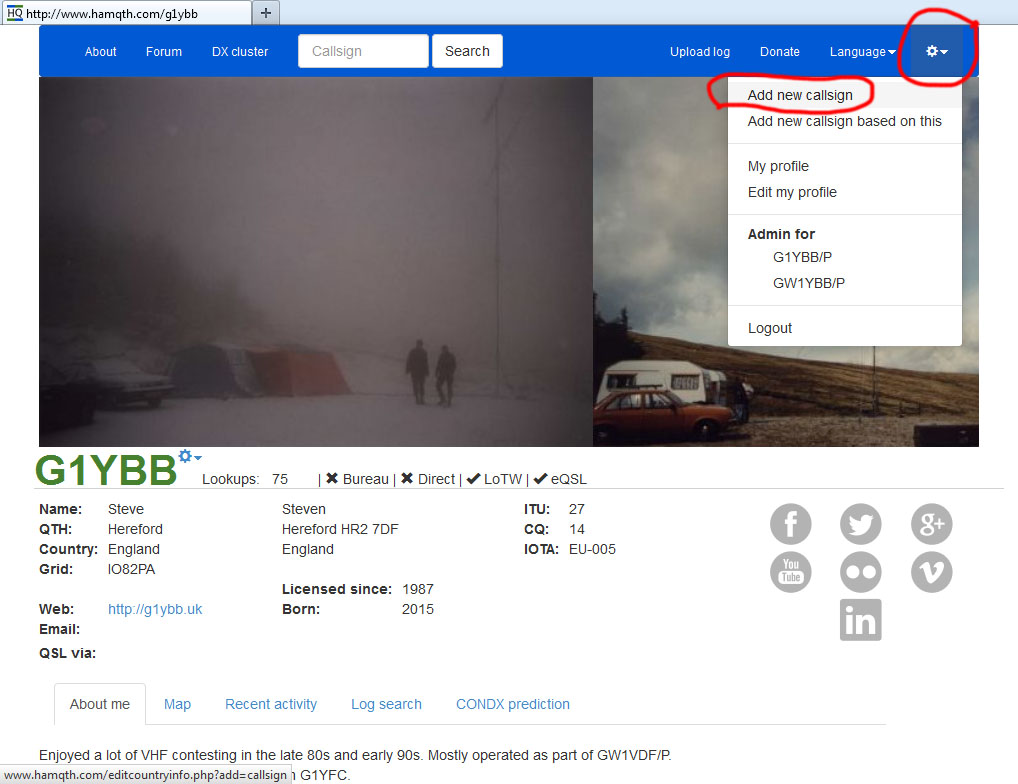
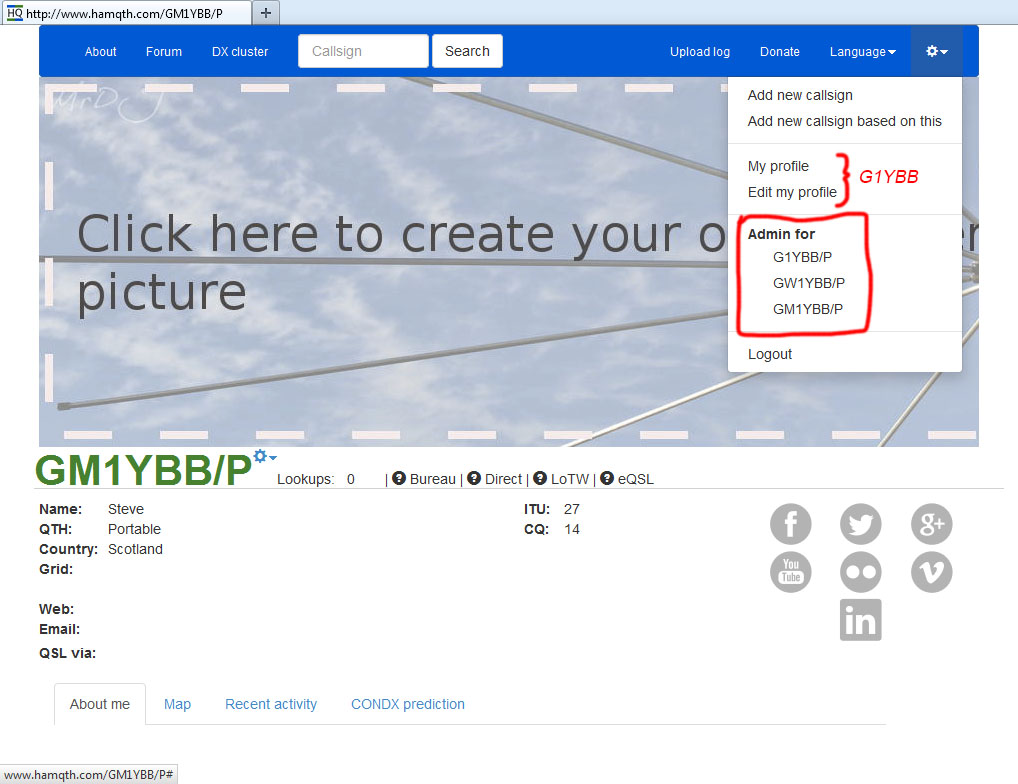
Go to the settings gear icon top right of the page when logged in and looking at your profile and choose “Add New Callsign”:
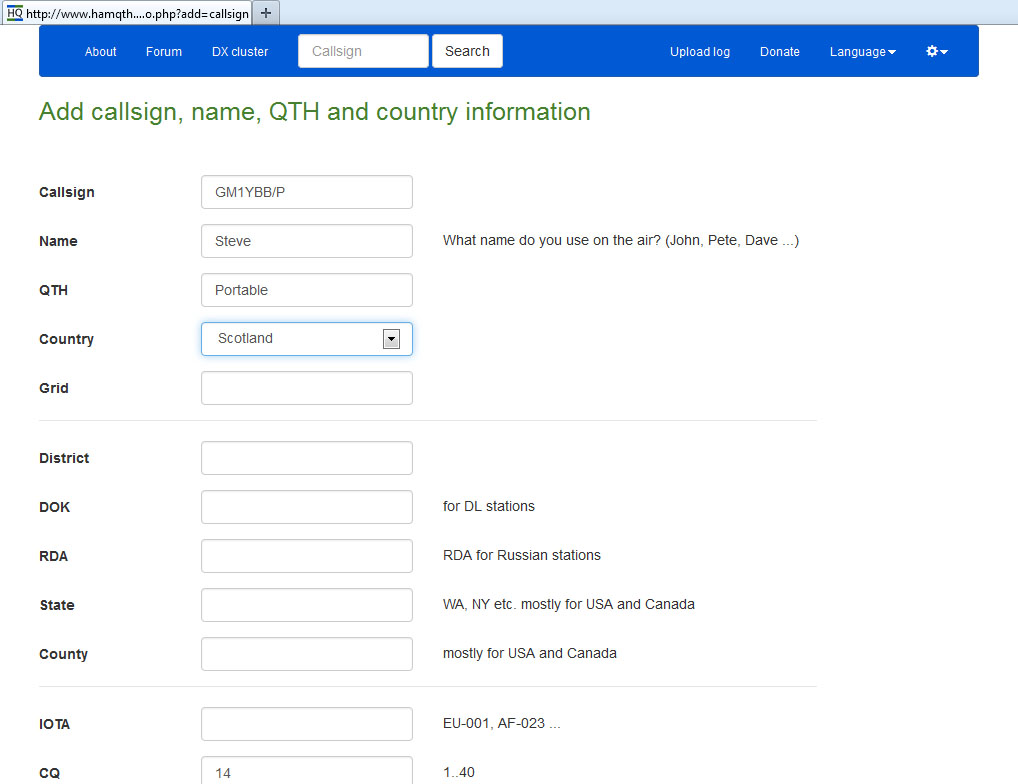
Fill in the new station details and scroll down to “Save” and save the new callsign:
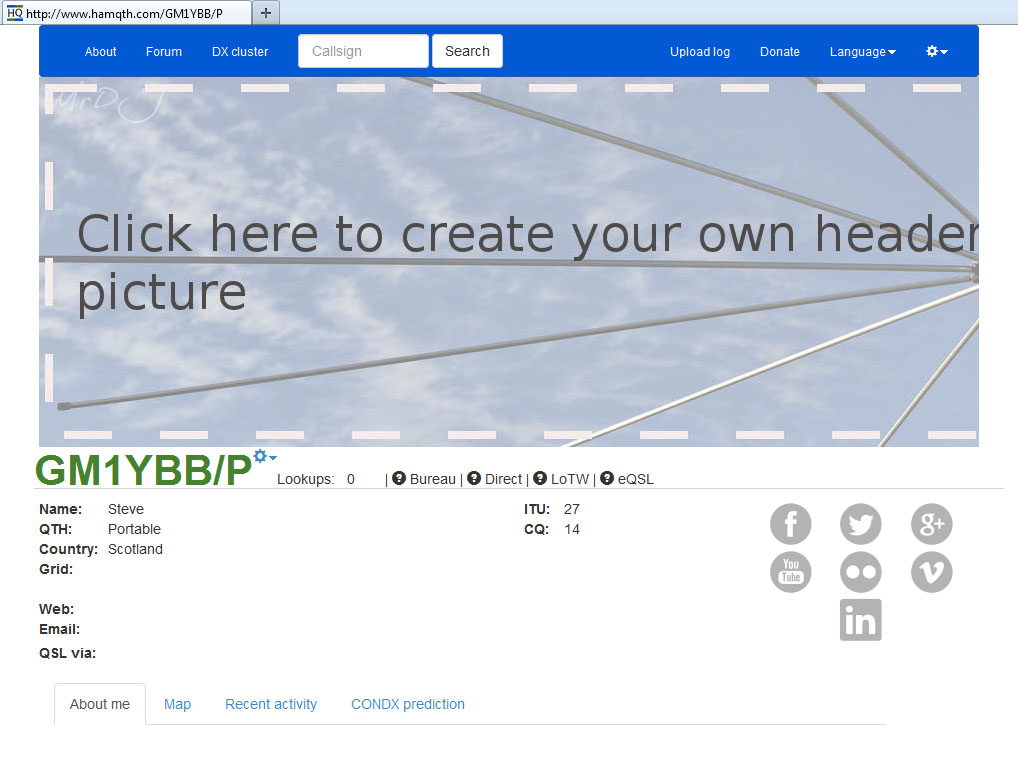
You will be taken straight to the settings page where you can activate the logbook for your profile, set QSL settings etc:
Once settings are made, scroll down to the bottom of the settings page and click “Back” which takes you to your profile page:
You can see all your created callsigns up on the settings top right:
HamQTH is now ready to accept your QSOs directed to the correct logbook via your logging software.
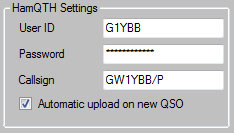
In Log4OM each callsign configuration you have set up will have it’s own HamQTH setting although some are common. Setting up multiple configurations for Log4OM is shown here.
The user ID is your main callsign and the password is the password you use to log in to the HamQTH site. That is used for ALL variations of your station locations and callsigns. The unique part that identifies where your logging software uploads the QSOs is the callsign which must match one of the callsigns set up on your HamQTH site.
Here is the info entered into the Log4OM settings for my GW1YBB/P Waun Fach configuration:
Just change the callsign to suit on each configuration and QSOs will upload to correct log on HamQTH.
HRDLOG.net is the easiest of the online logging sites to get your QSOs associated with any portable or alternative callsigns you use.
All you need to do is set up multiple configurations in your logging software so that you can have one (at least) with the callsign used on the location. Setting up multiple configurations for Log4OM is shown here.
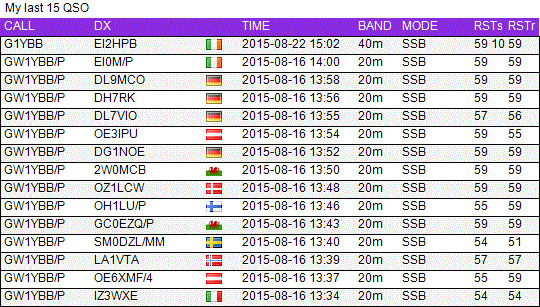
As long as your configuration has the station callsign set correctly (eg GW1YBB/P) HRDLOG will show that callsign used in your logbook:
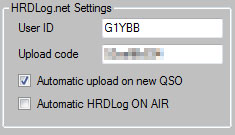
Set Log4OM (or your particular logging program) to have your user ID (callsign) and the upload key received by email when you signed up. Shown here in Log4OM:
And station callsign set in station details for each configuration:
That’s all it needs to work.
In order for your QSOs worked when not at home to appear correctly on LoTW (ARRL’s Logbook of the World) you need to add the portable and alternative callsigns to your account.
Assuming you have your main account set to your normal callsign (eg G1YBB), to add a portable callsign in your home country (eg G1YBB/P), or an overseas country where you add a prefix or suffix for the country you are working from (eg G1YBB/VP2) is quite straight forward. The process described below may not be the only way to do this but it works for me, and keeps things organised.
First, once you have your initial callsign certificate installed in TQSL you can then request certificates for your further calls, like GM1YBB/P.
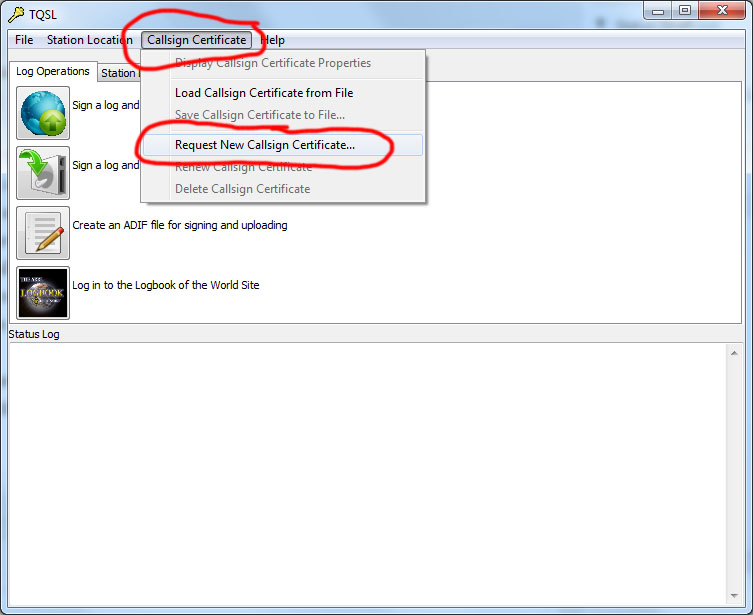
Got to “Callsign Certificate” then “Request New Callsign Certificate…”:
In the next window fill in the desired callsign and DXCC country and click “Next”:
Hit “Next” again:
Enter an email to receive your new certificate and hit “Next” again:
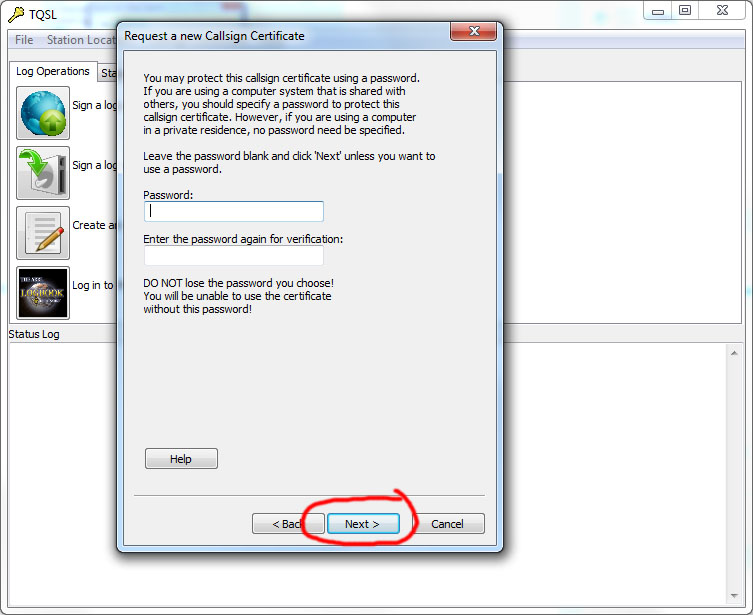
At the next widow either enter a password for the certificate or don’t enter anything. Then hit “Next”:
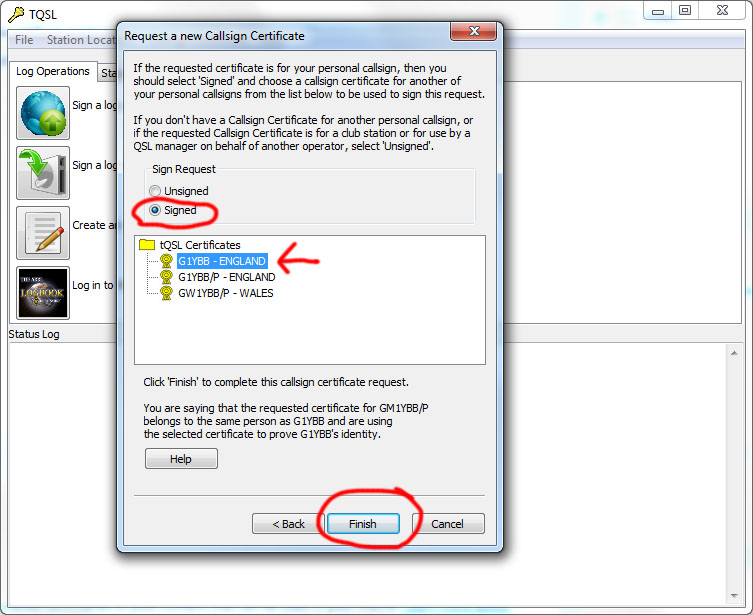
Now sign the new request with your base callsign and click “Finish”:
And finally click “Yes” to send the New Certificate Request:
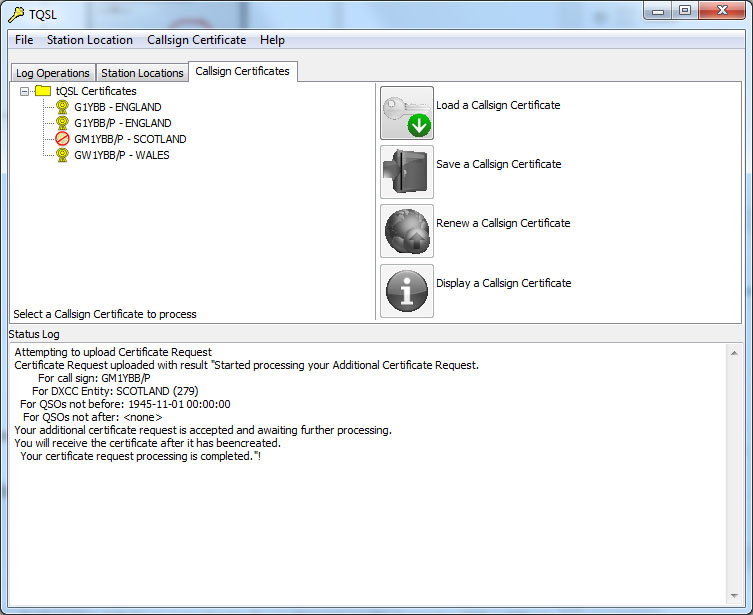
Repeat this process for all callsigns you plan to use, and when the certificate arrives install it.
You should then have a small list of callsign certificates. (As I have just this second applied for the GM1YBB/P callsign it is not yet available):
Now we need to add the locations that the logging software can use to send the QSOs to the correct callsign log.
For this we head over to the “Station Locations” tab. Here you can see ones I have already used:
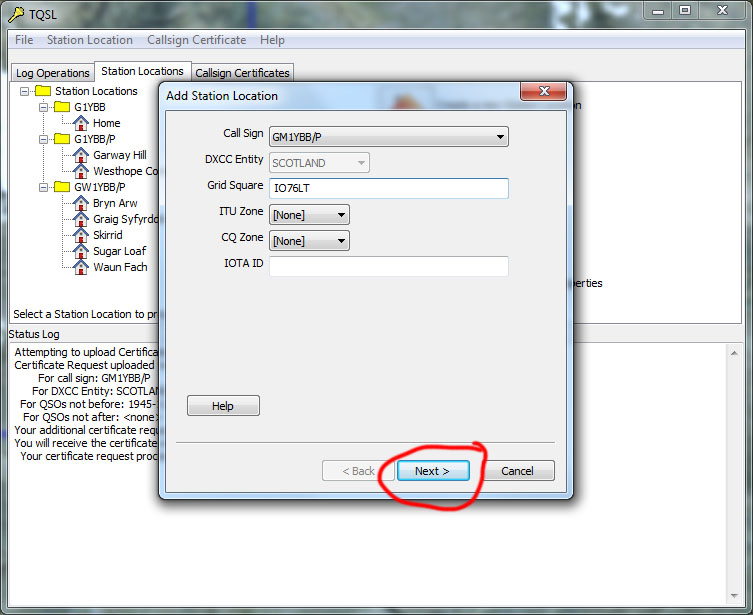
Click the “Create a new Station Location” button (house icon), use the callsign pulldown to choose the correct callsign and enter the location details and click “Next”:
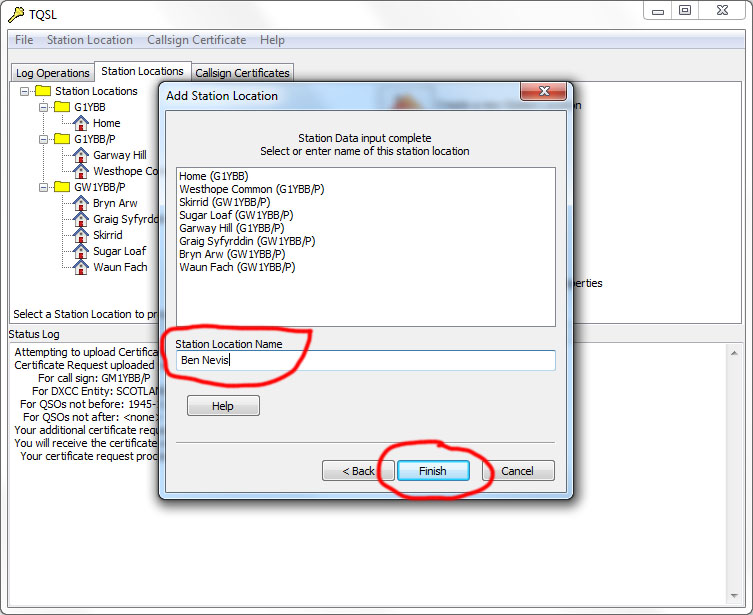
At the next screen you need to name the Station location. This is the name your logging software will need to use to load the QSOs with the correct information. Click “Finish” to complete:
And now we have a new location in our available Station Locations:
We will repeat this process for each NEW portable spot we operate from.
Now we have that all set up, it’s a simple case of using what we have done in our logging software. In Log4OM each configuration you have set up will have it’s own LoTW setting although some are common. Setting up multiple configurations for Log4OM is shown here.
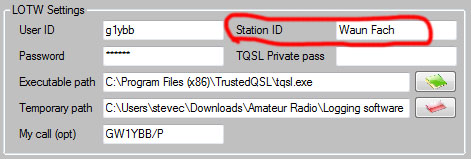
The user ID is your main callsign and the password is the password you use to log in to the LoTW site. That is used for ALL variations of your station locations and callsigns. The unique part that identifies where your logging software uploads the QSOs is the Station ID, which is the Station Name given to the details in TQSL above. You will very likely (certainly in Log4OM) have to give the path to the ARRL LoTW TQSL installation on your PC too.
Here is the info entered into the Log4OM settings for my GW1YBB/P Waun Fach configuration:
Repeat for your other location based configurations in Log4OM.
In order for your QSOs worked when not at home to appear correctly on eQSL you need to add the portable and alternative callsigns to your account.
Assuming you have your main account set to your normal callsign (eg G1YBB), to add a portable callsign in your home country (eg G1YBB/P), or an overseas country where you add a prefix or suffix for the country you are working from (eg G1YBB/VP2) is quite straight forward.
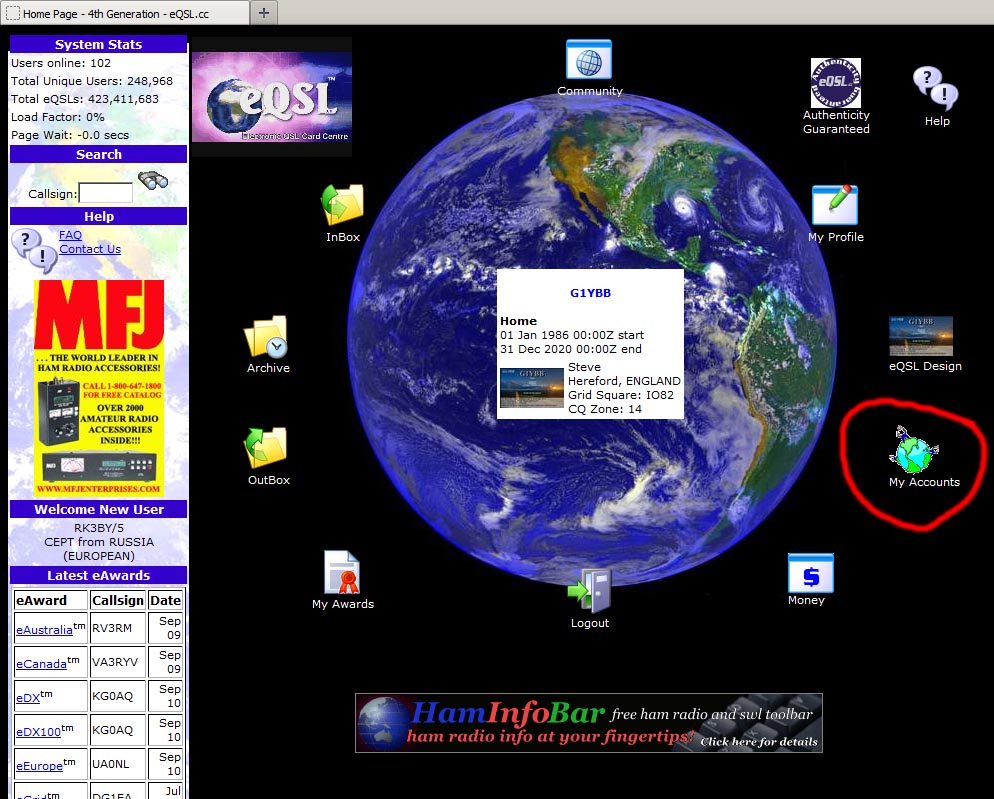
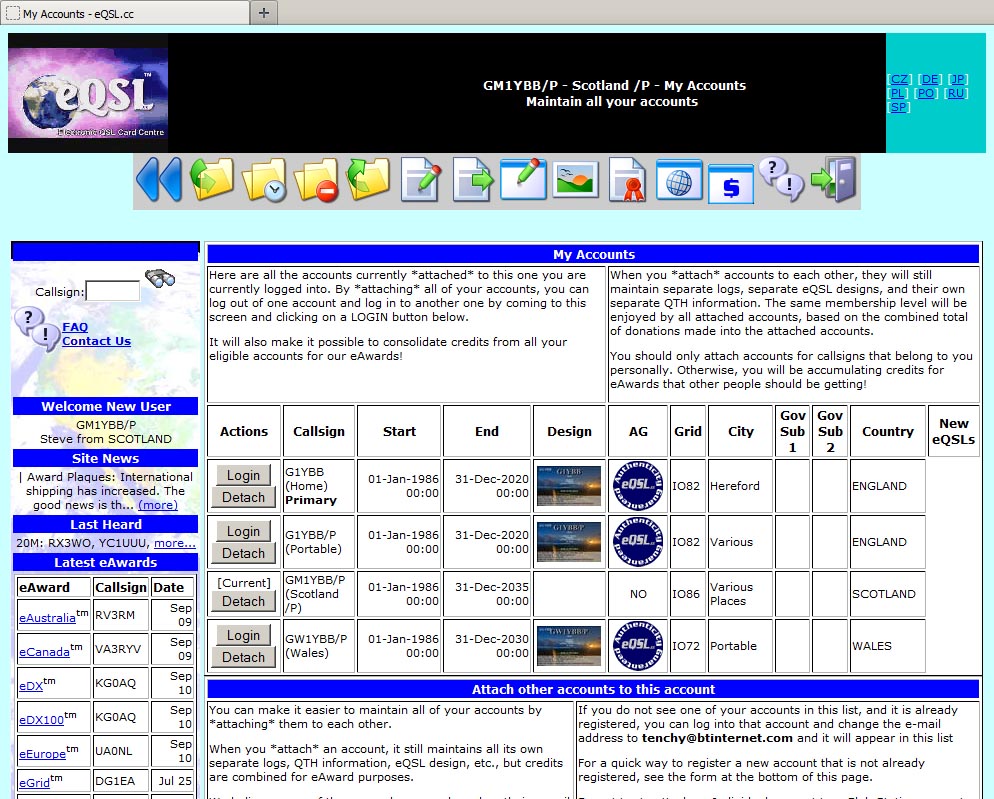
Go to “My Accounts”:
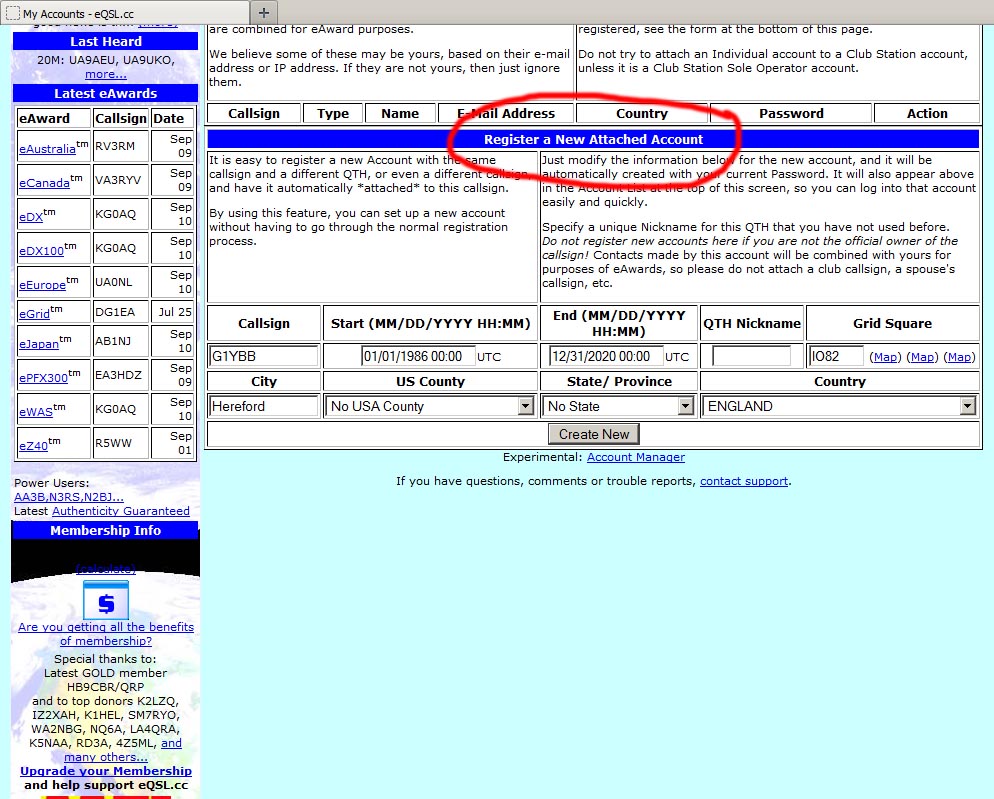
And scroll down to Register a New Attached Account:
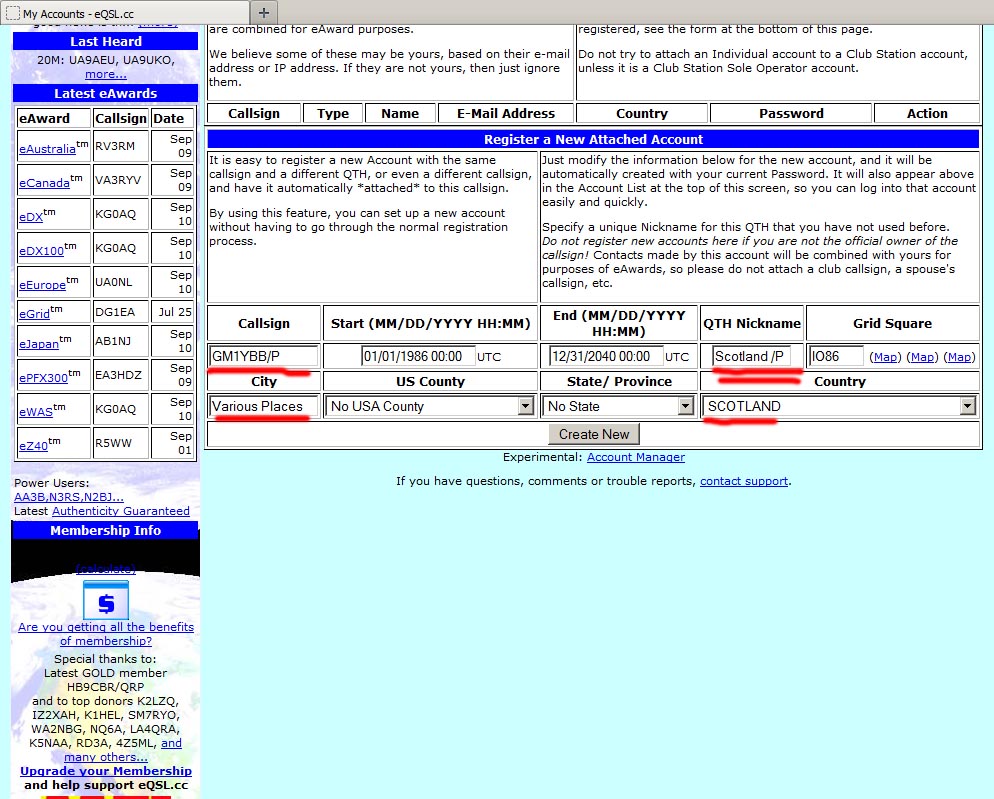
Now fill in your desired new call. I am going to add GM1YBB/P. Note the QTH Nickname is the crux of this stage. This is how your logging software will know the correct log to upload your QSOs to. Once done click
“Create New”:
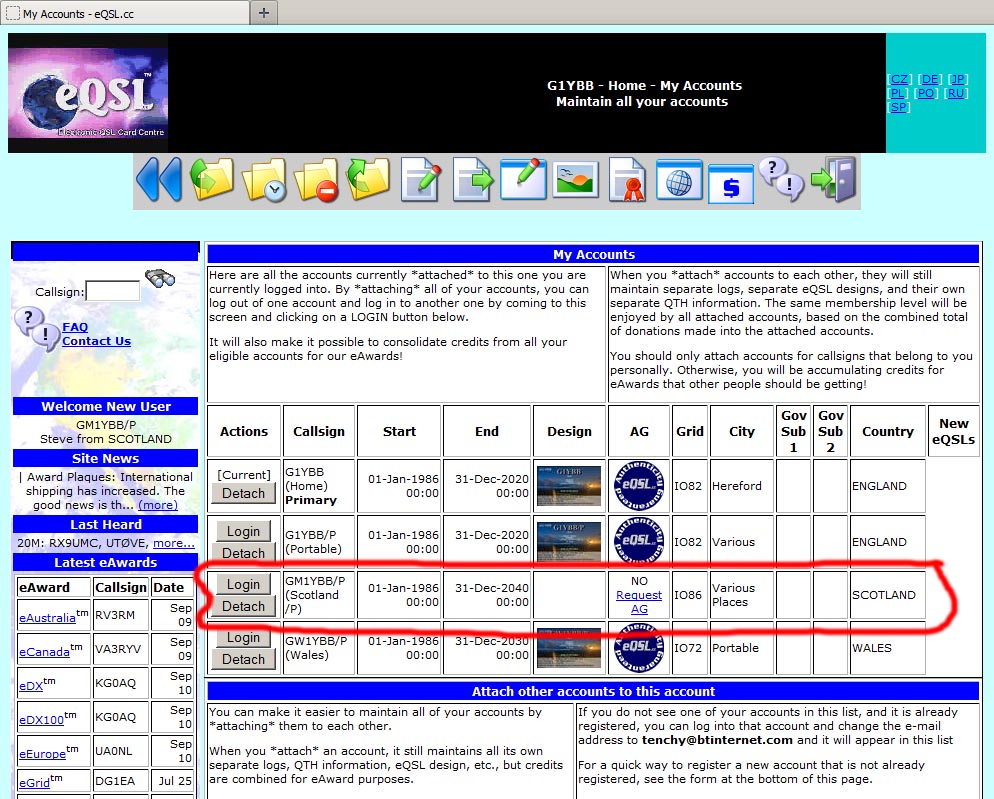
Once you click that it takes to to a page saying it will now log you in, but never seems to work for me, so I just go back directly to the home page and click on “My Accounts”:
Now you can see the new GM1YBB/P account. (I now notice I have nicknamed it differently to the GW one which is annoying, but I might be able to edit that – I can and have since):
The all important nicknames are in the brackets: Home, Portable, Scotland /P, and Wales.
Click on the “login” button to go to that account(you don’t need to re-enter your password):
From there you can click “My Profile” etc and set up your account just like the base callsign account.
To add new accounts repeat the above process, ensuring nicknames are unique.
You can access all accounts in turn via the login buttons seen after clicking “My Accounts”:
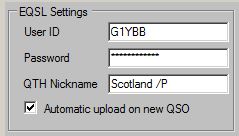
Now head over to your logging program and enter the details required for eQSL uploads. In Log4OM, as this is my GM1YBB/P info, then it must go in ALL and ONLY the GM1YBB/P configurations I have set up. This is why once I have set up my first Scottish portable configuration, I clone that for subsequent ones and edit the station details as shown here.
The user ID is your main callsign and the password is the password you use to log in. That is used for ALL variations of your callsigns. The unique part that identifies where your logging software uploads the QSOs is the nickname.
Here is the info entered into the Log4OM settings for my GM1YBB/P configuration:
Repeat the above steps for all your varied callsigns.


 I have two FSK folders and two AFSK folder because I tried to get dual rx/tx going so I could run on TRX1 and S&P on TRX2 but I couldn’t tx on TRX2 so I just use the one RX now, but I have left the folders there in case. You will also notice I have a 2Tone folder there, which I use as my 2nd decoder on RX1. I won’t cover setting that up, but it went quite well and is highly recommended.
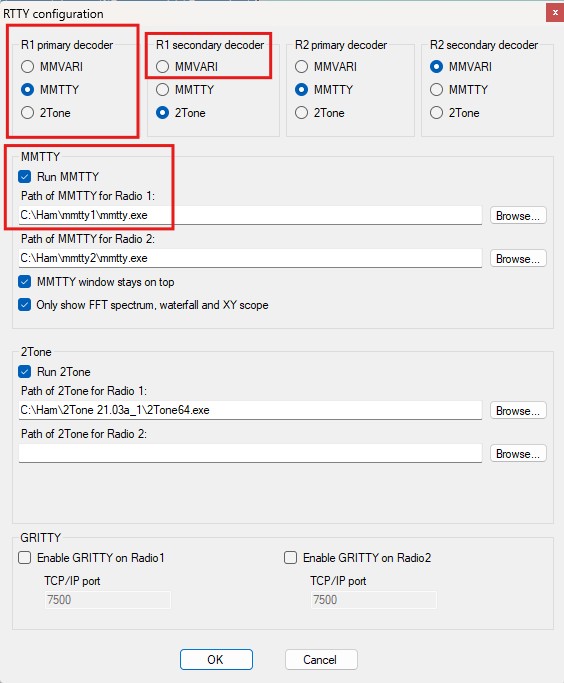
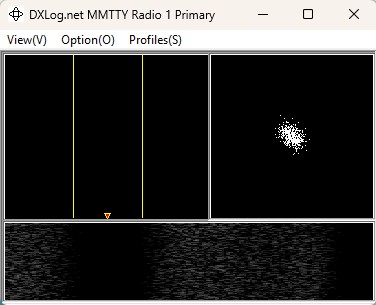 Mine looks like the above as I ticked in the settings window “Only show FFT spectrum, waterfall and XY scope”. I did this to save space. I never touch the settings that are visible other wise so decided I didn’t need them.